For years I’ve wanted a high-precision engine lathe. It’s been something I’ve contemplated, considered, and shopped for on and off for about 15 years. It was precision rifle gunsmithing that finally motivated me to “do it”. It was painful to sell my Logan 11″x36″ lathe as I had put a lot of time and effort into customizing it, but I knew I needed more precision, capacity, features, and accessories/tooling. After a long search, I decided on the Precision Matthews PM-1440GT. I’ve had this lathe running for over 6 months now (see my “arrival story”), and I love it. In this article I’ll give you a complete walk-through of the PM-1440GT, evaluate its performance and precision, and share the tooling and upgrades I’ve added to this lathe. What’s more, I’ve partnered with Precision Matthews to bring you all a complete series of content covering the fundamentals of lathe and mill operation. The PM-1440GT will be featured in the lathe series, and I’ll feature the Precision Matthews PM-949TV Bridgeport-style milling machine in the milling series. It’s going to be a lot of great content, so make sure you’re subscribed!
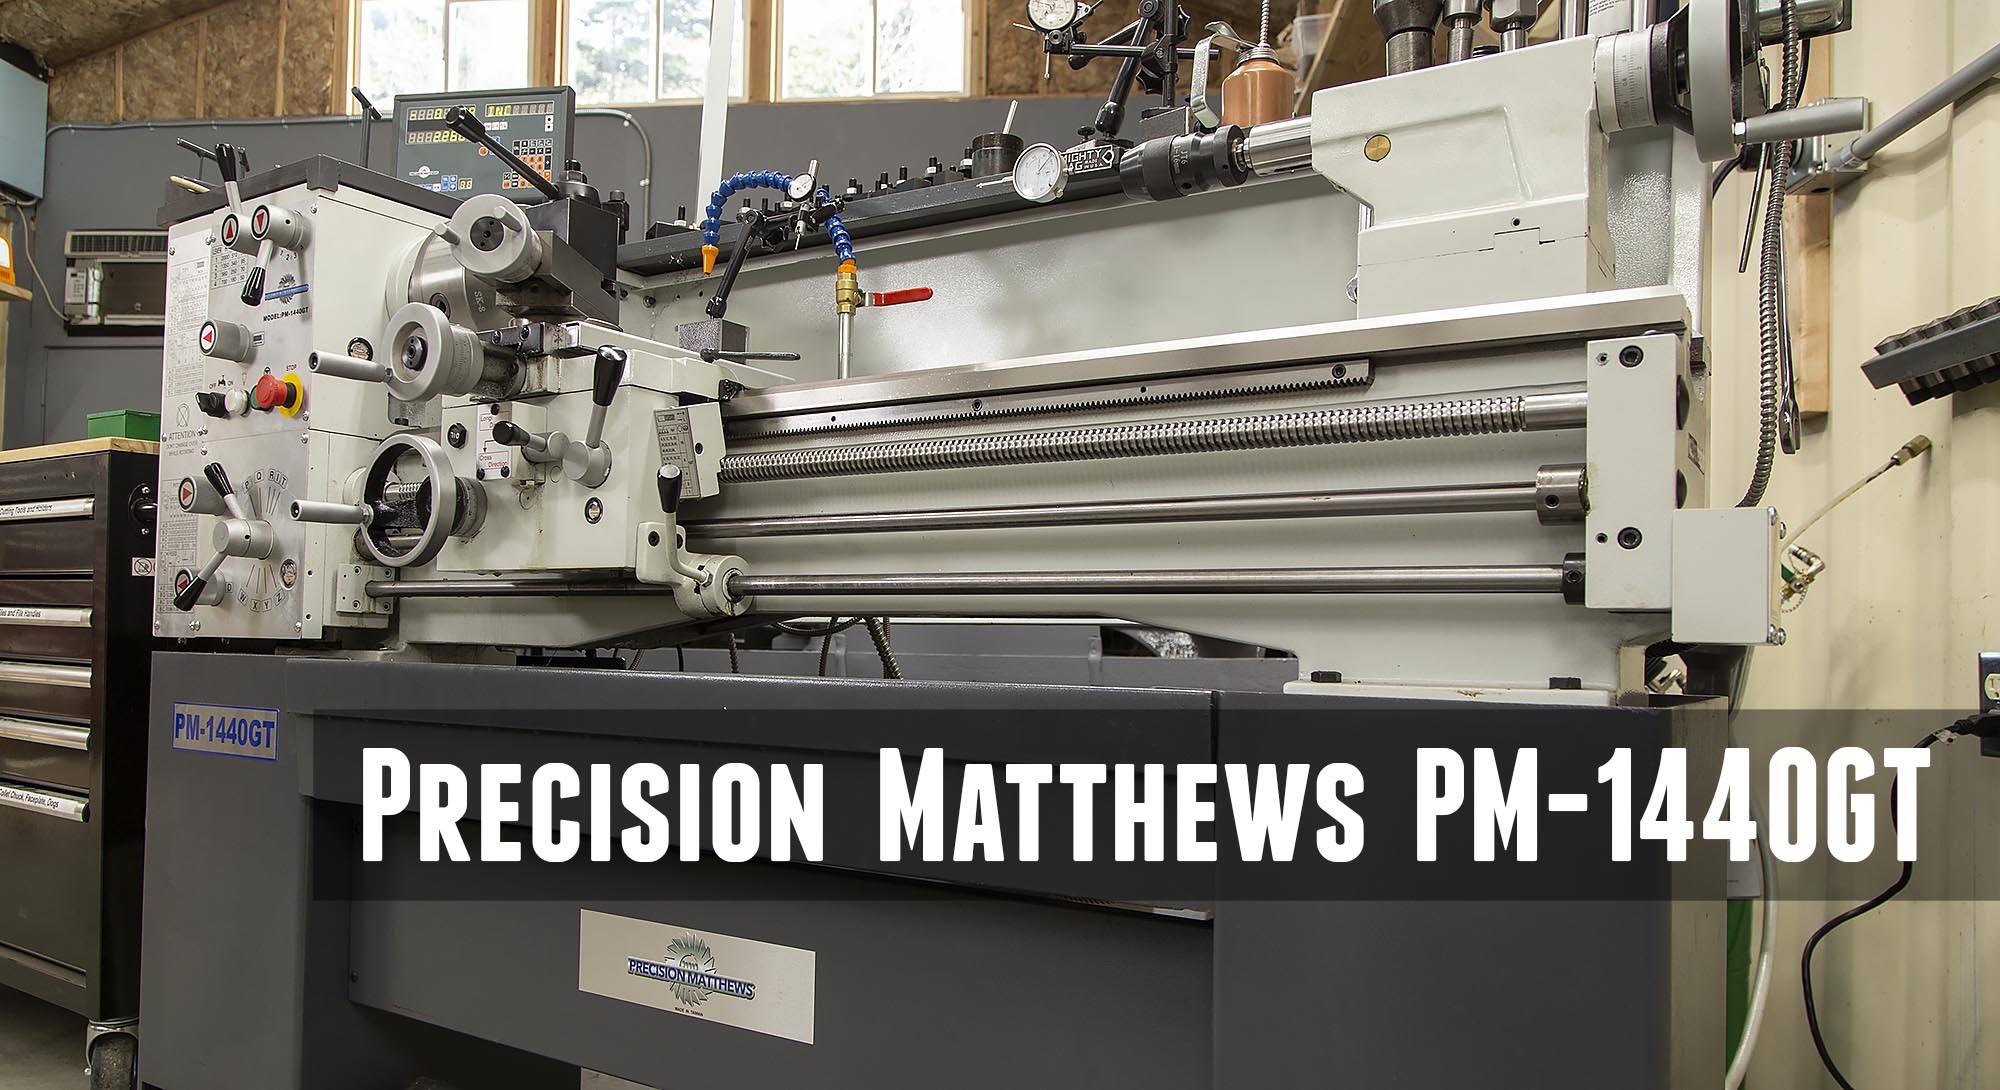
PM-1440GT Overview and Specs

The PM-1440GT engine lathe is a versatile machine tool because of the level of precision, the capacity, the features, and the pricetag (starting at about $8500.00 when this article was written). This lathe is suitable for high-precision work, can handle 2″ material through the spindle, and has great capacity (14″ over bed swing, 40″ between centers). Because of all this, the PM1440-GT would be a great choice for gunsmithing, toolroom applications, and as a general-purpose shop lathe.
PM-1440GT Features and Specs
For full specs and details, see the Precision Matthews PM-1440GT product page and PM-1440GT owner’s manual.
- Country of origin: Taiwan
- High Precision, Hardened and Ground gears throughout headstock
- Leadscrews Are True Inch Pitch Screws (Not Metric Conversions Like Many), 10 Threads Per Inch (.100” Per Turn)
- 5-year warranty
- 2″ through-spindle bore, 15 1/2″ long spindle
- Power feeds on carriage and cross slide (both directions on each)
- Induction hardened and ground ways (FC-25 Meehanite Cast Iron)
- Removable gap bed
- High Precision Tapered Roller Bearings used in spindle, for the
ultimate in long life, high precision, and best surface
finishes. Guaranteed Run Out +/- .0001″ (see video where this was validated, my spindle shows about +/- 0.00003″) - Ultra-precision Japanese spindle bearings
- Inch and metric thread cutting
- Splash oil bath lubrication in headstock and carriage
- Width 70 in. x Height 47 in. x Depth 29 in. (full range crossslide
motion) - Footprint: 68 in. wide x 16-1/2 in. deep (Base Footprints: Headstock Base is 16.5 D x 14.25 W, Tailstock Base 16.5 D, 11.125 W, and 42-5/8″ between the bases)
- Bed length, excluding headstock: 51 in.
- Spindle centerline to floor: 43 in.
- Weight, approximate: 1750 lb net
- Power requirement 220 Vac, 60 Hz, 1Ø, 13A max (option: 220 Vac, 3Ø, 9A max)
- Motor TEFC type, 1725 rpm, optional 2 HP 1Ø or 3 HP, 3Ø
- Headstock center to tailstock center 40 in. max
- Swing over bed 14 in. diameter
- Swing over cross-slide 8-3/4 in. diameter
- Swing over gap 20-3/4 in. diameter
- Gap insert length 7-3/4 in.
- Spindle face to tailstock quill face 44 in. max
- Saddle travel 36-1/4 in.
- Cross-slide travel 6-1/2 in.
- Compound (top slide) travel 3-1/2 in.
- Spindle Speeds: Low range, rpm 50, 70, 95, 140 Mid range 180, 250, 340, 510 High range, rpm 700, 980, 1350, 2000
- Carriage drive, thread cutting Leadscrew 8 tpi
- Inch threads: Choice of 36, from 3 to 56 TPI
- Metric threads: Choice of 34, from 0.4 mm to 7.2 mm pitch
- Longitudinal Feed rates: from 0.0026 to 0.0368 in./spindle rev
- Cross Slide Feed Rates: from 0.0013 to 0.0184 in./spindle rev
- Chuck/faceplate attachment D1-5 Camlock
- Spindle Internal taper: MT5-1/2
- Spindle bore 2 in. diameter (slightly over, will pass a 2.000″ piece)
- Spindle length, LH end to chuck mounting face 15-1/2 in. overall
- Spindle length, LH end to chuck face (typical) 19-1/2 in. approx.
- Tailstock: Internal taper MT3, Quill travel 4 in.
- Work holding: Center rest (steady rest) capacity Up to 3 in. diameter, Follower rest capacity Up to 1 in. diameter
PM-1440GT Features and User Interface
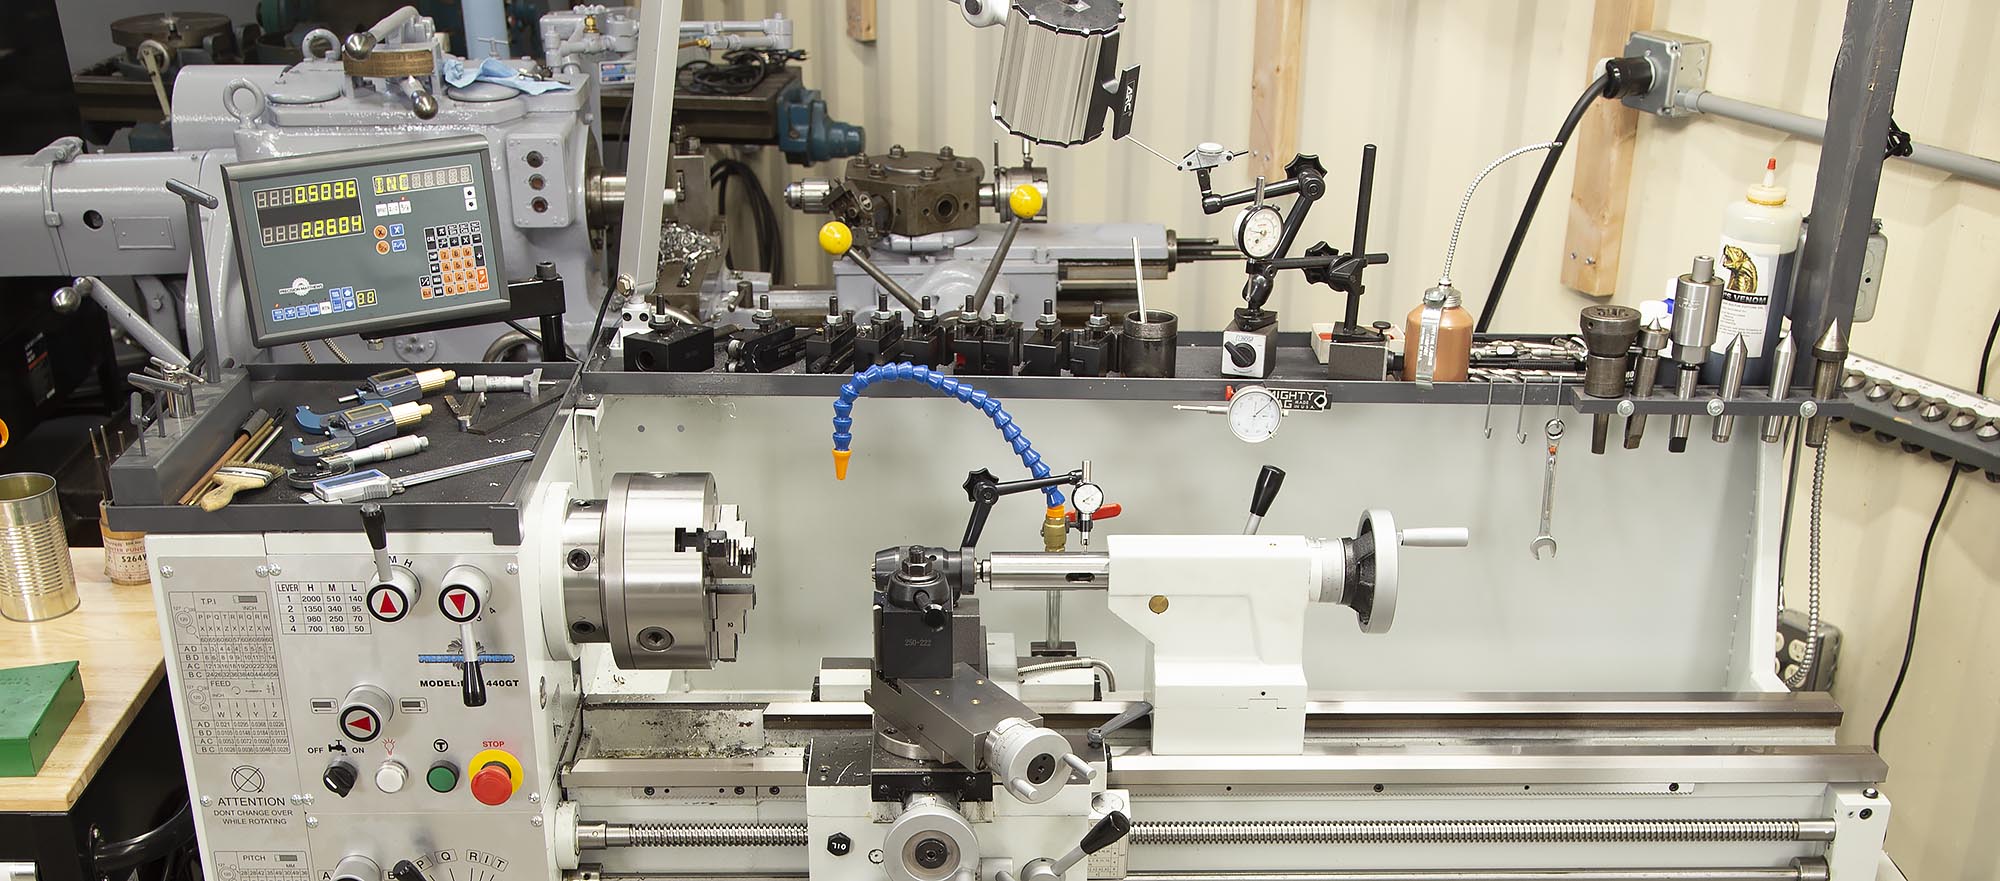
Headstock Controls and Features
The headstock is where most of the “user interface” for this lathe is located:

Above we have:
- English gearing, threading, feeds chart
- Spindle Speed chart (spindle RPM)
- Spindle speed range lever (low, medium, high)
- Spindle speed selector lever (1,2,3,4, plus neutral)
- Power feed and threading direction control knob
- Coolant on/off switch
- Power indicator lamp
- Spindle jog button
- Spindle emergency stop button
- Power feed / threading shift knob (A/B)
- Power feed / threading shift lever (upper)
- Power feed / threading shift lever (lower)
- Power feed / threading shift knob (C/D)
- Metric gearing, threading, feeds chart
Carriage Controls and Features
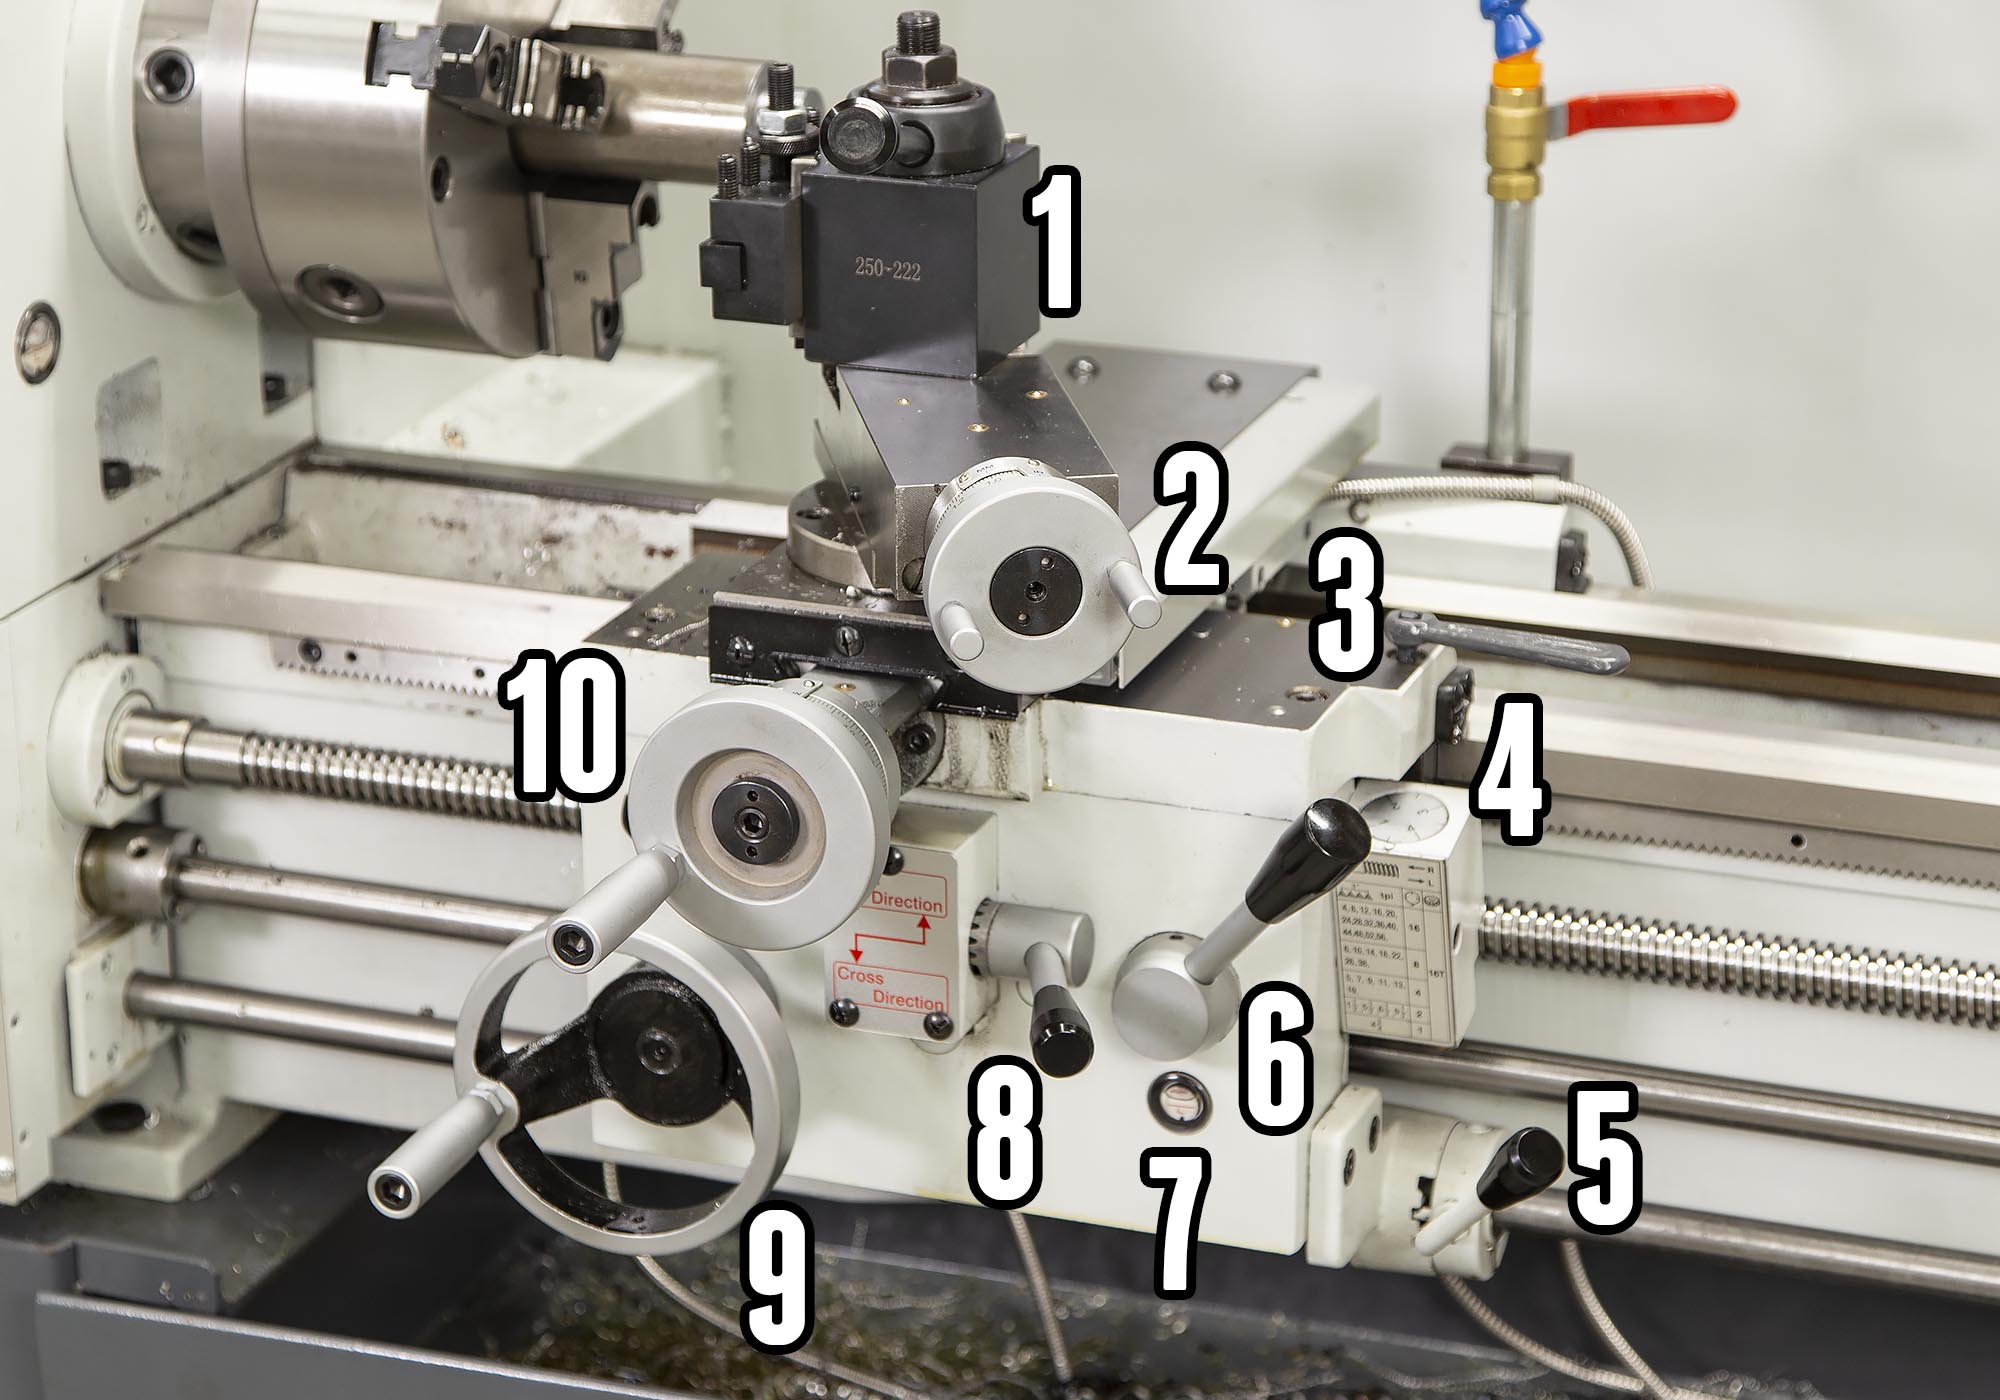
The carriage features the following:
- Toolpost (upgraded quick-change toolpost shown)
- Compound feed crank (with inch/metric dials)
- Carriage lock (with custom allen key wrench/handle)
- Threading dial
- Spindle speed control (up = reverse, center = off, down = forward)
- Half nut engagement lever
- Apron oil sight glass
- Power feed engagement lever (up = x, center = off, down = y)
- Carriage feed crank (with inch dial)
- Cross slide crank (with inch/metric dials)
Tailstock Controls and Features

The PM-1440 GT tailstock features a flat top, a ball oiler for quill lubrication, and the following features/controls:
- Quill (1.575″ / 40mm diameter)
- Quill lock lever
- Tailstock clamp lever
- Quill feed crank
- Tailstock offset adjustment lock screw (1 of 2, tailstock offset adjustment screws are on the sides)
- Quill feed dial (with inch and metric graduations)
Running the PM-1440GT, Projects I’ve Completed
The PM-1440GT is great for general turning, boring, drilling, reaming, tapping, knurling, and more! That’s the beauty of an Engine Lathe: they are very versatile. I’ve turned aluminum, carbon steel (various alloys), stainless steel (416R and other alloys), delrin plastic, ABS plastic, and more!
Here are some projects I’ve completed with this lathe:
- Custom shop door latching system and hardware
- Custom outboard lathe spider (see later mention in this article)
- Three rifle builds (see links below)
- Clutch safety switch fix for my truck
- Black tank ABS repair flanges from ABS drain fittings
- Alternator pivot bushing and boring (saved expensive alternator)
- Coolant clamp ring for horizontal milling machine
- Precision measurement tooling to evaluate reloading press precision/construction
- Various bushings, spacers, threaded rods and hardware
Test Rifle Chamber:
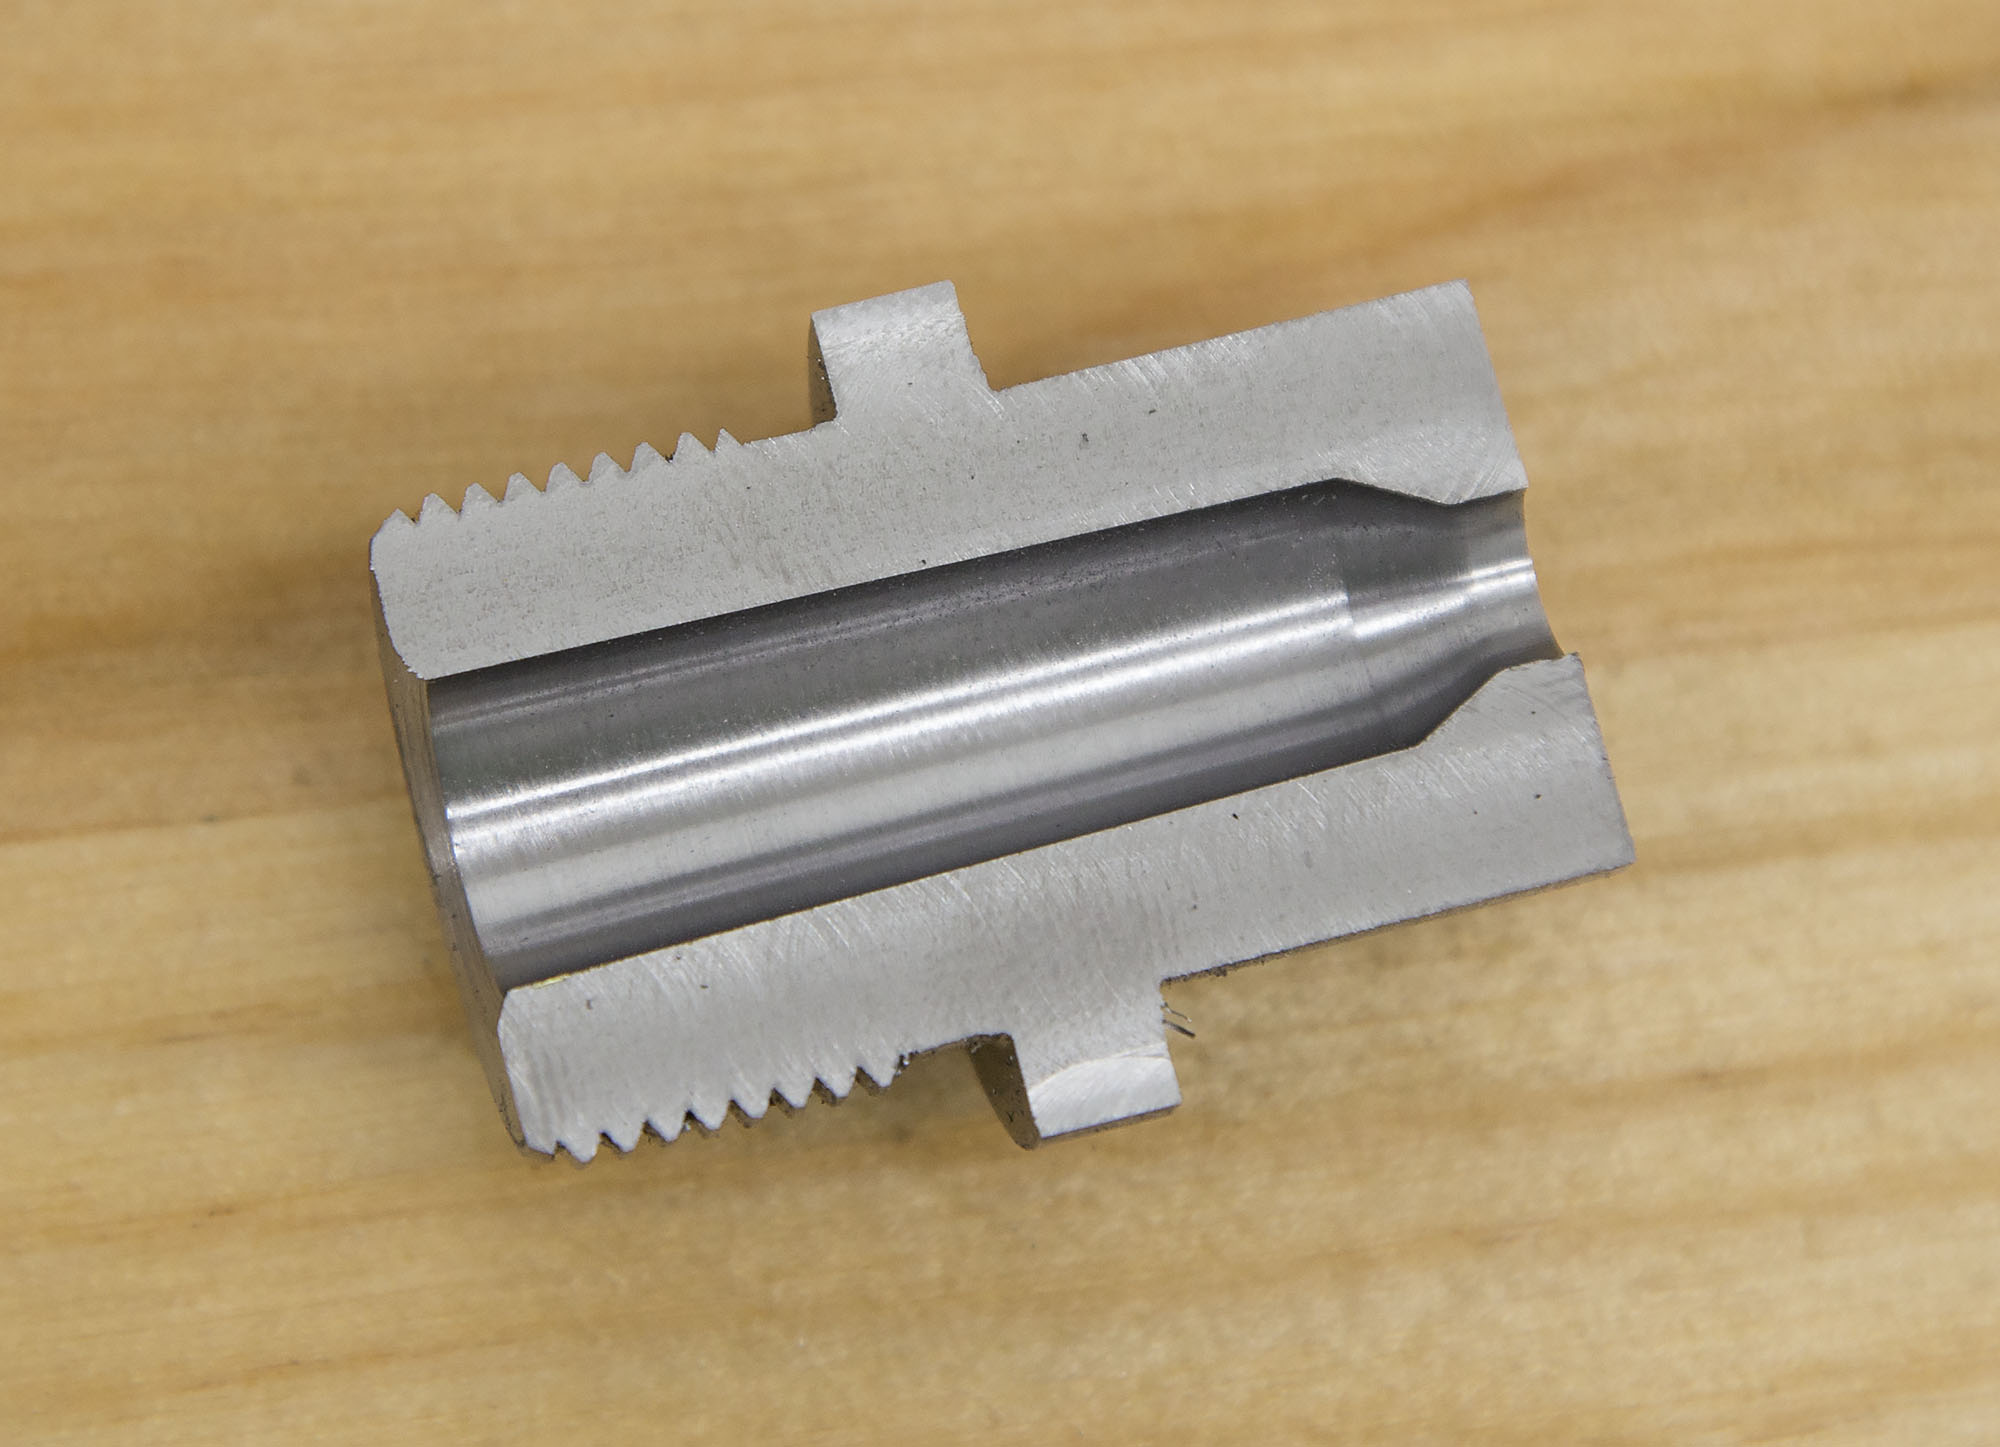
From my Remington 700 rifle build:
Reloading Press Test Fixture:

Gavin’s PM-1440GT Rifle Build Links:
Winchester Model 70 Re-Barrel:
- Winchester 70 Rebarrel Part 1: Overview
- Winchester 70 Rebarrel Part 2: Start to Finish Process
- Winchester 70 Rebarrel Part 3: Tools of the Trade
- 224 Valkyrie Remington 700 Build P1: Planning the Build
- 224 Valkyrie Remington 700 Build P2: Barrel Prep and Alignment In the Lathe
- 224 Valkyrie Remington 700 Build P3: Chambering and Machining
- 224 Valkyrie Remington 700 Build P4: Muzzle Threading and Barrel Install
- 224 Valkyrie Remington 700 Build P5: Custom Thread Protector
PM-1440GT Performance and Precision Evaluation
Since this is a precision lathe, I wanted to share some evaluations of the precision for my personal PM-1440GT, as shown in the video.
Spindle runout
Spindle runout is the measure of how much the spindle “wobbles” when it rotates. The most simple test is to test alignment with a dial test indicator while turning the spindle:
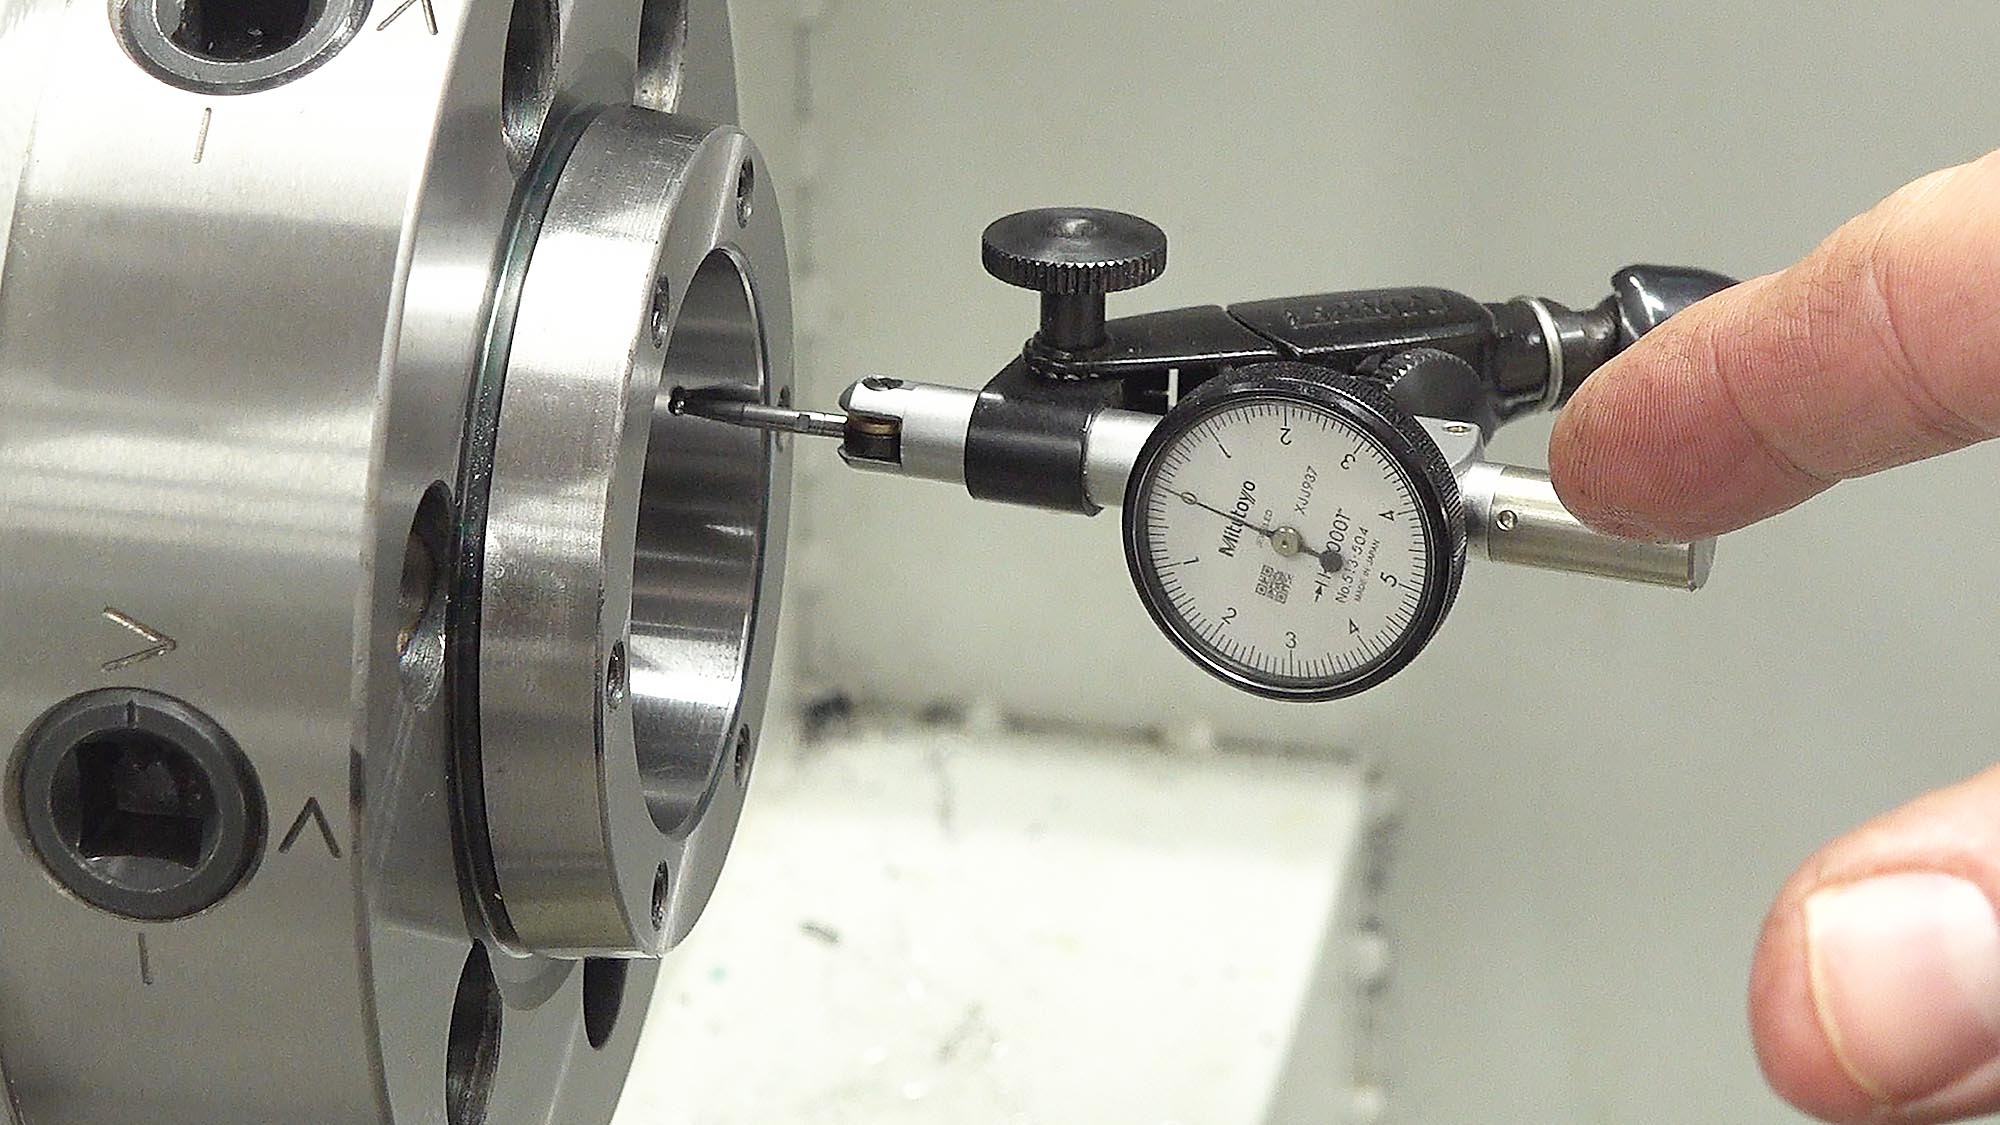
On my PM-1440GT, the spindle runout was measured at less than +/- 0.00003″ which is very good.
Headstock Alignment to Ways
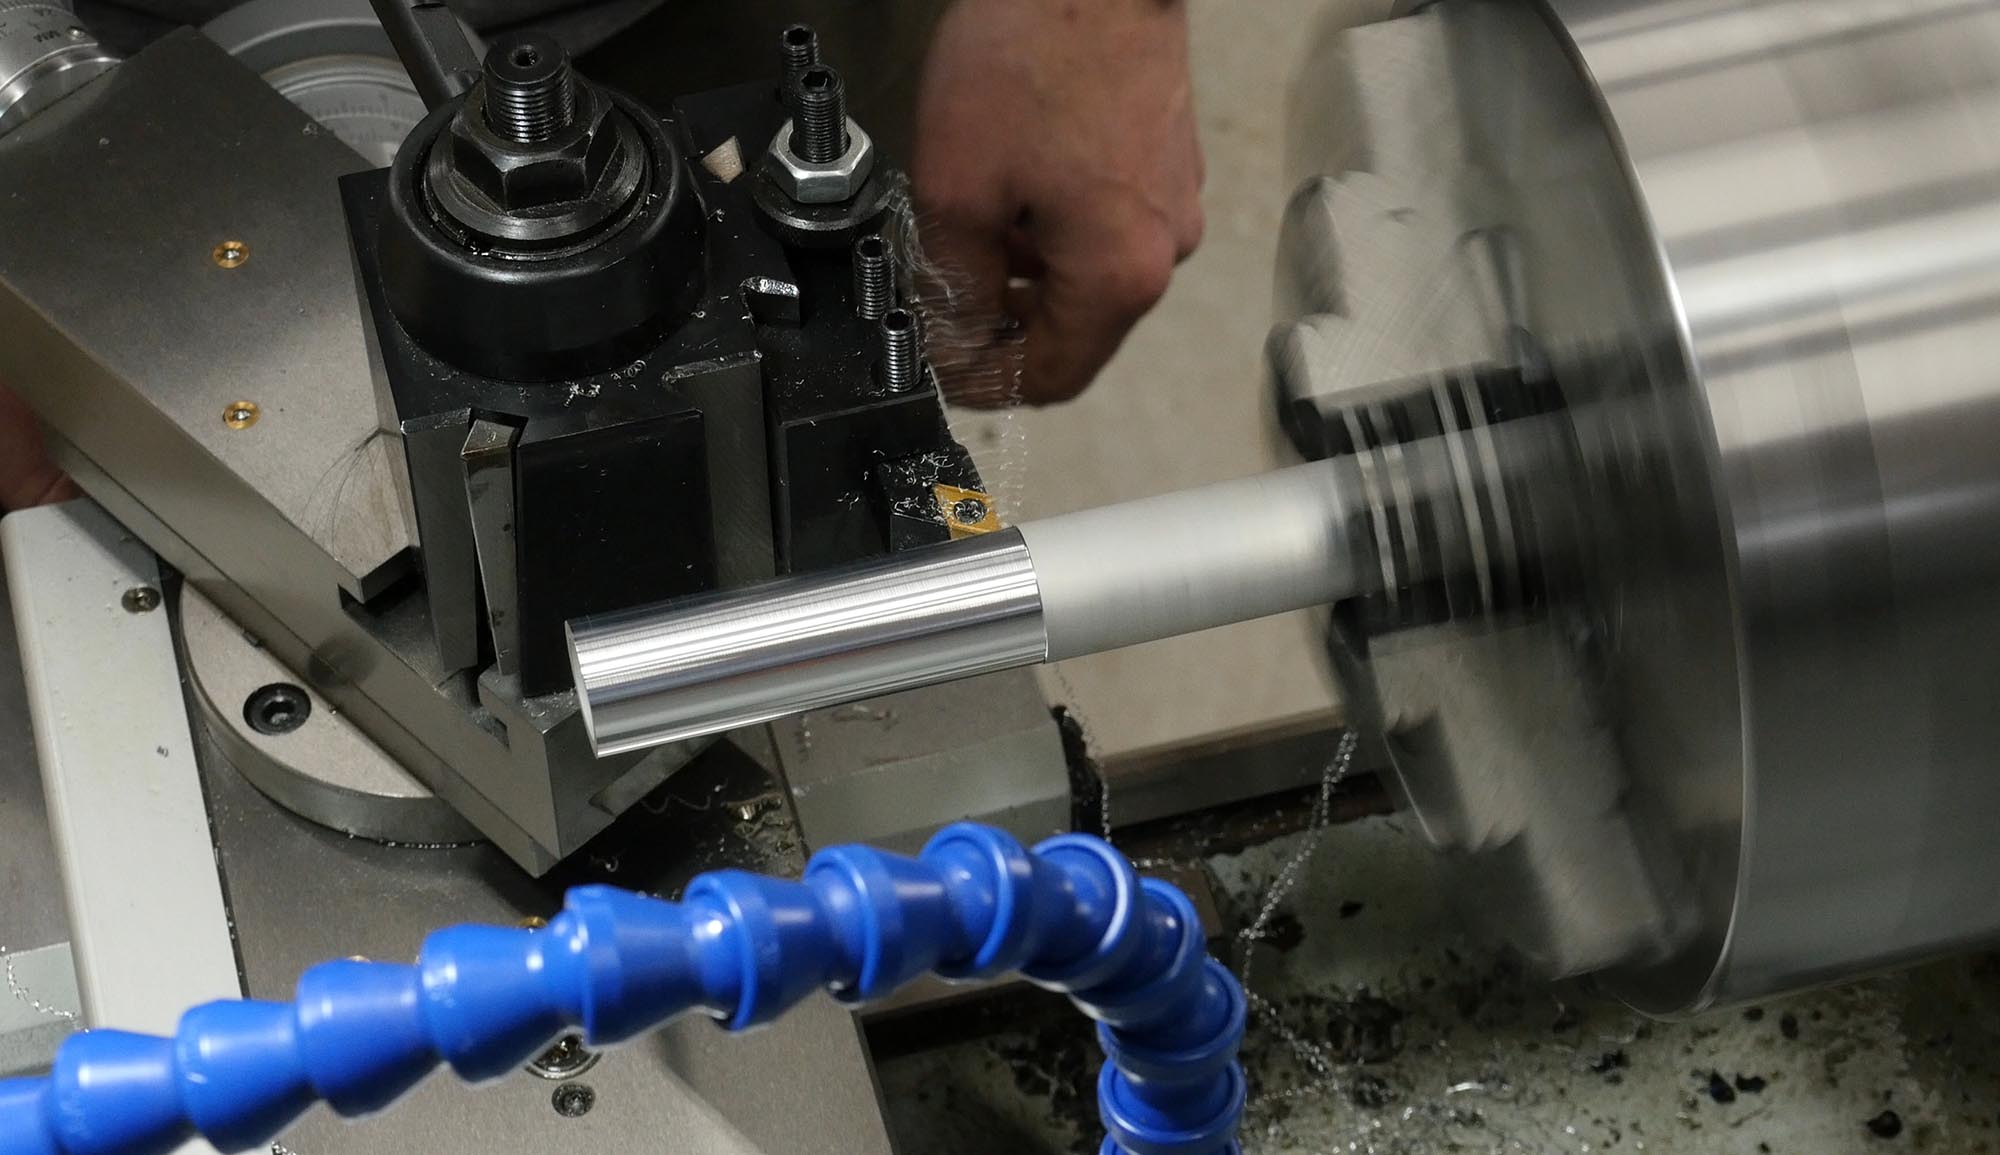
The headstock can “pivot” slightly so that the axis of the spindle is exactly parallel with the ways (you have to loosen bolts, as covered in the PM-1440GT owner’s manual). You can measure for spindle-to-ways alignment by turning an outside diameter, and measuring the variation in diameter over a distance.
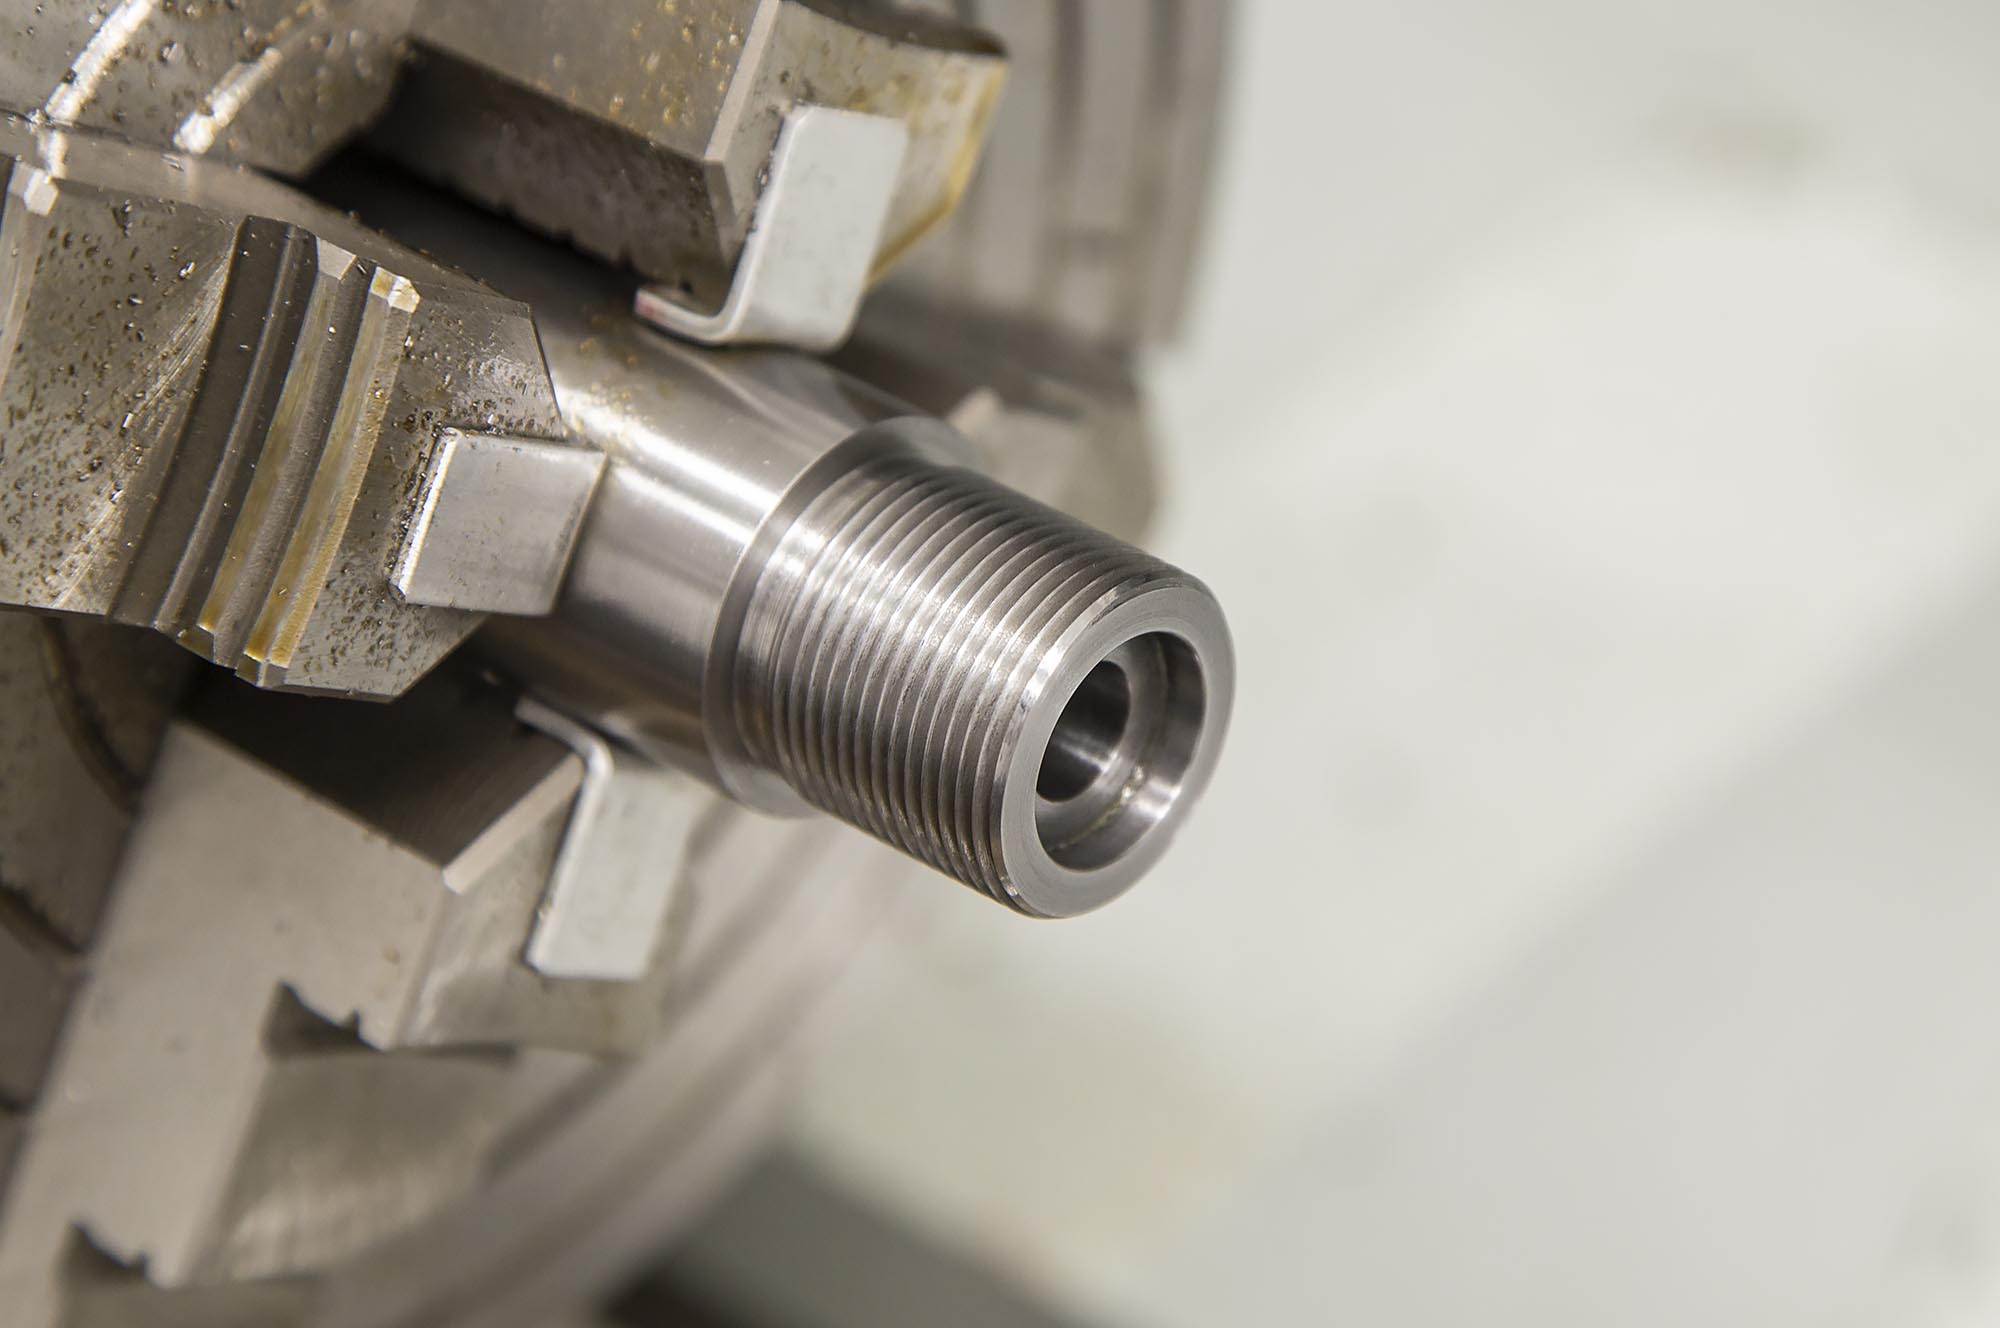
Turning the OD:
Measuring two diameters, ~4″ apart:
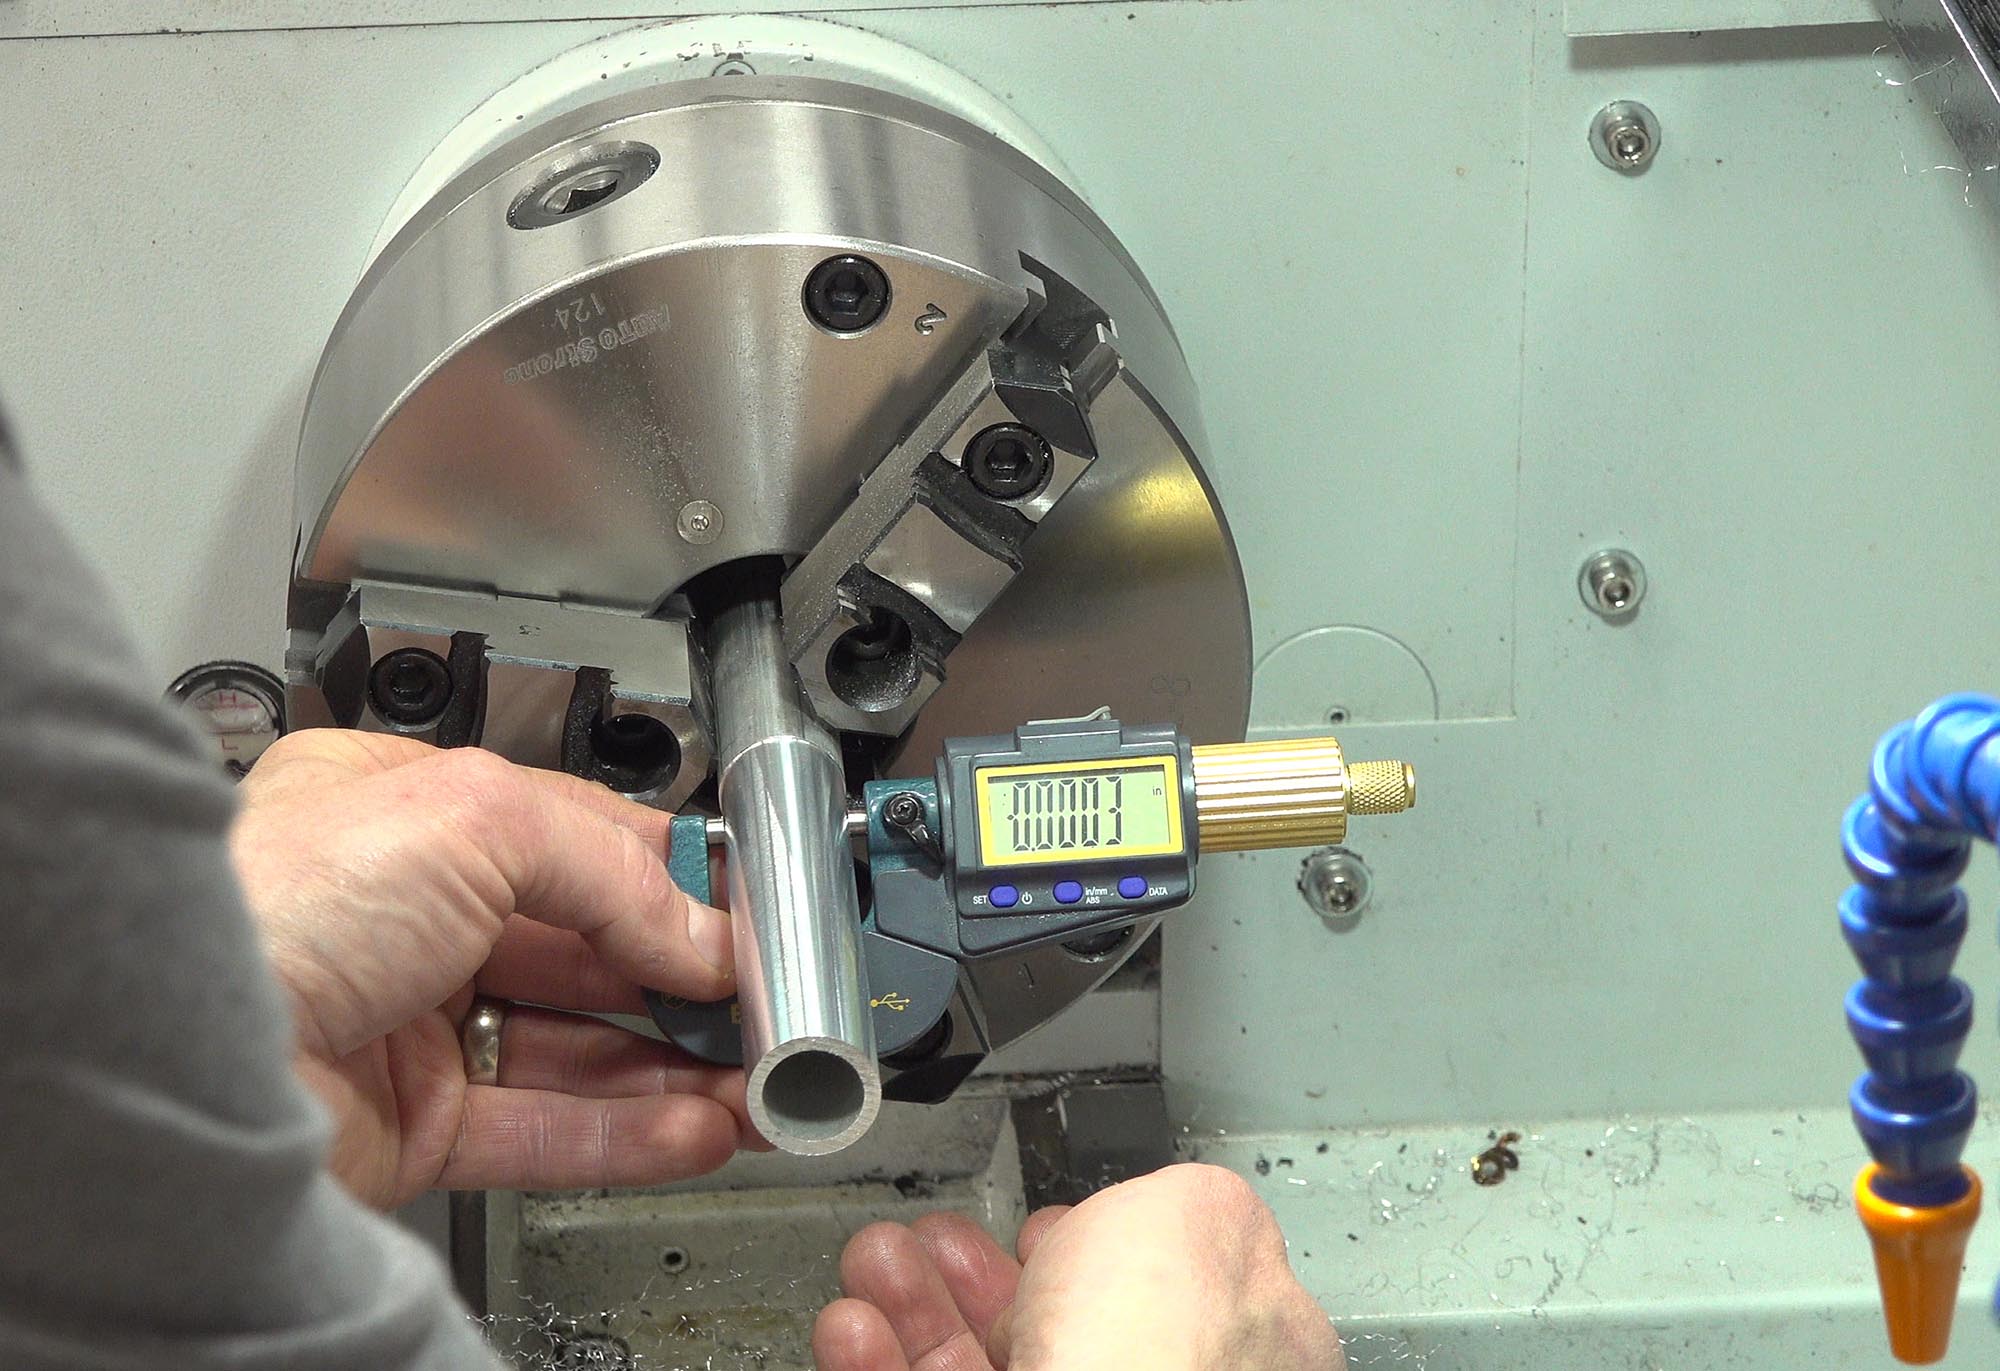
For my PM-1440GT as delivered from the factory (I have not changed this alignment) I got a result of 0.0003″ / 4″, which nets out to 0.000075″ per inch. This is totally acceptable for my fine-precision work. Note: After precision leveling the lathe (as I have) this alignment can be fine-tuned by slight tweaks to the leveling of the lathe.
Tailstock Quill Alignment to Ways
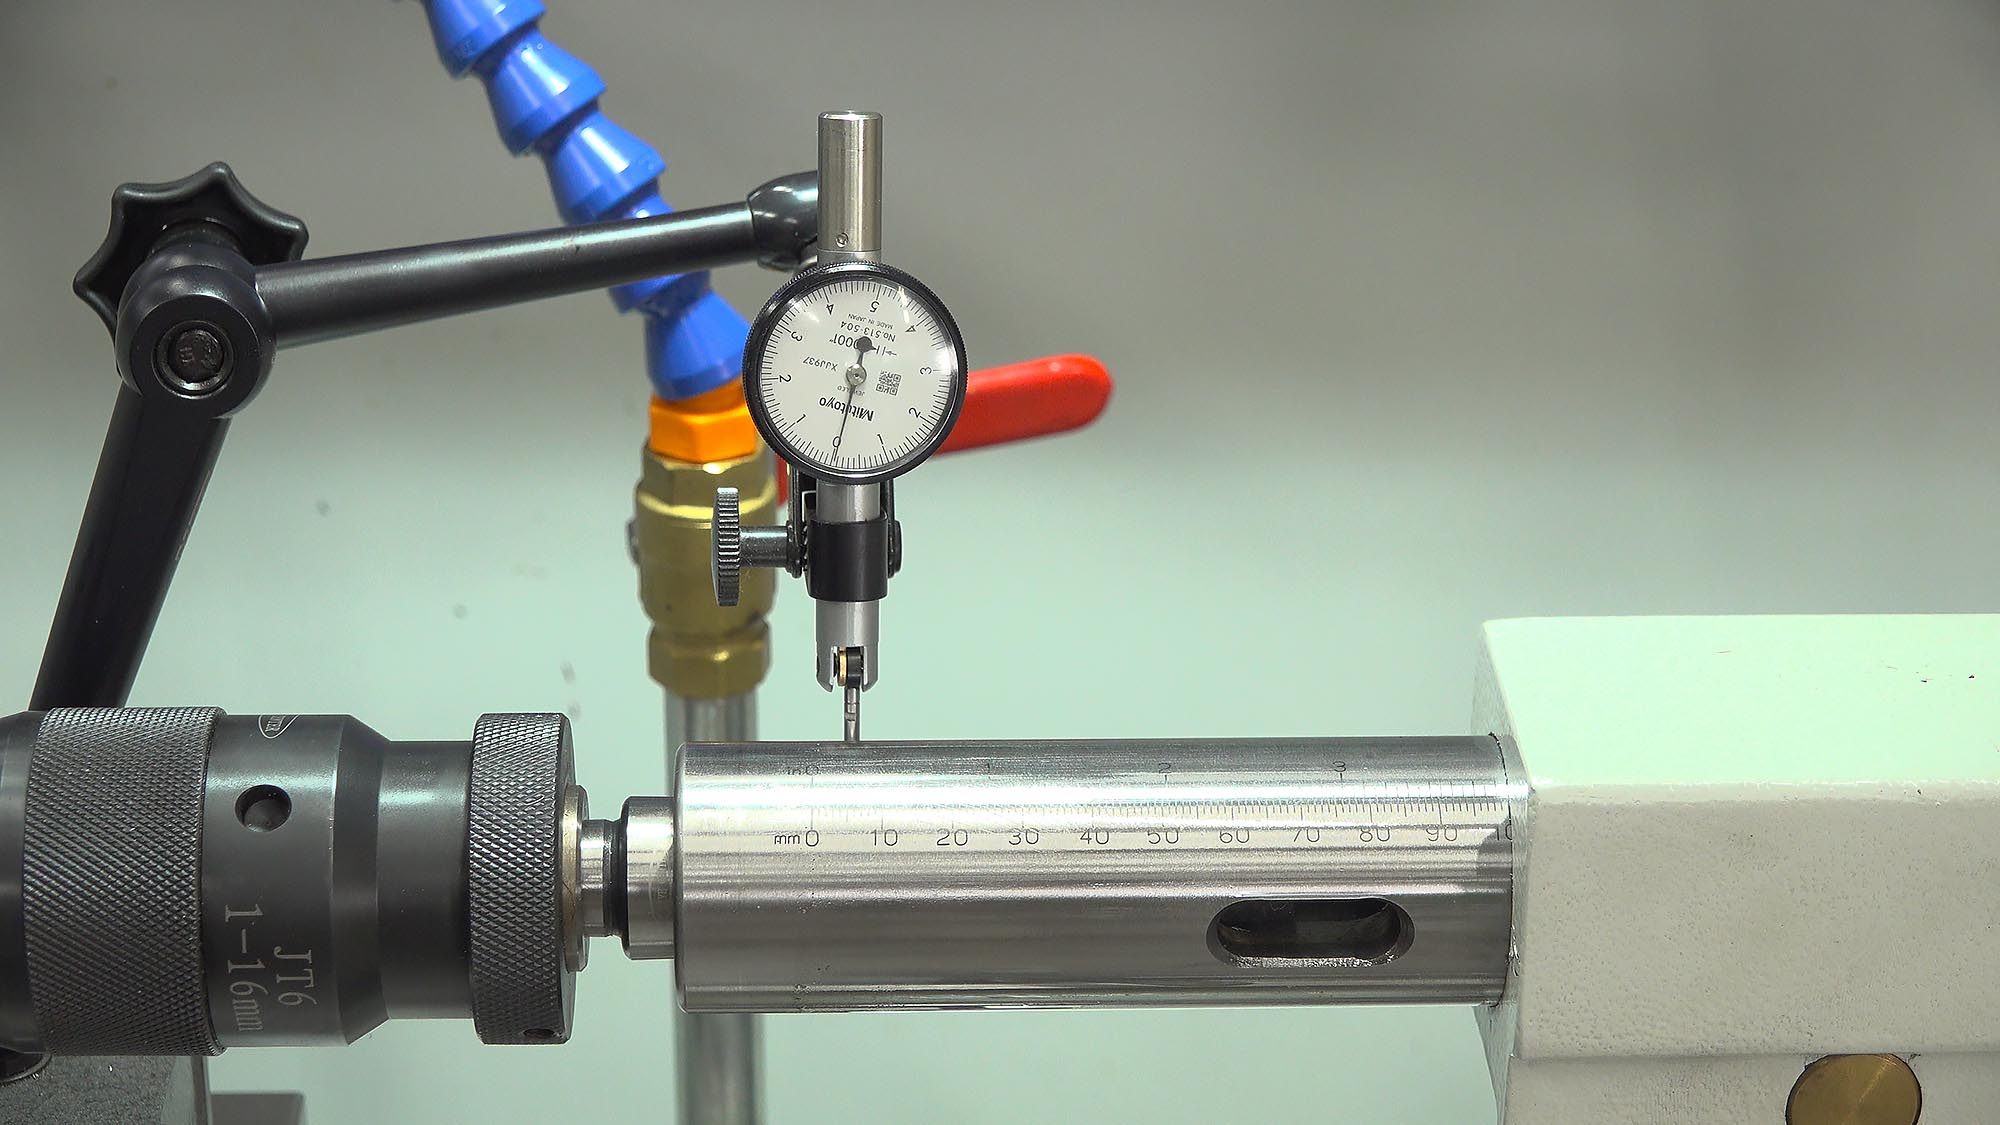
The tailstock quill should be as parallel to the ways as possible. That way, tailstock alignment is preserved regardless of how far in or out the quill is extended. This is a simple test, you bring a dial test indicator up against the back of the quill, and run the carriage sideways a couple inches or so. My tailstock quill had a misalignment of 0.0001″ over 2″ or 0.00005″ per inch. This is a great result. Over the entire extension of the quill (4″ total) the center of the quill could move sideways only 0.0002″.
*Note: I did not show this in the video: after filming I ran the same test along the top of the quill (to measure vertical alignment) and found an error in alignment of only 0.000025″ over 2″ or 0.0000125″ per inch. Pretty much DEAD ON.
Tailstock Alignment to Headstock
Tailstock to headstock alignment (tailstock to spindle) ensures that the tailstock quill and spindle are collinear (their axes form a single line in space). This is easily adjusted via the tailstock offset adjustment (which you can use to turn a slight taper when turning between centers). The method I used is called “turning a test bar between centers”. This method is great because it is a very accurate test, isn’t hard to setup, and doesn’t require any special tooling or instrumentation.
First, you mount a bar between centers, and turn two different sections (mine are separated by about 4″ at the center of each section).

Then, you measure the diameter of the two sections that you turned. The difference in diameters indicates the amount of alignment error.
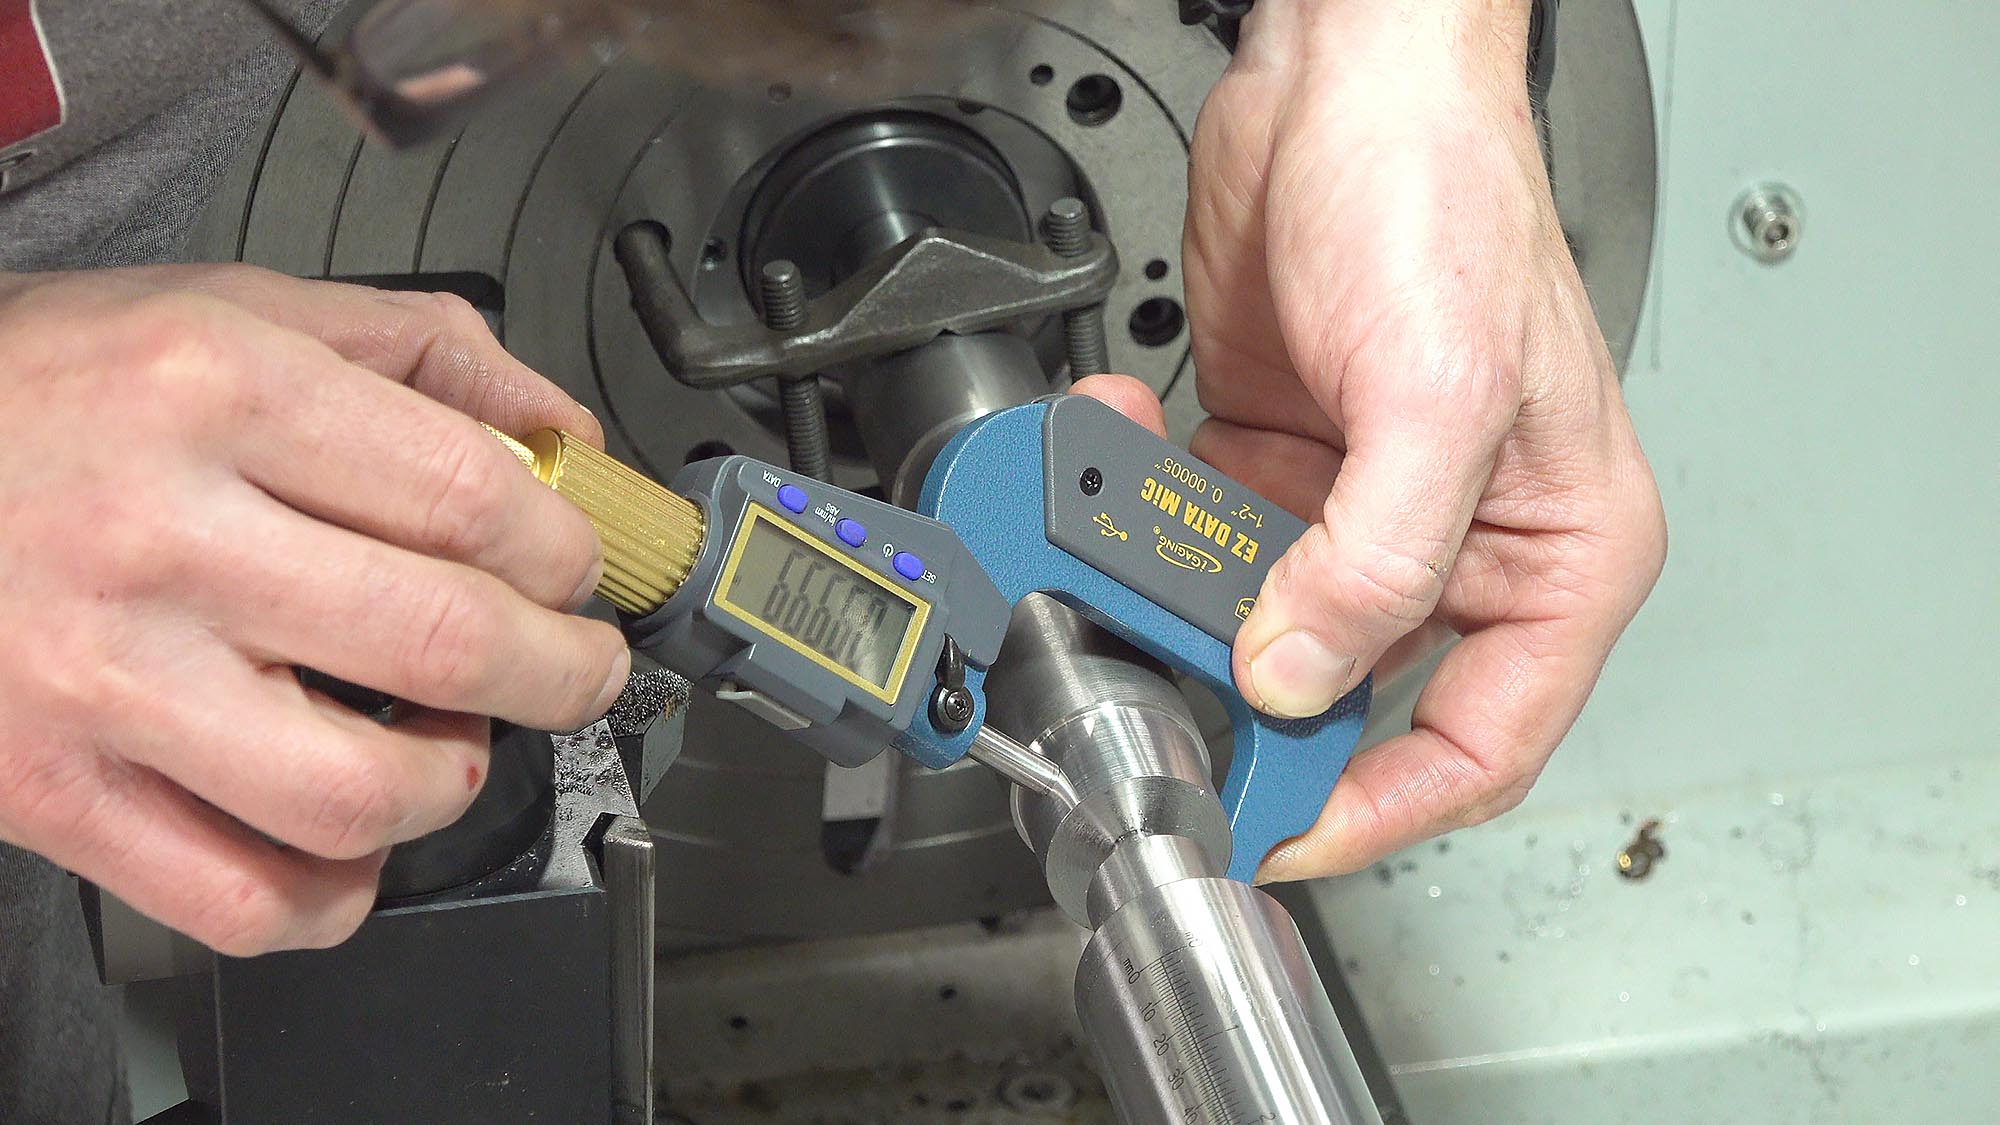
My tailstock is aligned to the headstock with an error of 0.0001″ over 4, or 0.000025″ per inch. This is plenty good for the work I’m doing. If I was not happy with this result, I could adjust the tailstock offset, recut the bar, measure the diameters, and repeat the process until I had achieved the result I wanted.
Summary of Lathe Precision
I am very happy with how this lathe was manufactured, adjusted at the factory, and aligned by myself in my shop. The cast iron feet are a great addition (they make leveling easier, provide a stable platform for the lathe to sit on), and I would highly recommend purchasing a set if you get this lathe. I initially setup my lathe in a shipping container with a wood floor which was not solid enough for this precision lathe. After moving it onto a 9″ thick concrete slab with embedded rebar, I’m MUCH happier (and so is the lathe).
Gavin’s PM-1440GT Core Tooling Package
Tooling is one of the most important aspects of a lathe package. And that’s the advantage of buying a new lathe: most often you’ll get all of the basic tooling you’ll need, and you can order additional tooling and accessories as needed. I have a lot of cutting tools and tool blocks which I won’t go into depth on here. I’ll save that for the Fundamentals of Lathe series (stay tuned).
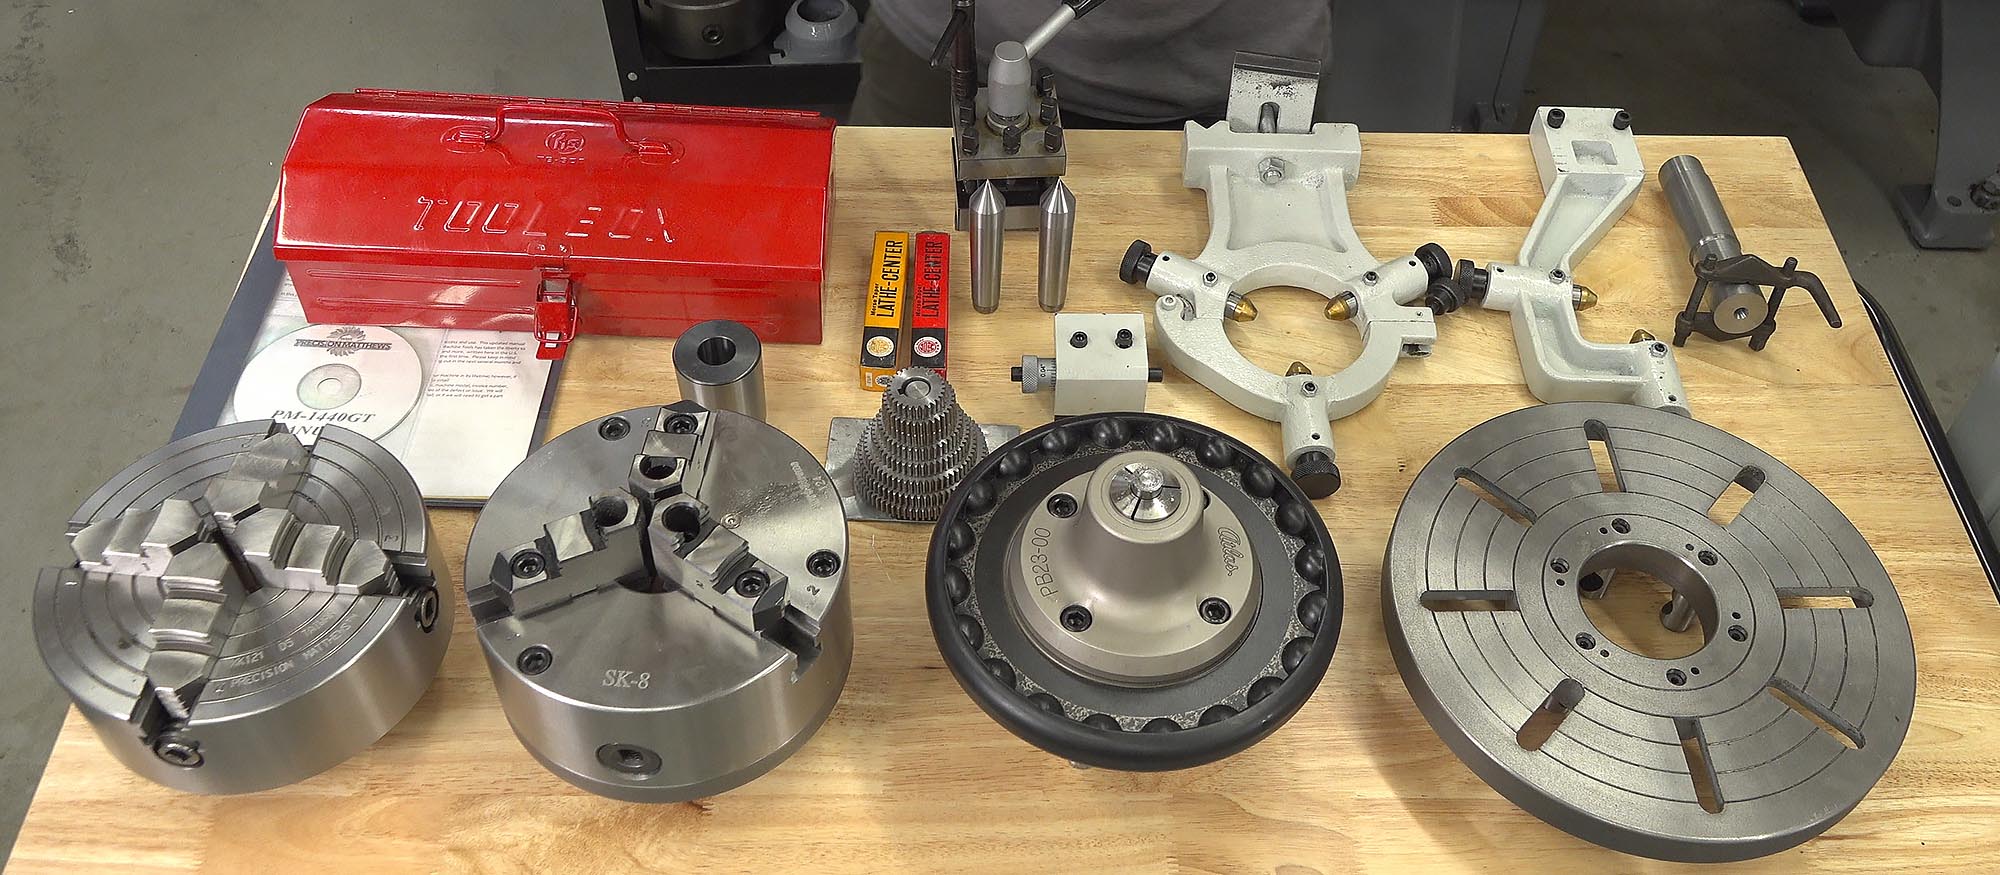
Above we have the D1-5 Chucks and Faceplate, from left (bottom):
- 8″ Precision Matthews 4-Jaw Chuck (I purchased separately)
- 8″ AutoStrong precision 3-Jaw Chuck (was part of the preferred package)
- Pratt Burnerd Atlas Quickie 5C collet chuck (I purchased separately)
- 10″ Face Plate (was part of the preferred package)
And along the back row in the above picture (from left)
- Owner’s manual and literature
- Toolbox (with combo wrench, allen key set)
- Spindle reducing sleeve (from 5 1/2MT to 3MT, included with lathe)
- Change gears on custom rack I built (comes with lathe, gear change only necessary for certain threading or feed rates)
- 3MT dead centers (one with carbide tip, comes with lathe)
- 4-way turret-style toolpost (comes with lathe)
- Micrometer Carriage stop (available separately)
- Steady Rest, Follow Rest (both come with lathe)
- Lathe tailstock alignment test bar and lathe dog (from items in the shop)
In addition to what’s pictured, I opted to get the Aloris-clone BXA quick change toolpost that’s available on the PM-1440GT product page. You’ll also need a MT3 drill chuck for the tailstock.
DRO
One requirement I had for this new lathe was a good quality DRO with high resolution cross-slide.
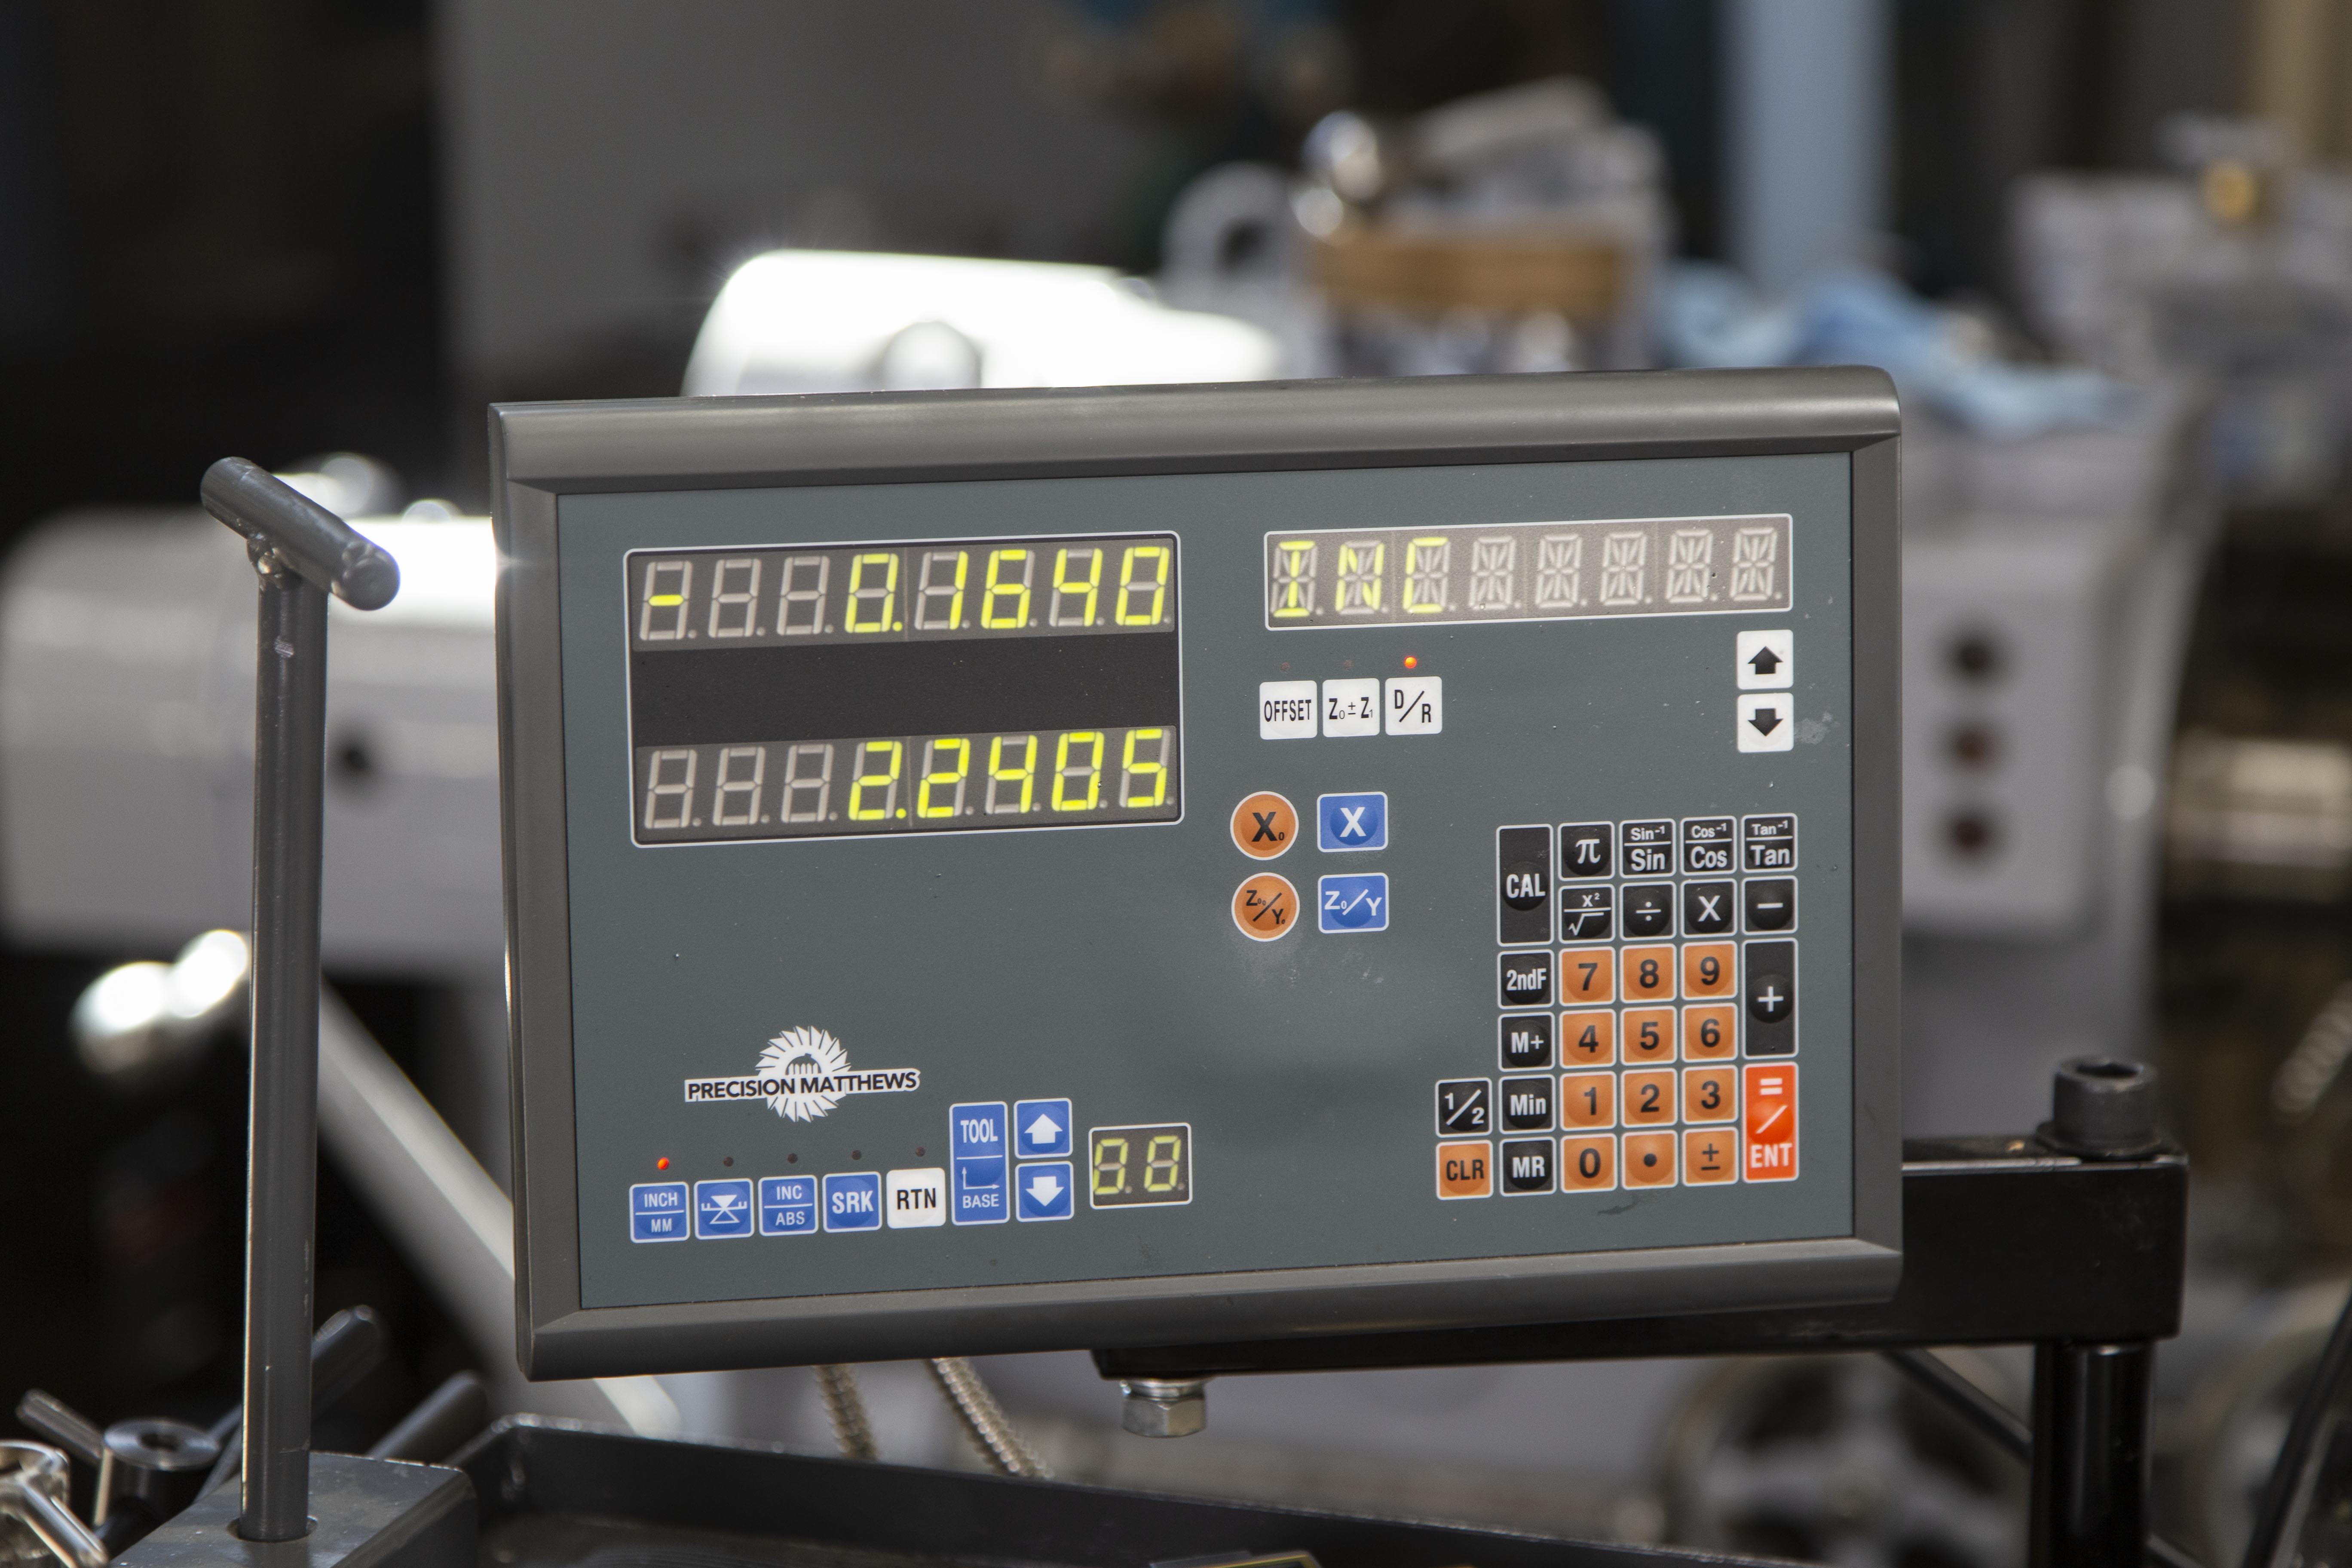
I ordered the Precision Matthews 2-Axis Lathe DRO with the lathe, and had Precision Matthews install it. I’ll have a separate story covering the DRO, but needless to say it’s been AWESOME!
Here’s some information about this DRO from the Precision Matthews product page:
This Precision Matthews DRO is a dedicated Lathe specific digital readout housed in a compact, slim, high performance plastic case.
Fully loaded with all the features you would expect including. It is the ideal DRO for a cost effective solution without compromising on performance.
● Machine specific version
● Optical Glass encoders, Hi Res .0001″ Cross Scale Resolution, and .0002” Bed Scale Resolution
● Cost effective design
● One touch axis zero keys
● Message AND Tool/SDM displays
● Latest SDM manufactured design
● Bright clear wide-viewing angle display
● Wipe clean membrane keypad allows easy cleanupPrecision Matthews DRO Set for Lathes, 2 axis, 8″x40″ Travels, This set is complete with:
1. DRO Display, 2 axis, for Lathes, with Mounting Bracket, and 110V Power Cord
2. 200mm Slim Cross Slide Scale, .0001″ Resolution (Slim scale to fit most any lathe cross slide)
3. 1000mm Bed Scale, .0002″ Resolution
4. Bracket/Hardware Set for installation
Gavin’s PM-1440GT Mods and Accessories
I can’t help myself, I HAVE to get my tools “dialed in” and organized my way or I go crazy trying to use them! It’s also great to have all of the “right tools for the job”.
Custom Outboard Spider (separate story coming)
One of the first customizations I did to this lathe was to build an outboard spider. Here you can see the side of the spider with the lathe side cover removed:
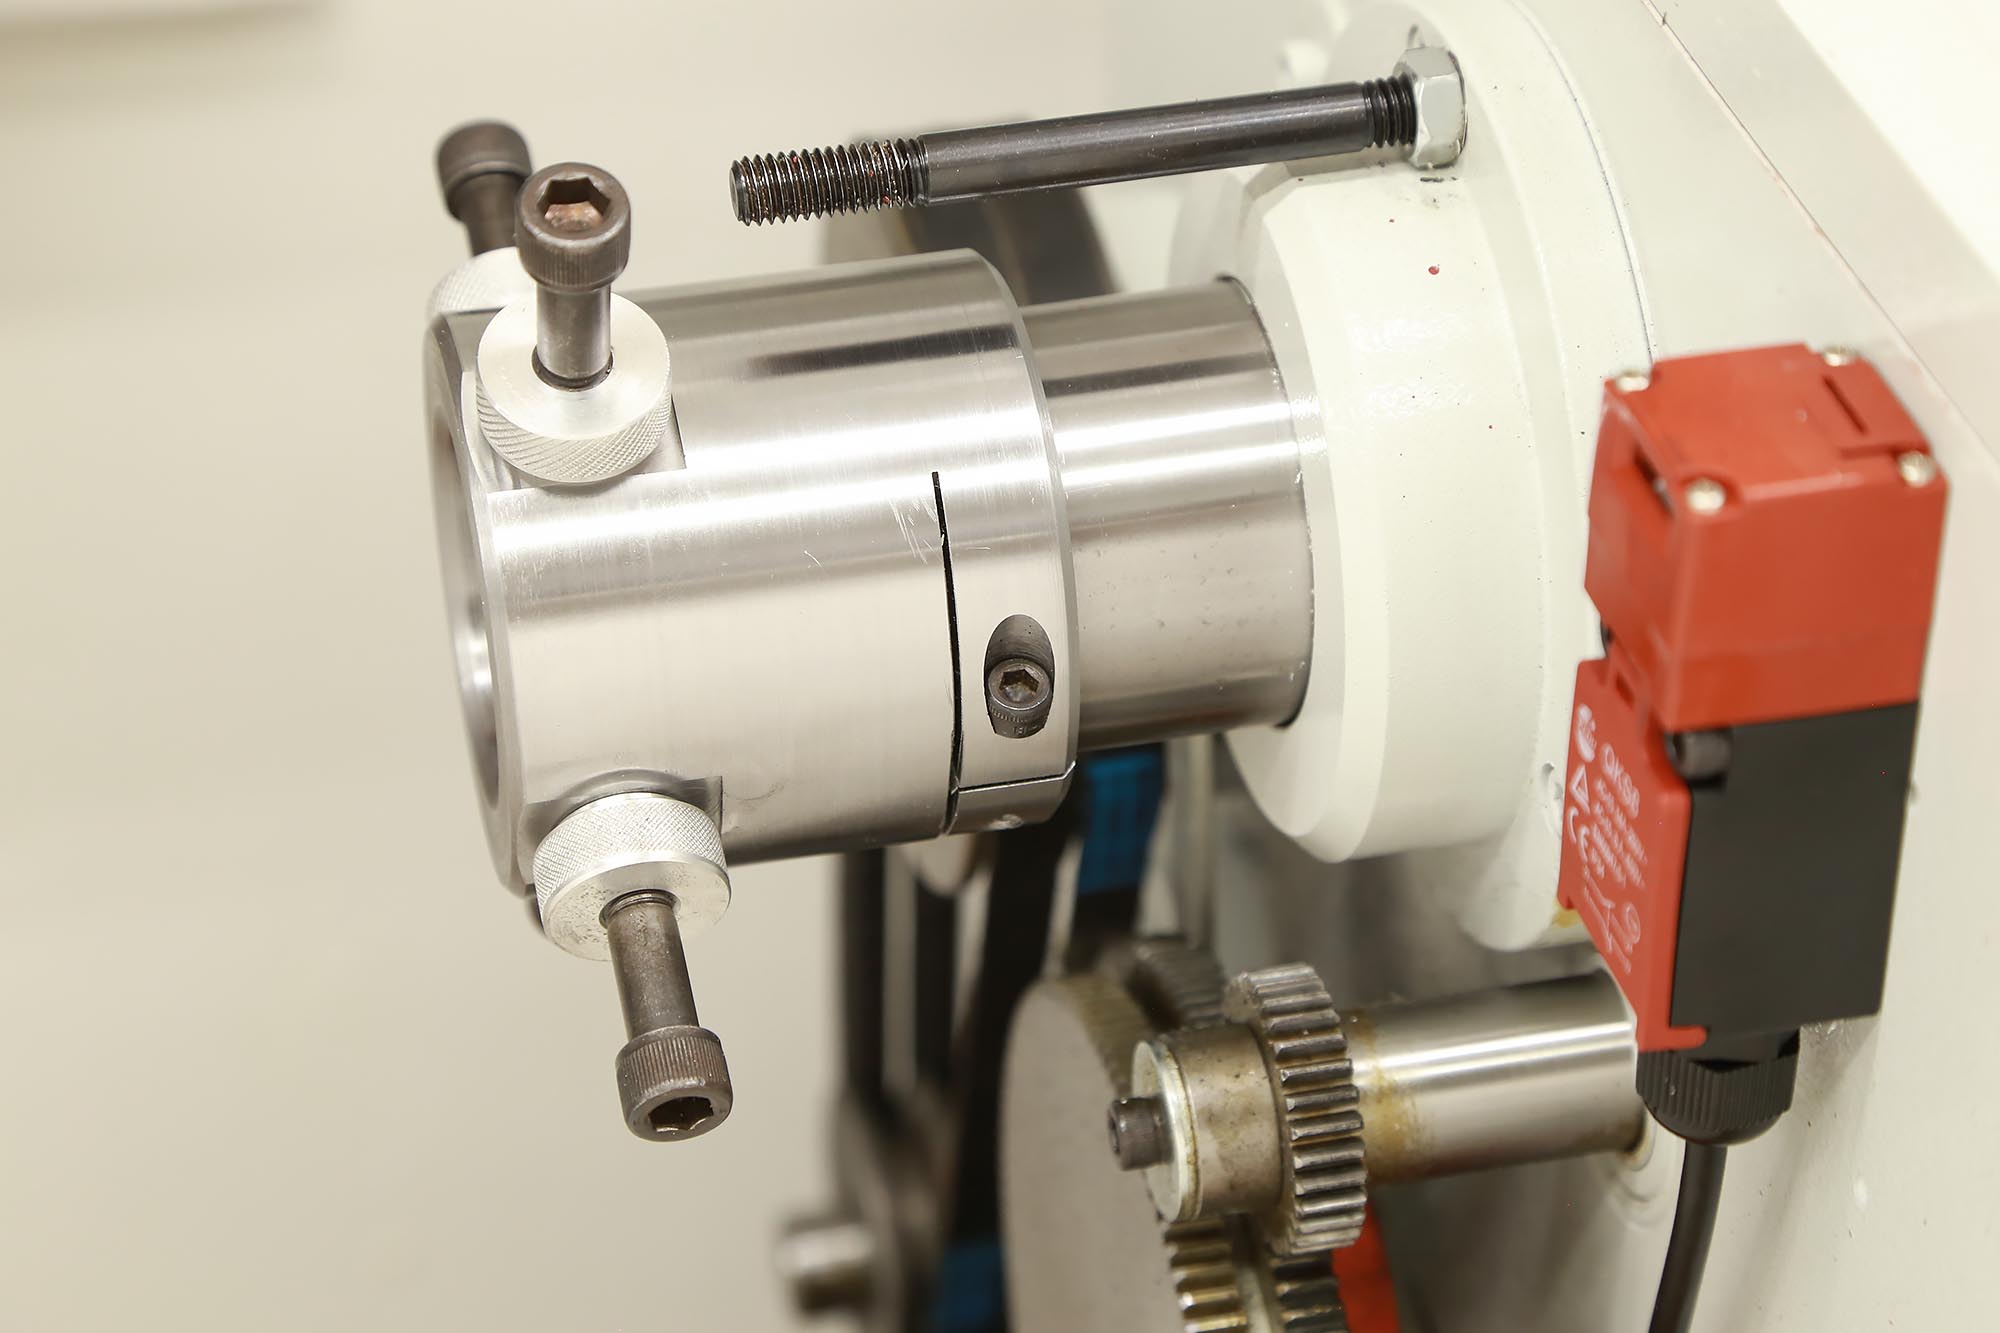
This spider uses a pinch clamp instead of set screws to hold it onto the spindle. This is great because there’s only one screw to tighten/loosen, and it doesn’t mark or mar the spindle. It was a fair bit of work to design and make this spider, but was well worth it! I’ve now done three rifle builds with this spider, and really like the way it works.
Tool Trays
I built two tool trays for the PM-1440GT: one for the top of the headstock, and one for the top of the splash guard. These are so handy, I can’t imagine not having them!
These tool trays were constructed with angle iron (frames) , heavy sheet metal (bottoms), and then finished off with vinyl grooved stair tread material as tray inserts. Since they are made of steel, these trays are great for clamping indicator holders to magnetically.
Tool Cart
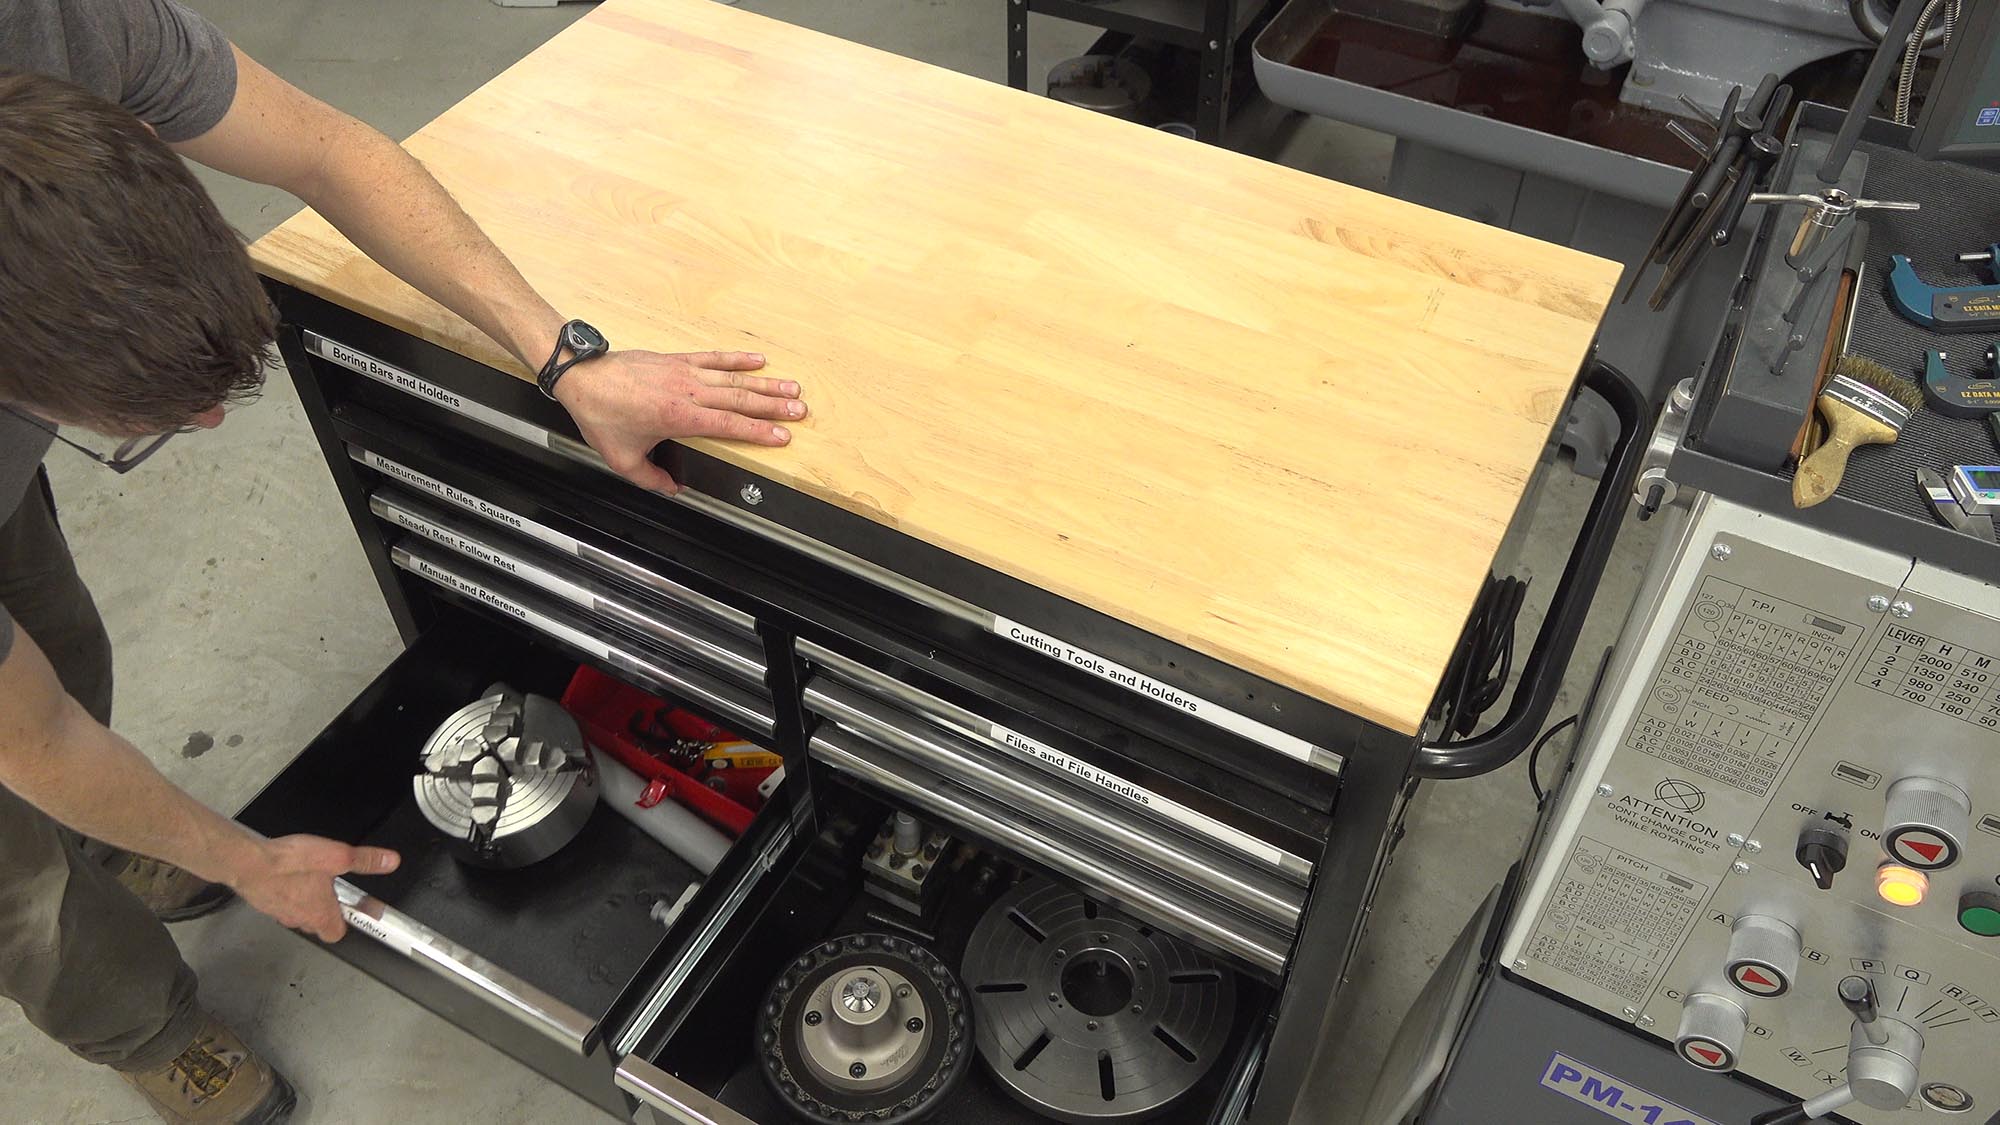
This tool cart is just a Home Depot special, and features ball bearing drawer slides and a maple top. It stores all of the tooling for the lathe that doens’t fit on my tool trays, and I use the top for parts layout and to set tools/stock on. I’m really happy with how much I can fit in this cart, and it’s got wheels for portability (or to just move it out of the way).
Minor Issues and Feedback
There are a few things I’ve run into with this lathe that I’ve given feedback to Matt at Precision Matthews about:
- There was some very minor over spray from the factory paint job
- The DRO scale on the cross slide covers up the cross slide lock (I plan to put a cross slide lock on the other side of the cross slide)
- The Aloris clone BXA toolpost has left scratches on the top of the compound slide when rotated
- I’d like to see a factory option for an outboard spindle spider, and clearance on the side cover for adding one (I made modifications to my side cover)
- The motor belt tension adjustment nuts are hard to get to
Other than those minor things, I have very little to complain about, and a lot to love with regard to this lathe.
Conclusion
The Precision Matthews PM-1440GT lathe has definitely met my expectations, and has exceeded my expectations in several areas. It was a “big bet” to commit to this lathe, and I’m glad I did. I feel like to chose the right machine for my needs, and am happy to have my “dream precision lathe”. If you are looking for a high-precision medium sized lathe, you should consider the Precision Matthews PM-1440GT, it’s a great machine.
Precision Matthews Links
Precision Matthews PM-1440GT lathe product page
Precision Matthews PM-1440GT lathe owner’s manual
Precision Matthews PM-949TV Mill (Gavin’s mill)
Lots more to come with the PM-1440GT, including “Fundamentals of Lathe” series. Don’t miss out on these Making With Metal updates, make sure you’re subscribed!
Thanks,
Gavin


Great job explaining the lathe parts and what they do. I have been wanting to take the basic machinist course at our local JC. Looking forward to you lathe course. Did you look at and compare your lathe with the Grizzly products? I believe they are also from Taiwan. Thanks Again.
I have a Monarch 10EE and plan to get something a bit larger for Gunsmithing. This lathe seems perfect. I would be interested in your outboard spider plans if you would be willing to share them when I buy this. Also, have you looked into the possibility for an inboard spider? Working on pistol barrels has me wondering if it would be worth designing and using one. Your thoughts?
This is an excellent review and discussion of your equipment.
I particularly like the way you documented your work.
Love my PM-1440GT and hope to learn lots from you from you