Building a precision rifle is an exacting process. You need to have knowledge, skills, tools, and a LOT of patience. In my last post, I talked about the planning, preparation, and experiences involved in completing this rifle build. In this post, I’ll walk through the steps I performed at a high level. Note that there are many different ways to rebarrel a rifle: multiple legitimate paths towards the same result. On this blog (and on my YouTube channel) I will be showing different ways to work on rifles, but this process was relatively straightforward, and worked really well.
For reference, here’s the complete content series:
- Winchester 70 Rebarrel Part 1: Overview
- Winchester 70 Rebarrel Part 2: Start to Finish Process (you are HERE)
- Winchester 70 Rebarrel Part 3: Tools of the Trade
Disclaimer
Ultimate Reloader LLC / Making with Metal Disclaimer: (by reading this article and/or watching video content you accept these terms)
- The content on this website (including videos, articles, ammunition reloading data, technical articles, gunsmithing and other information) is for demonstration purposes only.
- Do not attempt any of the processes or procedures shown or described on this website.
- All gunsmithing procedures should be carried out by a qualified and licensed gunsmith at their own risk.
- Do not attempt to repair or modify any firearms based on information on this website
- Ultimate Reloader, LLC and Making With Metal can not be held liable for property or personal damage due to viewers/readers of this website performing activities, procedures, techniques, or practices described in whole or part on this website.
- By accepting these terms, you agree that you alone are solely responsible for your own safety and property as it pertains to activities, procedures, techniques, or practices described in whole or part on this website.
Re-Barelling the Winchester Model 70
Tearing Down the Rifle
The first step in a rebarrel job is to tear down the rifle. This consists mostly of the following (your steps may be different depending on your rifle, optics, and setup.
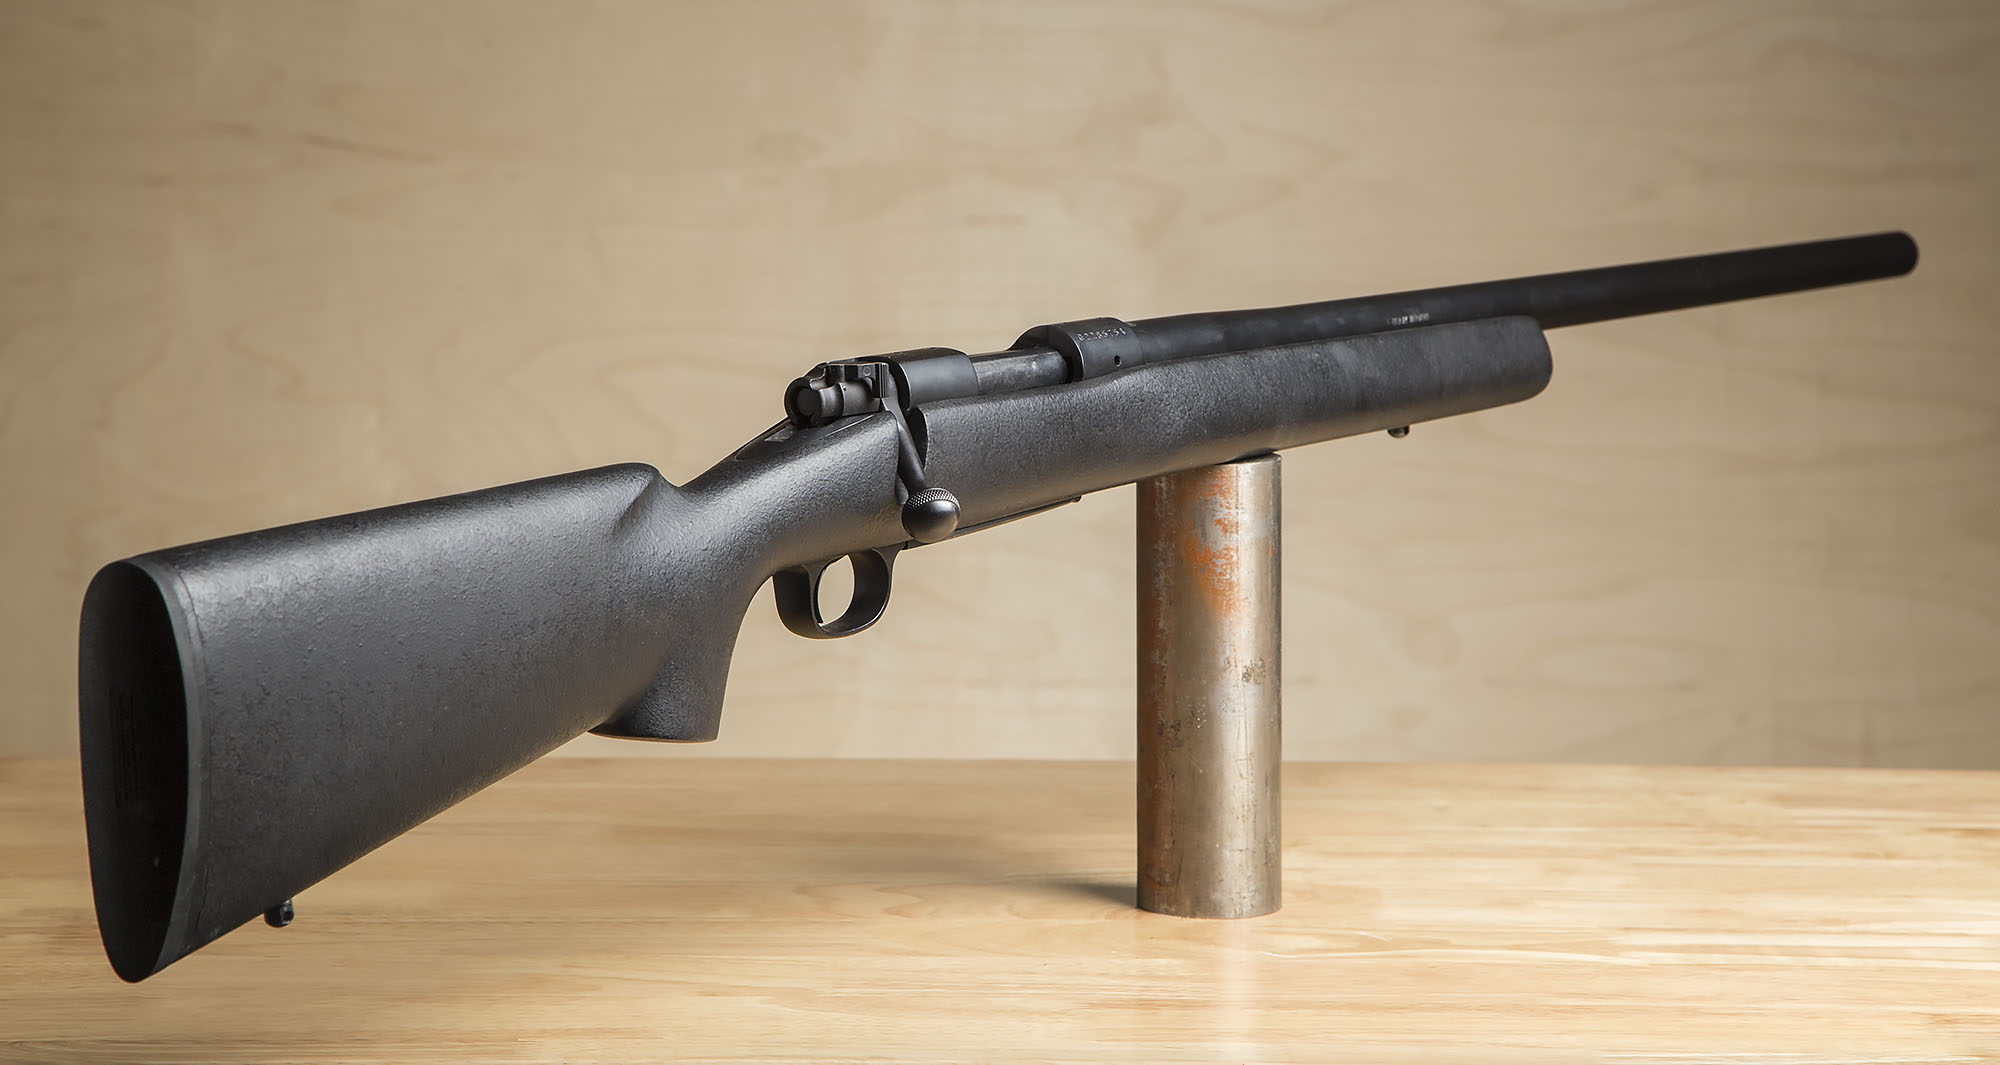
Above: The rifle after scope removal, and before the rest of the tear-down (click/tap to enlarge)
Here’s what I did to get things apart:
- Remove the scope and scope mounts
- Remove the barreled action from the stock
- Remove the trigger from the action
- Remove the barrel from the action
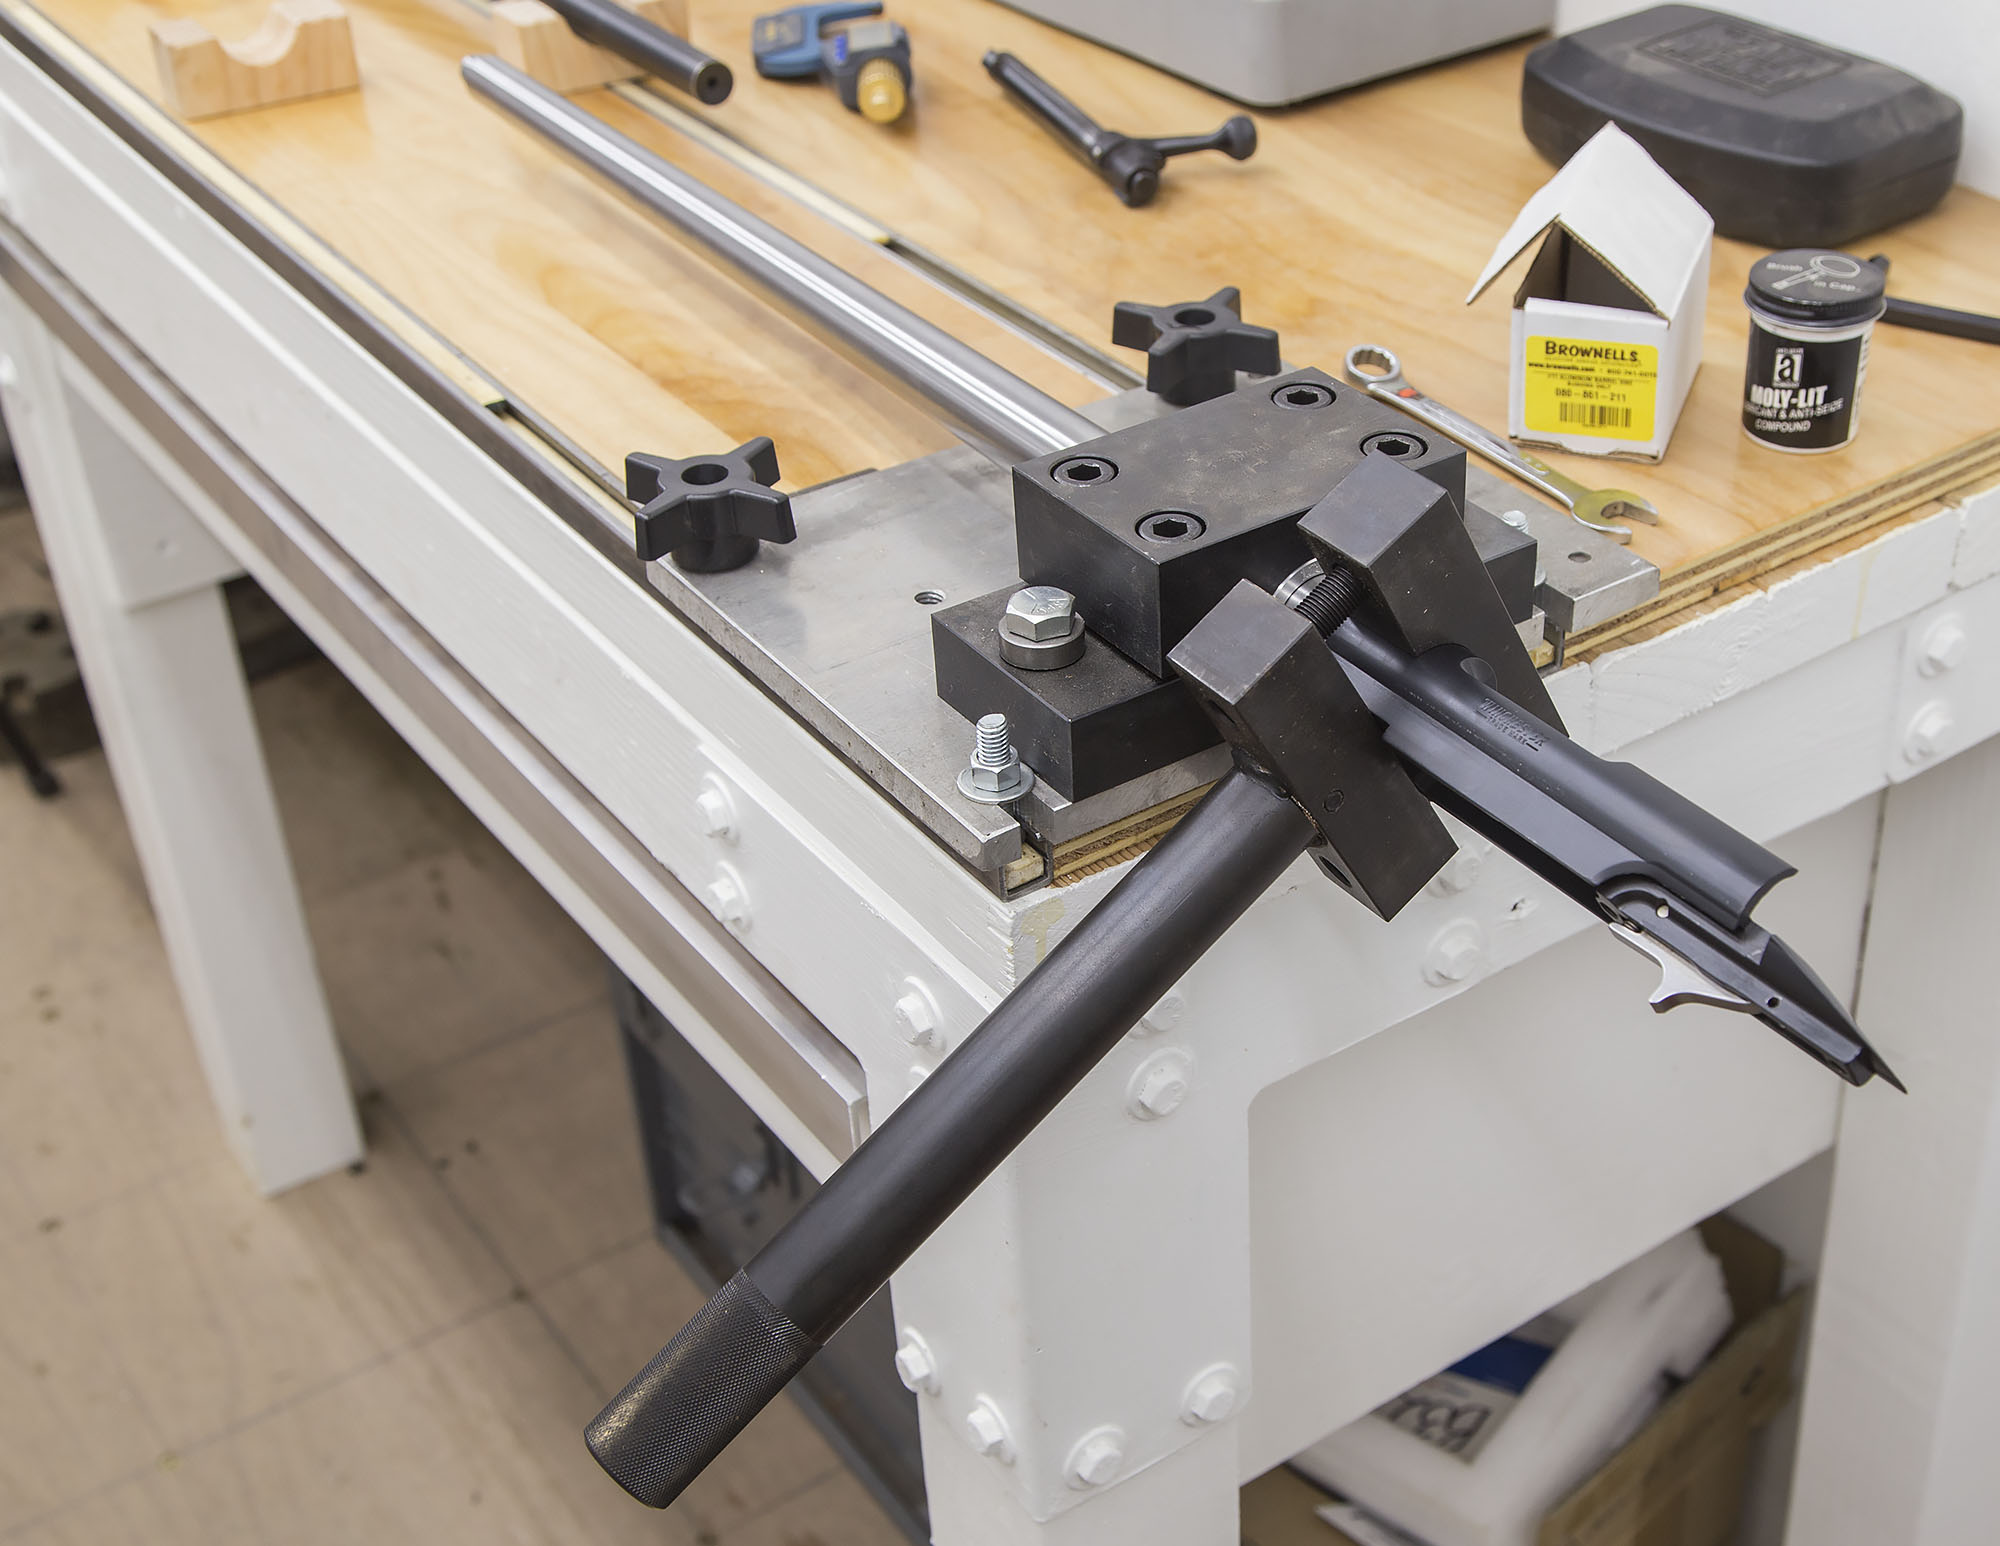
In order to remove the barrel, I had to add a couple layers of duct tape (high quality 3M blue duct tape) in order to get the right fit with the barrel vice bushings I had on hand. I used the Brownells Barrel Vice, and the Brownells Action Wrench setup for Winchester Model 70 in order to remove the barrel.
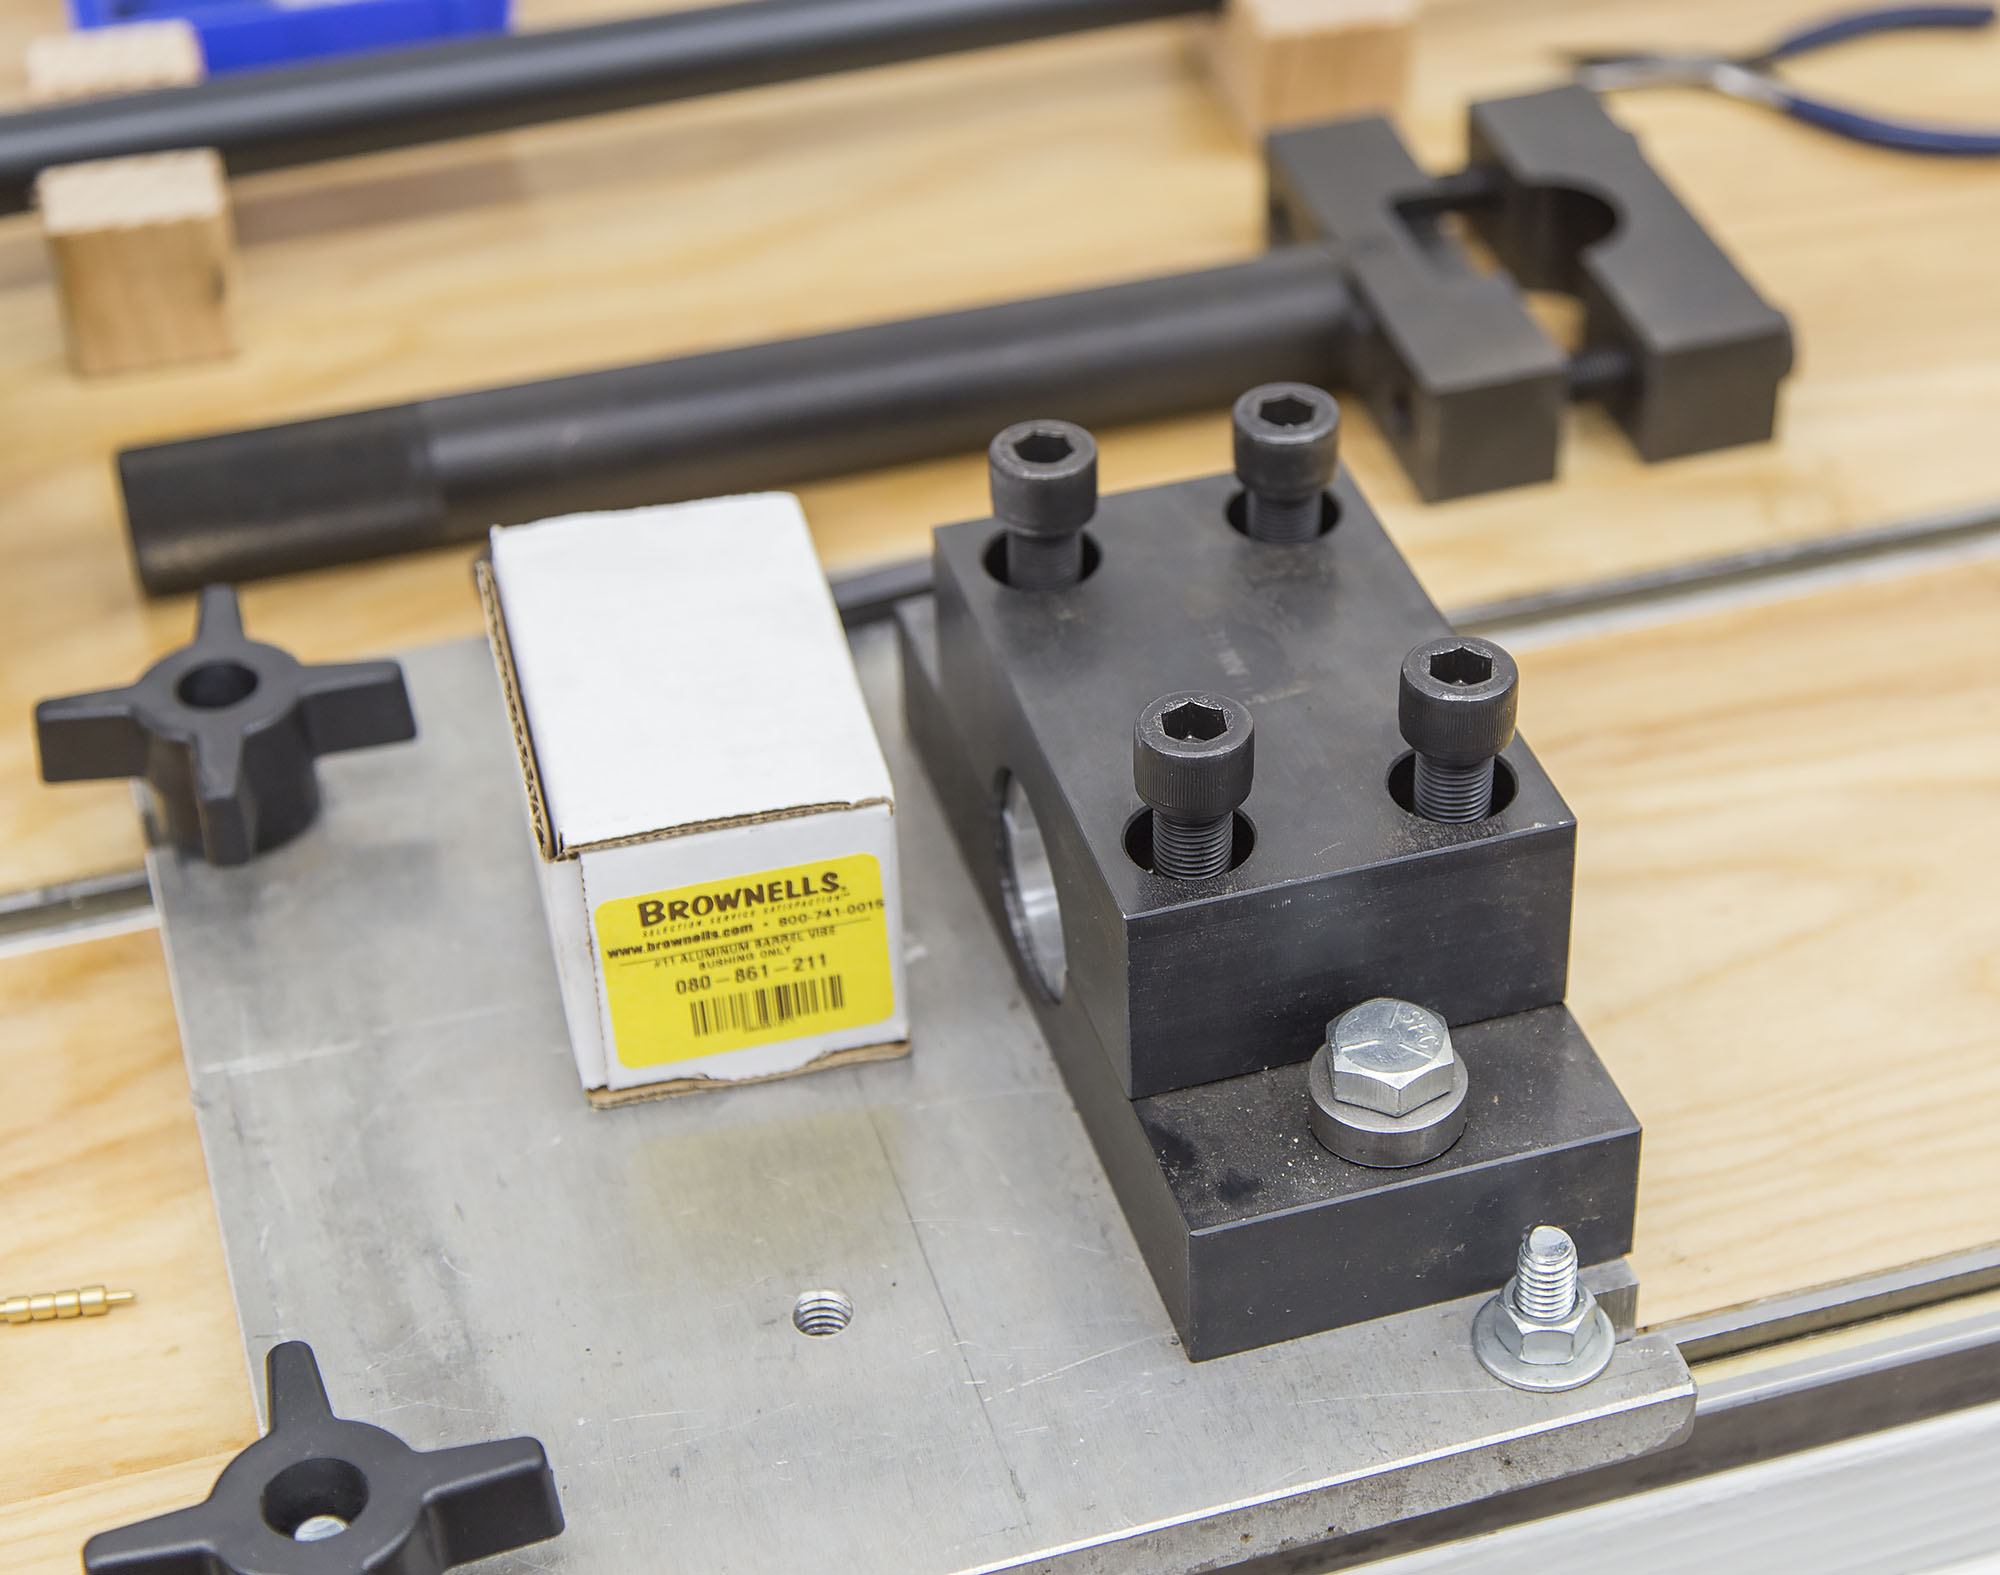
Note the mounting plate I made to interface this barrel vice with the Ultimate Reloader Modular Bench System (the vice is slide to the end of the bench when used).
Here’s a picture of the bench top while I was in the process of tearing down the rifle, and trying out the new tools: (click/tap to enlarge)

I also removed the ejector from the bolt: an important step to enhance the “feel” when checking headspace measurements.
Measurements and Dimensions
Before heading over to the lathe to start work on the barrel, you’ll need to have absolute confidence in the measurements, dimensions and specifications you’ll be using to determine the proper final dimensions for your barrel.
There are a few things I did in order to make sure I had everything “down on paper” correctly before I started:
- I read the entire Complete Illustrated Guide to Precision Rifle Barrel Fitting”, published in 2003, available from Brownells HERE – including references.
- I read the “Winchester Model 70 1968 version” section in the book titled “The Bolt Action, A Design Analysis“, by Stuart Otteson (1976)
- I measured all of the critical dimensions from the my rifle after teardown including tenon length, tenon diameter, tenon threads per inch, bolt face depth, and bolt nose depth.
Following all of this research and measurement, I wrote down all of the measurements and dimensions, and did some math to calculate critical dimensions like headspace length. Here’s what my sketch looked like (DO NOT USE ANY OF THESE DIMENSIONS FOR YOUR OWN WORK)
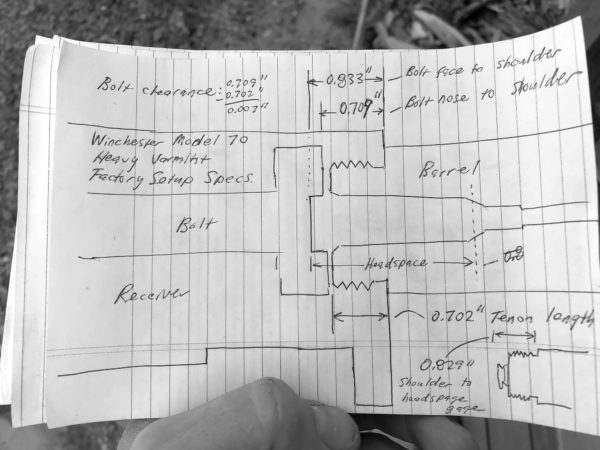
I checked, double checked, and triple checked everything: including my math.
OK, LET’S DO THIS.
Dress Rehearsal
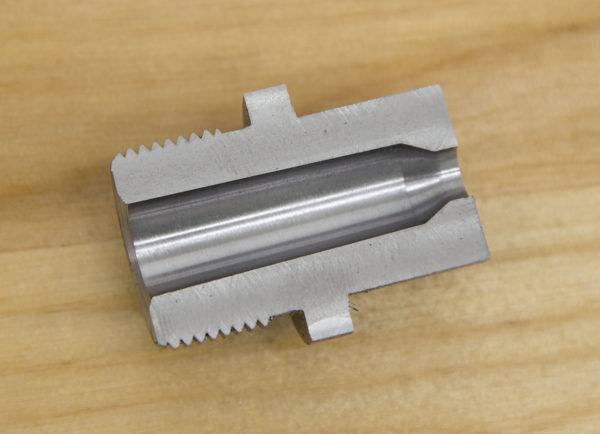
Can you imagine going to a play where the actors had never run through the performance end-to-end? In the same way, I wanted to make sure my chambering performance would be “up to par”. So I ran through the entire process from start-to-finish on a 2″ cut down section from the barrel blank.
Let me tell you- this was VERY worth-while. I had some minor issues, but for the most part things went really well. I actually worked on both sides of this cut-off section as you can see in the image above. This was the first time I had used the 4-Jaw chuck with my new Precision Matthews lathe (I was used to my old 4-Jaw on my Logan lathe, but this one had different feel and was larger). This was also my first time single-point threading on this lathe. I am not sure why, but the Clymer rougher reamer I used during this test run chattered quite a bit, something I’m investigating. It was exciting to advance the Dave Manson 22-250 finish reamer into the section of barrel and see the finished product- this reamer totally cleaned up the chatter marks, and finished up really nice.
Dialing Things In
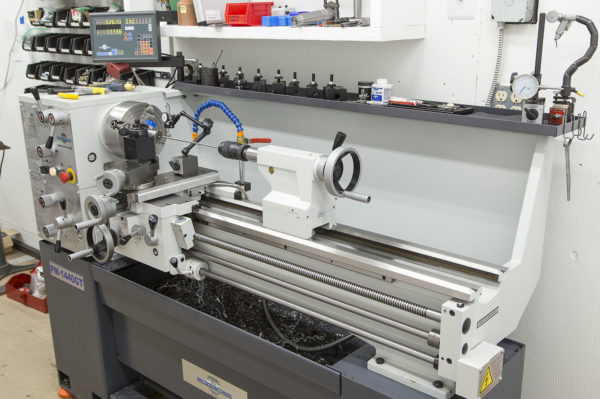
Athe lathe, I started by dialing in the barrel to the bore- for both radial and axial alignment. I’m using a Precision Matthews PM-1440GT (a very good option for gunsmithing). For this alignment exercise, I used the “Gordy Gritters Method”. This technique involves a Grizzly bar, precisely fit bushings, and precision indicators.
Above is a picture that shows the barrel alignment process. It’s a very tedious and time consuming activity, but is a super-important part of getting the best results possible. By aligning the axis of the “last few inches” of the bore close to the end you are working on (breech or muzzle) – you’ll know that your chamber or threaded muzzle is in perfect alignment with the part of the bore that matters most. This was my first “test drive” of the new outboard spider that I had designed and built which worked beautifully:
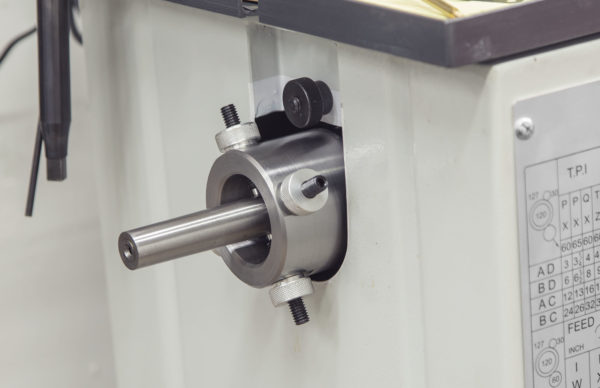
I’ll have a full video and post covering this outboard spider in more detail coming shortly, so make sure you’re subscribed!
The process for dialing in a barrel this way is shown in detail in Gordy Gritters’ DVD, but here’s a quick run down on the process: You start with the bushing inside the bore near the exit (muzzle or breech). You then dial in the 4-jaw chuck until the runout is near zero. You then advance the bushing about 3-4″ into the bore and repeat the process, this time using the outboard spider to dial in the alignment. The process repeats, alternating between the two locations in the barrel. I started with a 0.001″ indicator, and after both locations were close, then changed to a tenths (0.0001″) indicator to “dial things in”. I’m still getting the feel of the bushings- with their minute “slop” you have to read the tenths indicator carefully, and consistently work the chuck (in one direction, not alternating rotation directions).
At this point I was ready to start cutting!
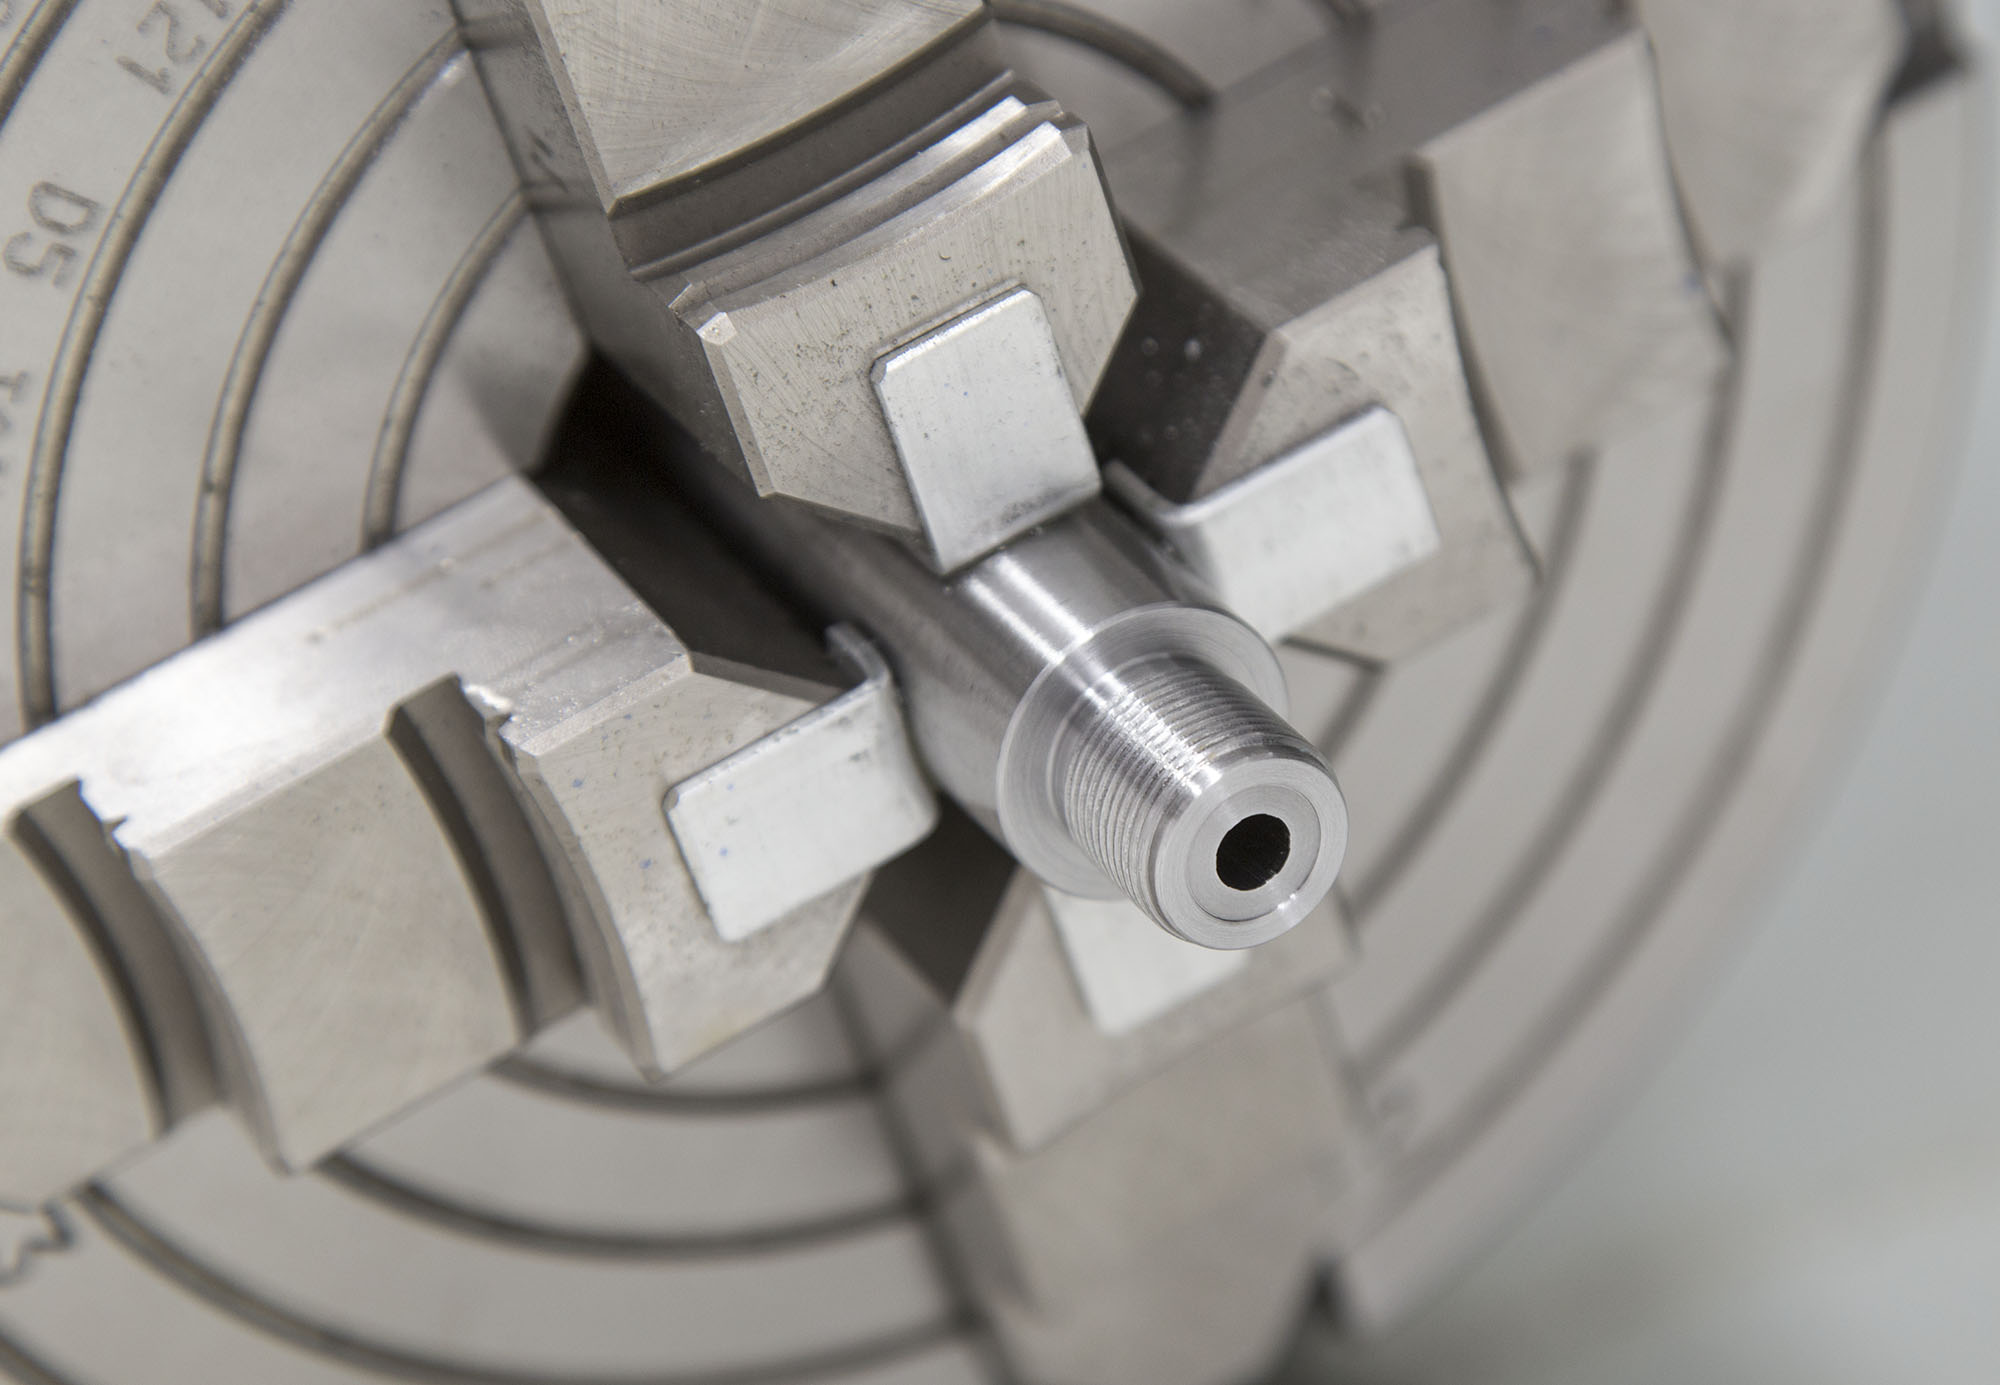
Cutting and Treading the Tenon
My first cuts were facing cuts on the breech end of the barrel. I only had to take about .015″ off to clean up the bandsaw cut marks and true things up square. This also cleaned up the entrance to the bore- an important detail when you start reaming the chamber!
Following the facing operation, I performed the following steps:
- Turning the tenon down to 0.995″, at the proper tenon length (0.700″) + 0.020″. So the tenon section measured 0.720″ from the breech end to the shoulder following this step.
- Cutting the threading relief (between the shoulder and the tenon threads) with a 1/8″ parting tool ground and sharpened perfectly square on the end.
- Chamfering the end of the tenon for the area where the threads start.
- Threading the tenon (1″ x 16TPI threads) – using the action to check thread fit.
- Cleaning up the shoulder, removing radius between the shoulder and the tenon.
- Filing the tops of the threads, cleaning up the threads with a threading file.
- Facing the tenon to length (0.700″).
Here’s what the tenon looked like following turning and with the relief cut:
And following the threading operation:
The threads looked pretty good, and cleaned up even better after filing, but I’m going to try HSS for threading next time since the carbide tool I used this time left some “quality on the table”. Thread fit between the tenon and action was perfect- some resistance while turning on the action all the way to the shoulder, and no “rattle”.
Chambering
And now for the “main event”. There’s something about cutting a bottleneck rifle chamber with a chambering reamer that’s magic to me, and I was about to unleash that magic.
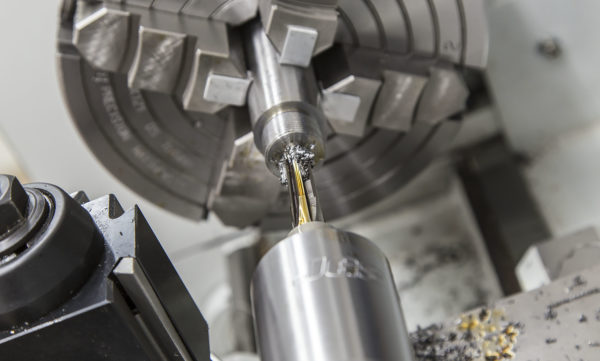
For this chambering job, I used:
- A Dave Manson 22-250 finisher reamer
- JGS Precision floating reamer holder with MT3 shank
- Viper’s Venom cutting fluid (high-sulfur)
I used minimum spindle speed (50 rpm), and only plunged about 0.040″ at a time being careful not to pack the reamer flutes with chips. Following advice from Bill Marr over at Rifleshooter.com, I was careful to start and stop the machine while the reamer was up against the chamber- this helps to avoid “rolling chips” between the reamer flutes and the chamber walls. I was absolutely amazed at how smooth the operation was- there was zero movement felt as I was reaming with my hand on the JGS floating reamer holder – a great sign. In the future I’ll speed things up, but for this first chambering job I felt it was best to take my time.
When it was clear I was getting close to final depth, I would check with the headspace gauge and depth micrometer after each pass to see how far I had left to go. When things got really close, I spun on the receiver with bolt and headspace gauge in place, closed the bolt and turned it gently until I could feel things “bottom out”. At this point, the remaining depth cut can be measured via a feeler gauge between the action and the barrel shoulder.
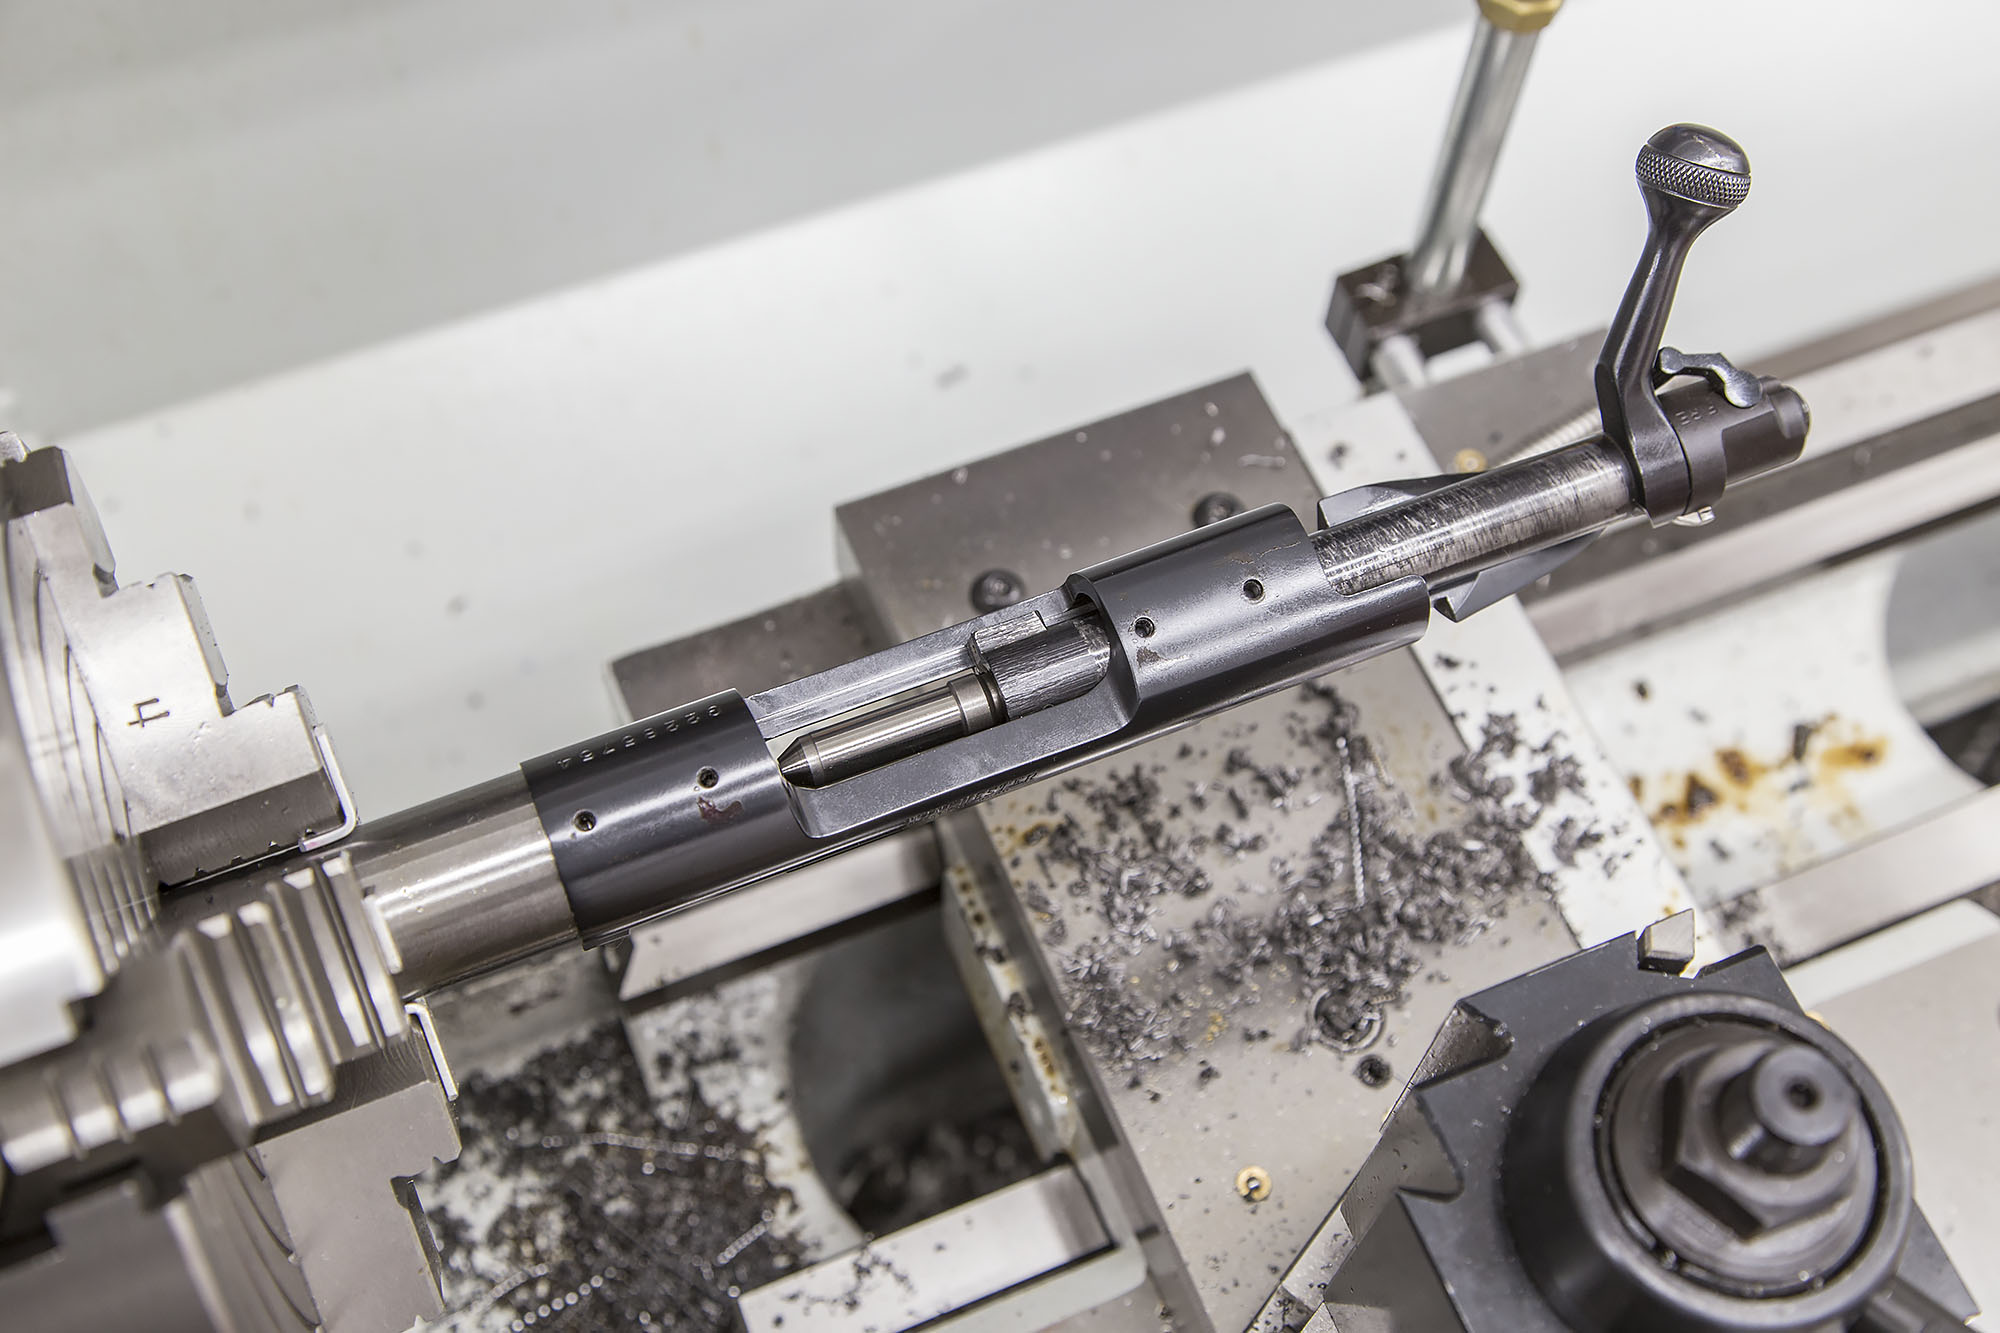
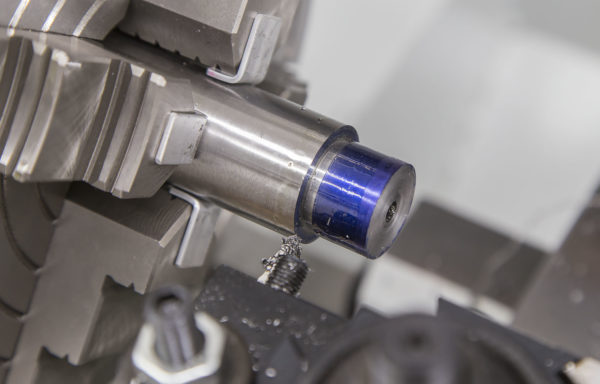
When only 0.006″ remained for my chamber depth, I installed the tailstock depth indicator setup- a very simple piece of angle aluminum clamped to the JGS Floating Reamder Holder– and a Mighty Mag holding my indicator on the tailstock. Here’s what that setup looks like installed on the lathe:
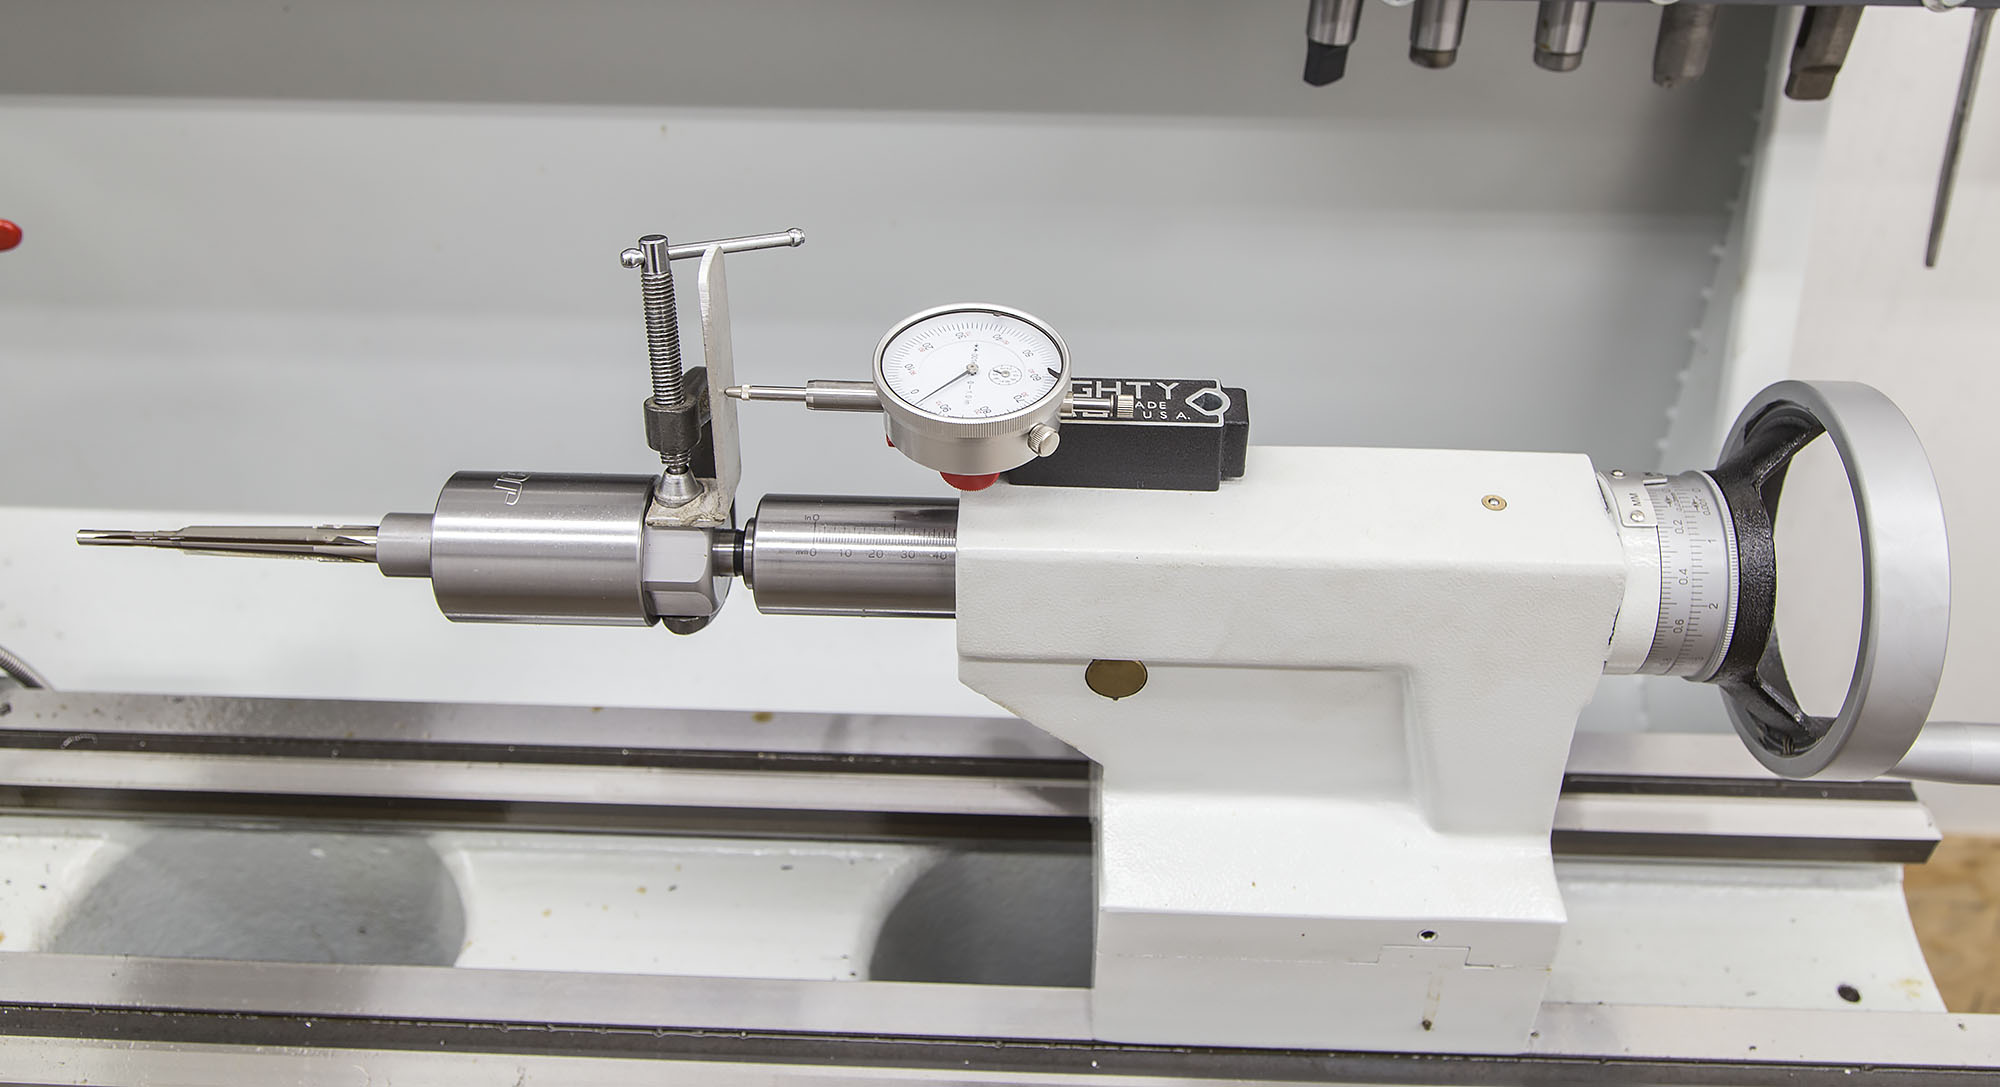
This is about the simplest depth measurement tool I’ve seen for a tailstock, and it’s great to be able to remove the indicator in seconds. I do have in mind to build a collar and stop that will clamp onto the tailstock quill, but that’s low priority since this setup is working so well. My last cut on the chamber was about 0.001″ – and in hind sight, I probably should have been more careful approaching the final dimension. However, I acheived the exact headspace I was looking for- on the lathe the bolt handle would barely go all the way down with the go gauge installed, and after tightening the barrel there was just a hint of resistance at the bottom of the bolt throw with the go gauge in place- this is a “very slightly tight chamber”. Just what I was looking for.
This left only two remaining steps to finish chamber:
- Chamfering the chamber entrance for good cartridge feed
- Polishing the chamber lightly with 320 grit sand paper on a wood dowel with some cutting oil
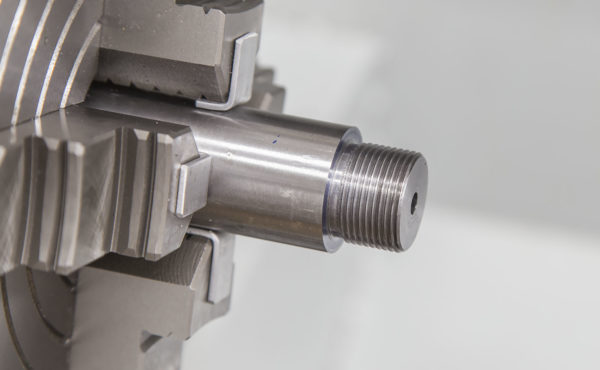
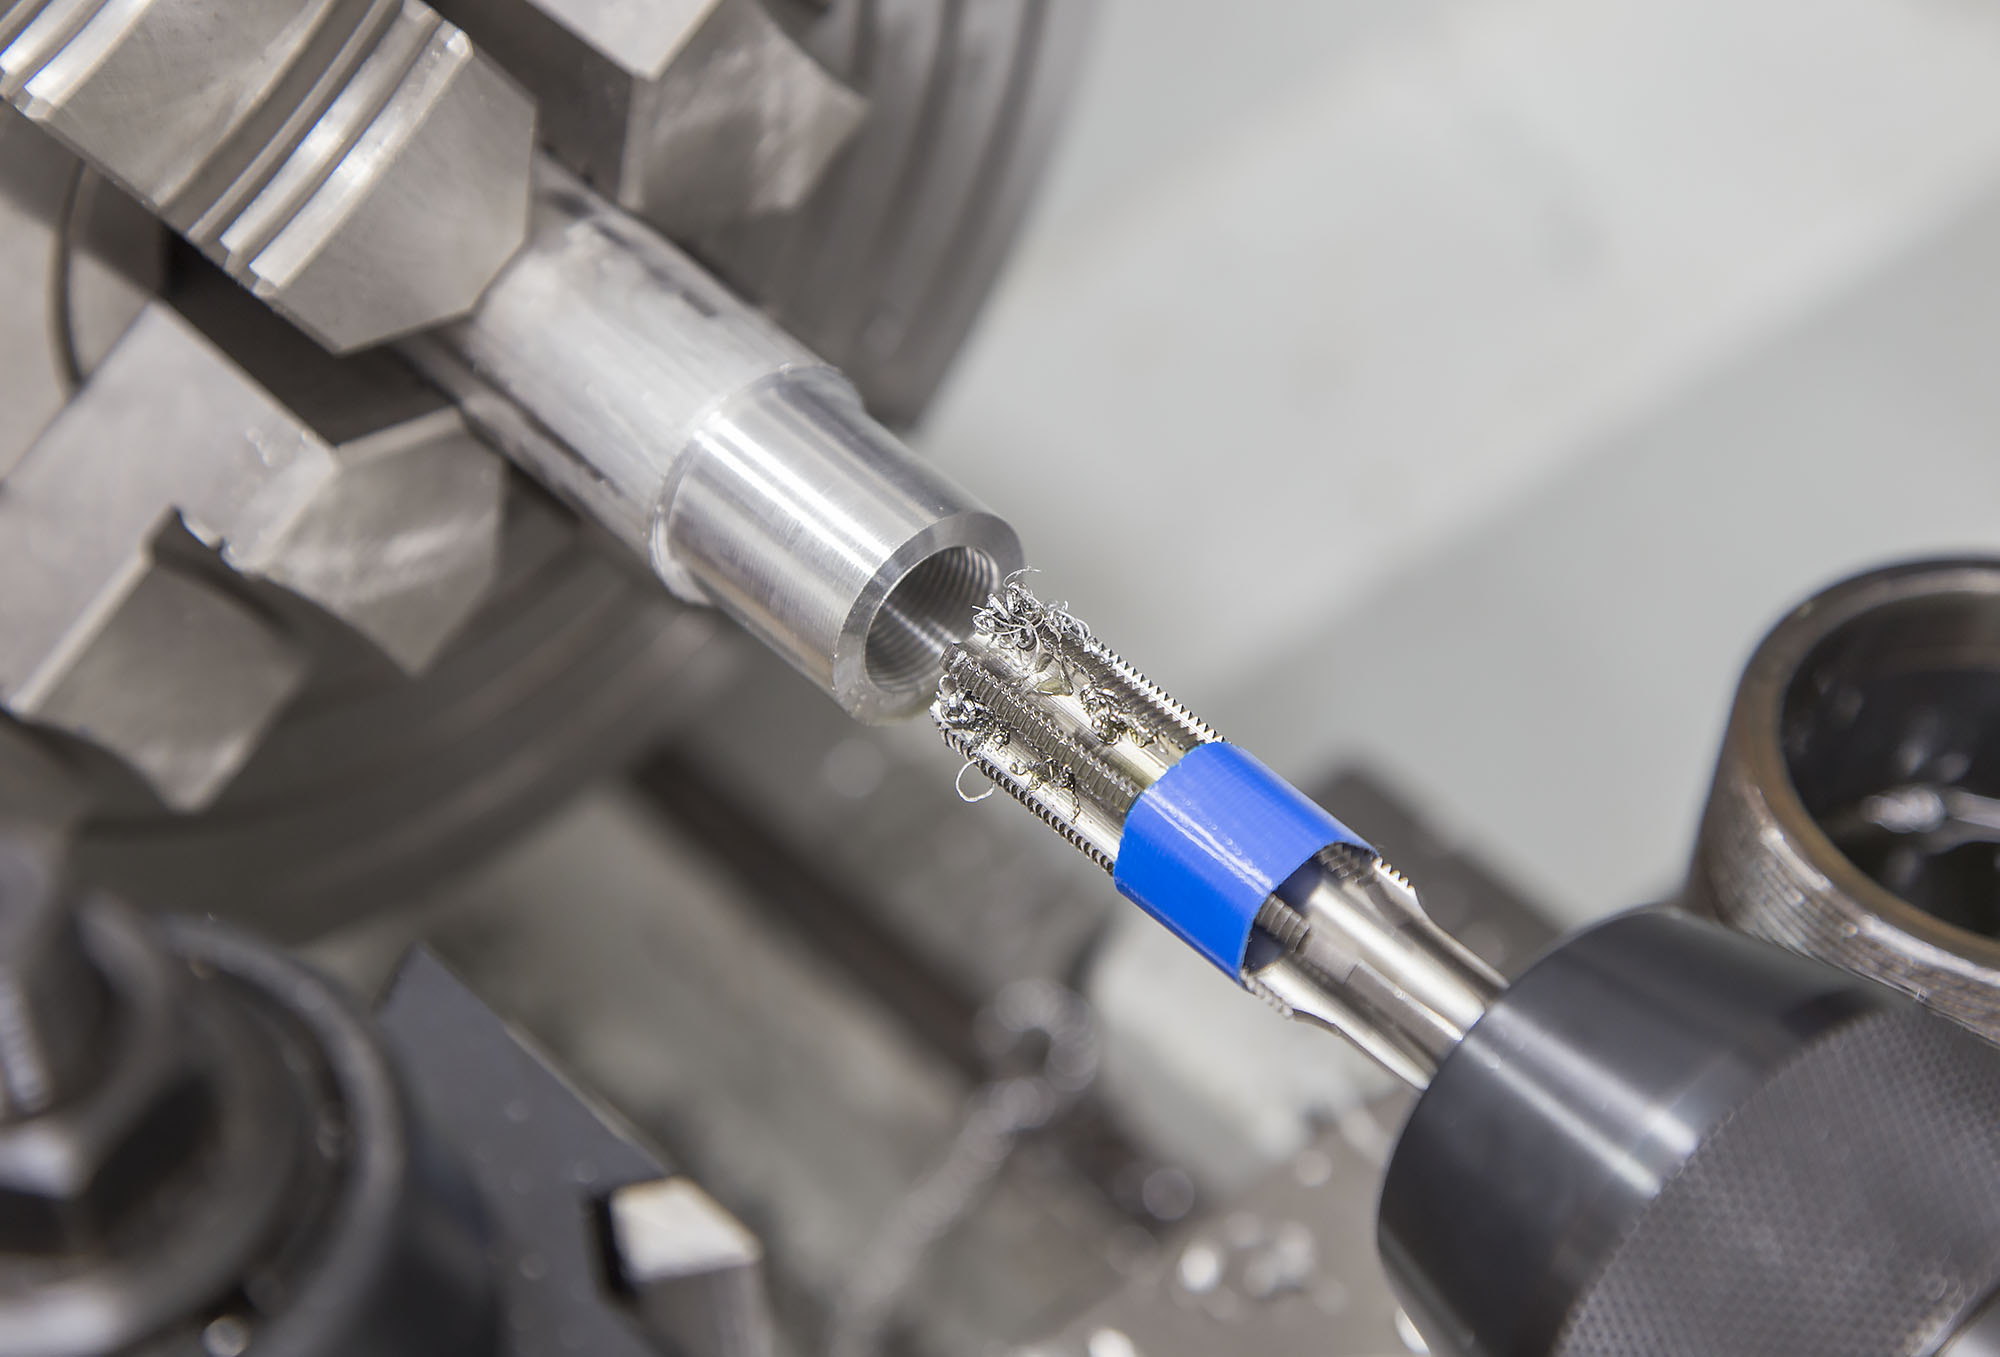
Threading the Muzzle
Threading the muzzle was very similar to threading the tenon before the chambering process.
Here’s what I did:
- Employ the Gordy Gritters method to dial in muzzle end of the barrel
- Part off ~1/8″ of the muzzle end of the barrel (this removes the center drilled end)
- Turn down the end of the muzzle to proper dimension for threads (I chose 5/8″ x 24 TPI)
- Use narrow parting tool to provide clearance for threading
- Turn down muzzle end (same as thread clearance width), and chamfer threaded section
- Dye the threaded section, take quick threading pass at 0.002″ depth, confirm TPI with thread gauge
- Finish threading operation using known good threaded muzzle device to check fit (what you use to check fit with is critical)
- File tops of threads, clean up threads lightly with thread file
- Face end of muzzle
- Turn muzzle recess and crown
Here’s the final result:
Now I can use a muzzle brake or suppressor with this rifle! Something I couldn’t do before this job.
No Barrel Spinner? No Problem.
In Gordy’s DVD, he shows his custom barrel spinner in action. A very cool tool to remove scratches and finish the outside of the barrel to a variety of textures and sheens depending on what’s used. I don’t have a barrel spinner, but I was able to create a lathe-base solution for this finishing step. I drilled and tapped a short section of aluminum round bar (5/8″ 24 TPI, the same threading as the muzzle) in order to secure the barrel without a lathe dog (which would scratch the barrel).
What I had at this point was essentially an aluminum thread protector, the perfect device to spin the barrel in the lathe without touching the outer surface. So I spun the barrel into this holder and put a live center in the tailstock. A slight bit of feed pressure between the live center and the chamber chamfer was perfect for spinning the barrel:

So I proceeded to sand the outside of the barrel with strips of varying grits of sandpaper, going finer with each pass. The barrel looked perfect! How exciting… After opening up the stock on my Precision Matthews PM-949TV Milling Machine, I would be ready to put it all together!
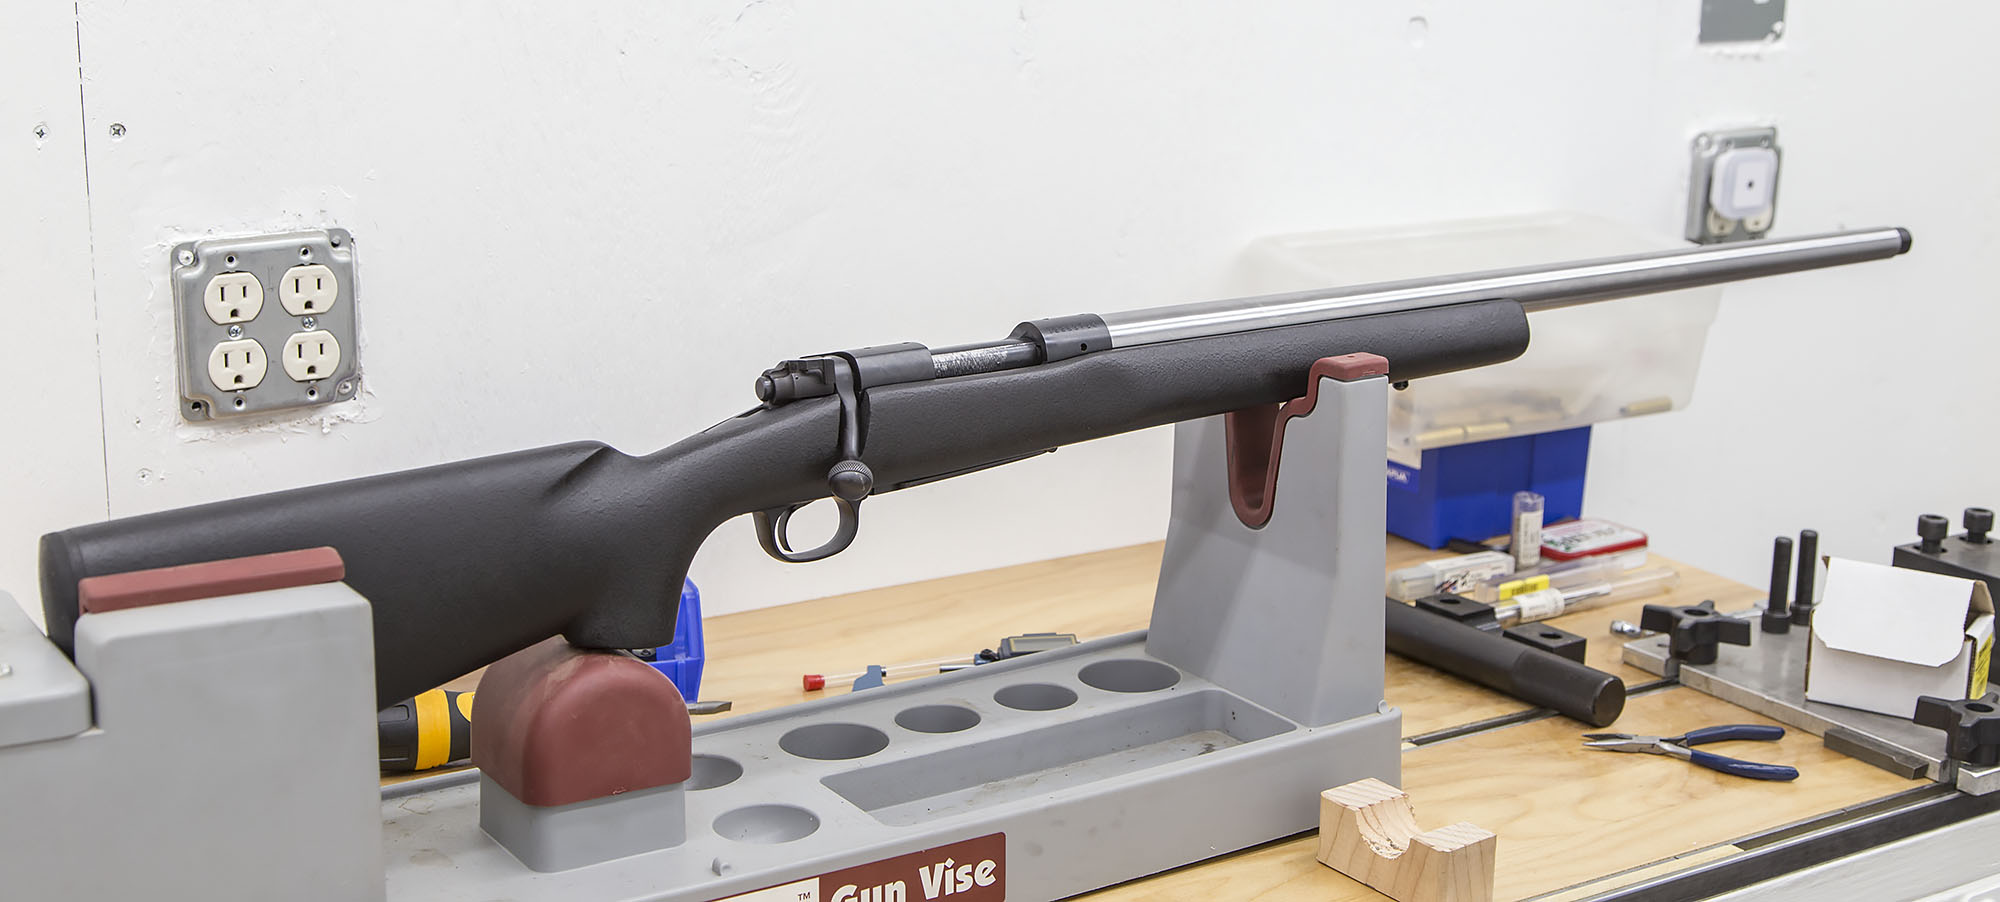
Assembly
I assembled the rifle for test shots immediately following the chambering and muzzle threading. I wanted to test things out!
This process was essentially the inverse of the tear-down. Here’s what I did:
- Install the barrel on the action using the Brownells Barrel Vice, and the Brownells Action Wrench setup for Winchester Model 70
- Check headspace after barrel tightening (dead on!)
- Install trigger on action
- Install barreled action in stock
- Install upgraded scope mounts
- Install scope
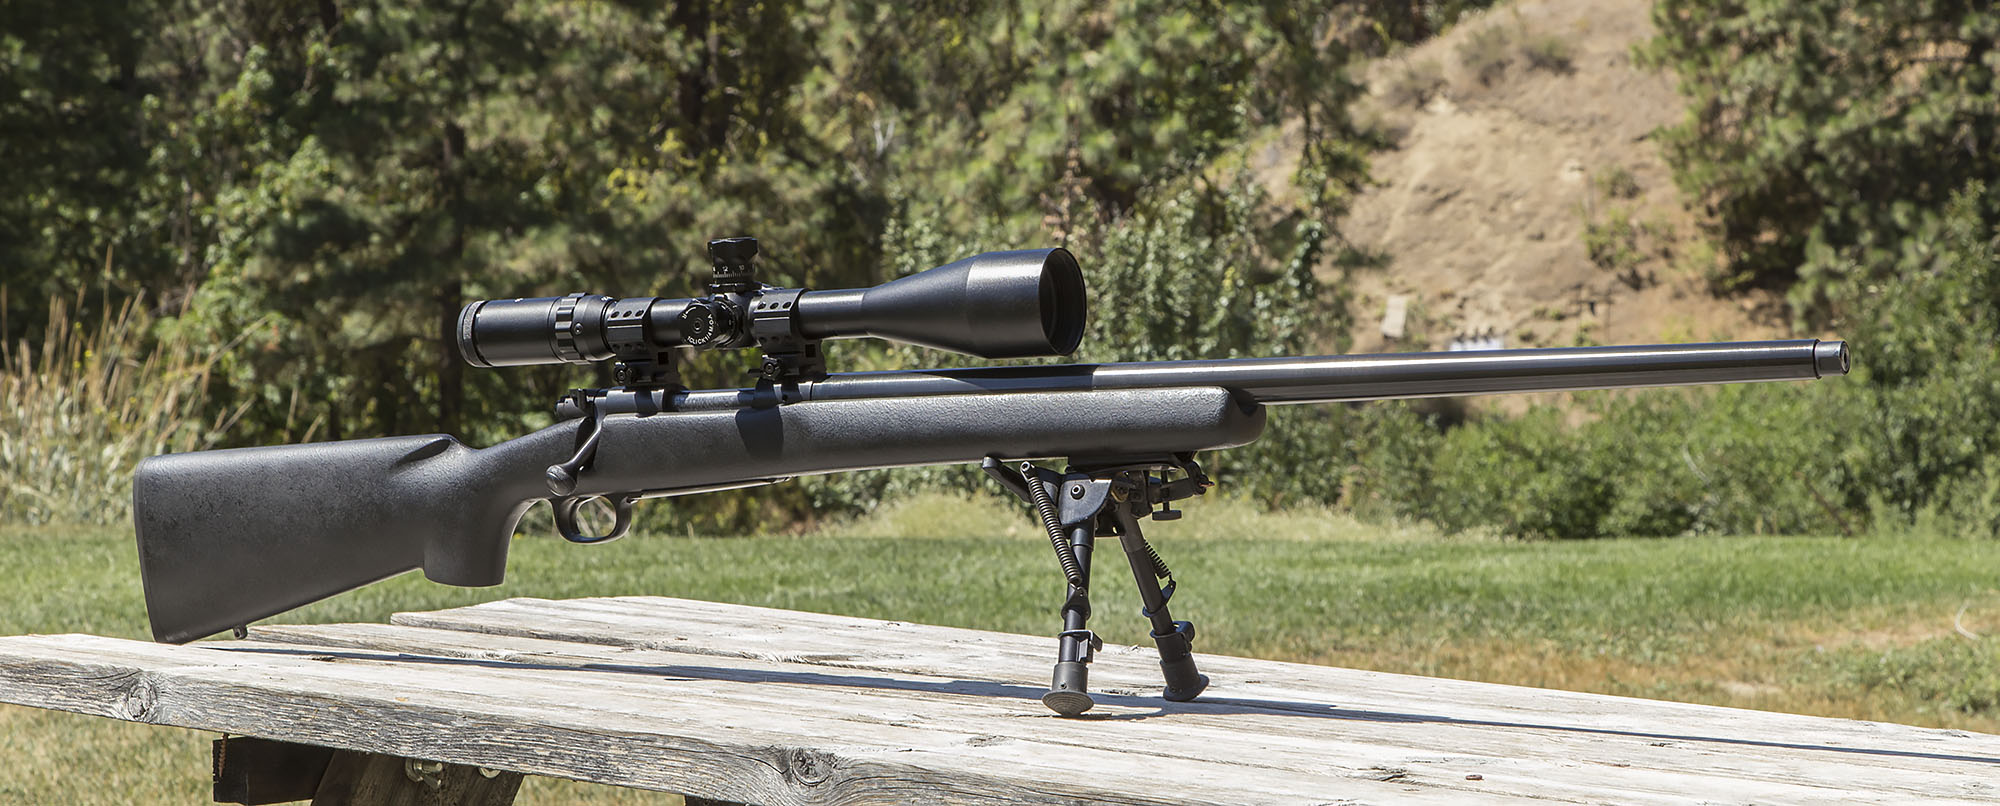
Here’s what the rifle looked like ready for scope mounts:
At this point I headed out back to the 100 yard range for some test groups. See Part 1 in this series for the results which were amazing!
I went through a formal barrel break-in process that Jesse Redell from R-Bros rifles had told me about.
Here’s the cliffs notes on what’s involved for this barrel break in mehod:
- Fire 1 shot, clean bore
- Fire 1 shot, clean bore
- Fire 1 shot, clean bore
- Fire 3 shots, clean bore
- Fire 3 shots, clean bore
- Fire 3 shots, clean bore
- Fire 5 shots, clean bore
When cleaning the bore, I used a Tipton 1-piece carbon fiber cleaning rod, and a bore guide I had made on the Precision Matthews lathe:

The best 3-shot group of the day measured about 0.225″. The following day I would shoot a cold-bore 5-shot group measuring 0.490″. Great results which will be improved with load development and fire-formed brass! Now I had to decide what to do about a finish for this chromoly steel barrel…
Bluing and Engraving the Barrel
I know I wanted to get this project done, and for this rifle, function was first and appearance second. So I decided to give cold blueing a try- with some Birchwood Casey Super Blue. Before the blueing, I engraved the chambering and twist rate on the barrel: 22-250 – 1:12″. In the future I’ll use a pantograph tracing engraver, letter/number stamps, or a laser engraver, but for now, the “by hand method” works. I decided to put the barrel back on my “lathe spinner” and turn it at 50 rpm while applying the blueing fluid. The blueing turned out better than I thought it would – good but not perfect. Now there’s no guilt when I sratch it with a chronograph strap, or in the field while hunting. Great!
Summary
This was quite the process, and quite the learning experience. I discovered in the process that I LOVE the process of turning barrels: chambering and threading muzzles. This rifle turned out great, and I’m really looking forward to future project (224 Valkyrie is up next!).
The most important things I learned during the process are as follows:
- Research and study of the rifle barreling process is paramount.
- Making friends that do this kind of work is both fun, and super helpful.
- Barrel work is about taking your time and “doing things right” – you can’t be in a hurry.
- Having the proper tools is critical (covered in-depth in the next story)
The adventure is just starting- and I can’t wait to see where this goes!
For reference, here’s the complete content series:
- Winchester 70 Rebarrel Part 1: Overview
- Winchester 70 Rebarrel Part 2: Start to Finish Process (you are HERE)
- Winchester 70 Rebarrel Part 3: Tools of the Trade
Also published on our sister website http://ultimatereloader.com
Thanks,
Gavin