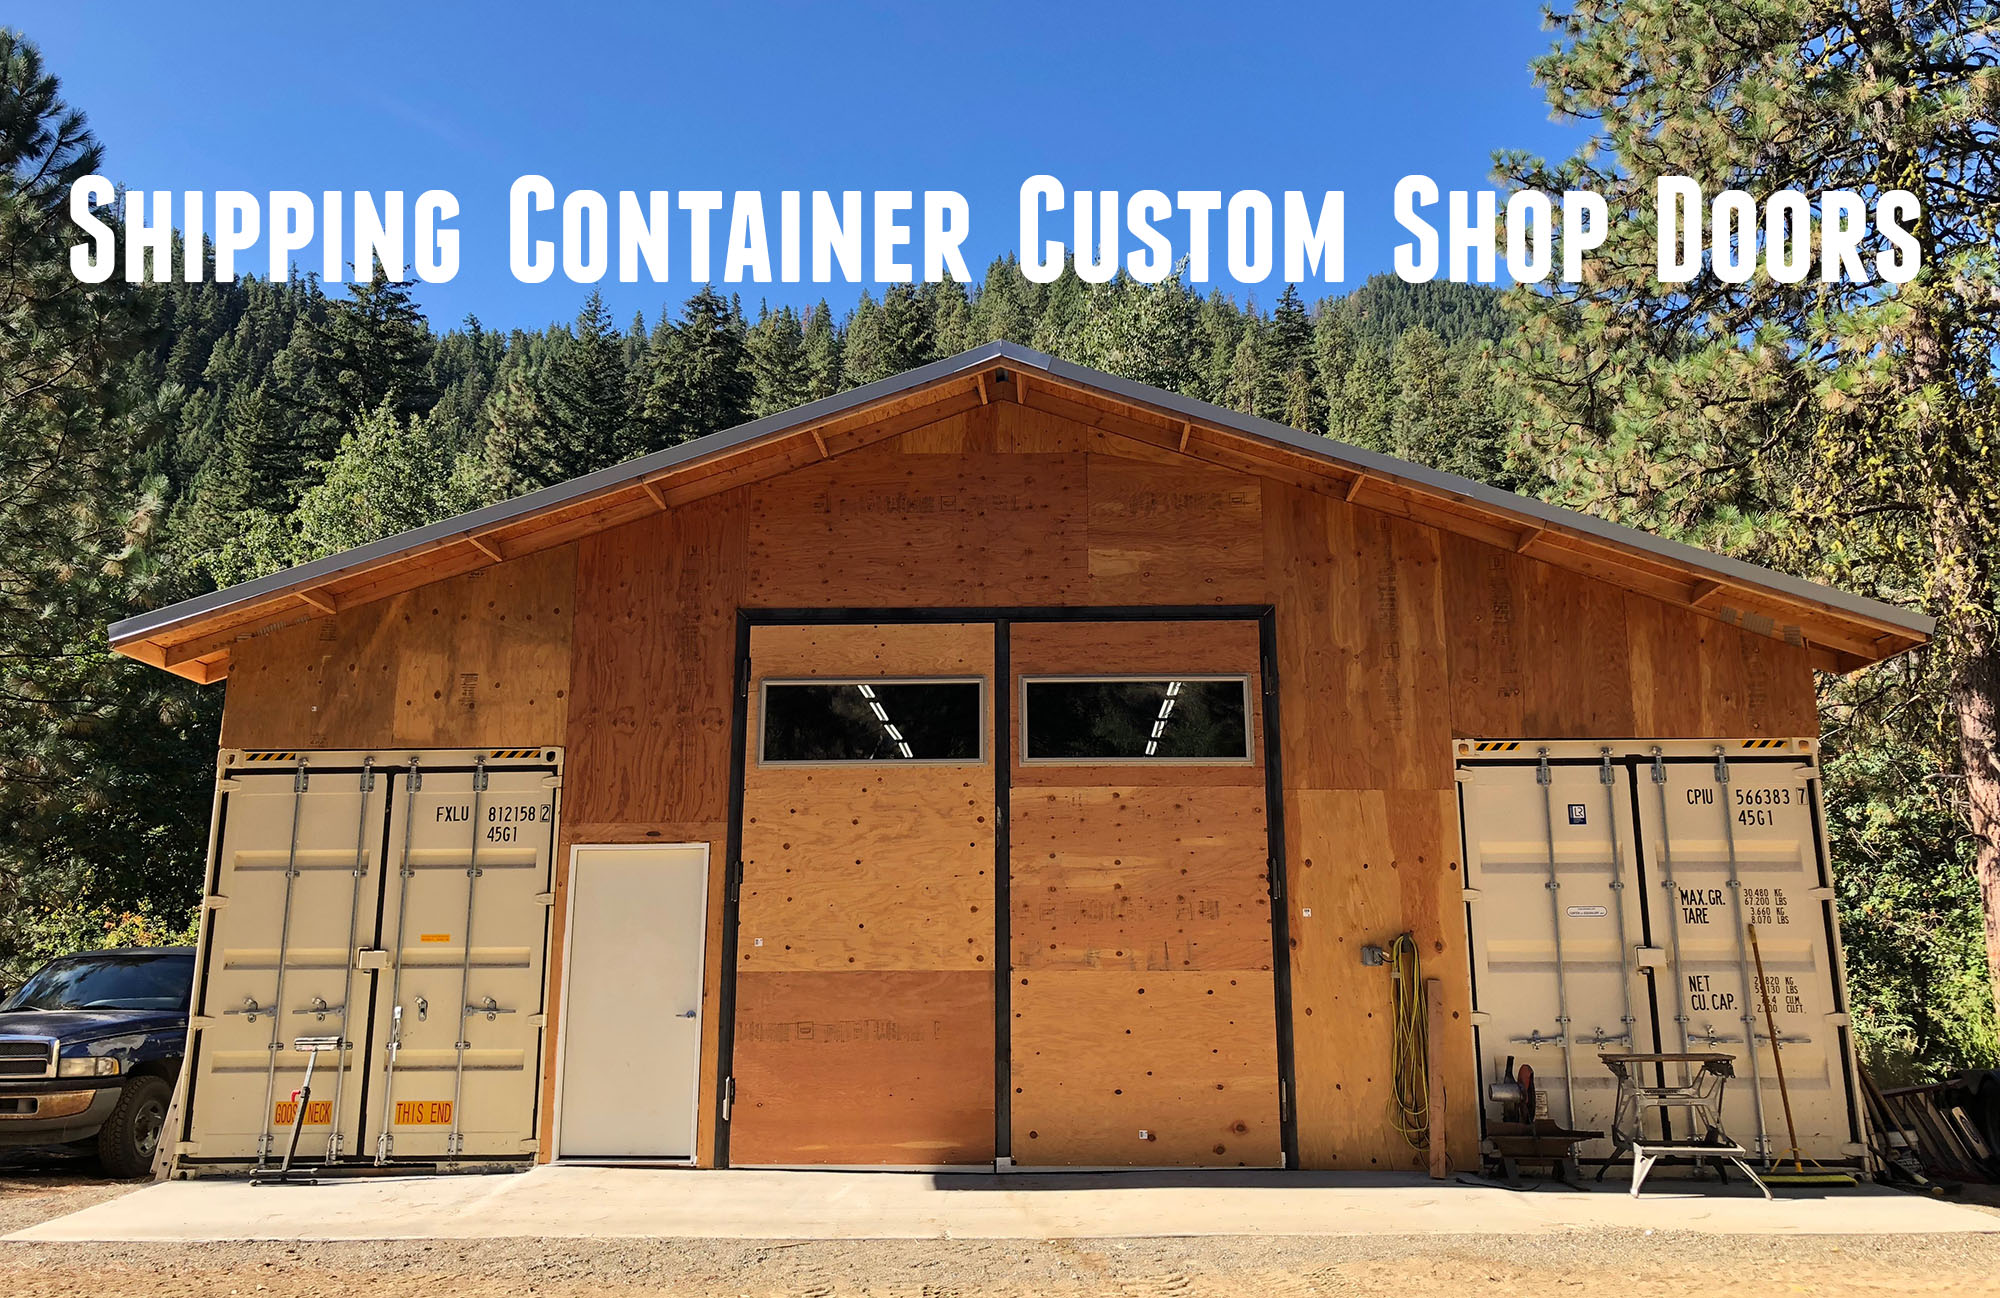
When I started out building my shipping container shop, I didn’t envision a dual-40′-high-cube arrangement like I ended up with. I started with a single container which I built-out as a studio and reloading shop, and things kind of evolved from there. Ultimately it was the coming winter that motivated me to build a full shop using shipping containers. So I ordered a second 40′ high-cube one-trip container (essentially brand new), and we went about building out the shop using wood trusses, which created a 20′ x 40′ enclosed center area. After framing in the back wall, it was time to decide what to do for a “main shop door” arrangement.
This is the story of what happened, and how I saved about $3500 compared to industrial turn-key alternatives!
Door Build Overview
The initial sketch I put together for my door build was very close to the final design, and included my “quick calculations” of the cost involved (including re-using some trivial materials I had on-hand):
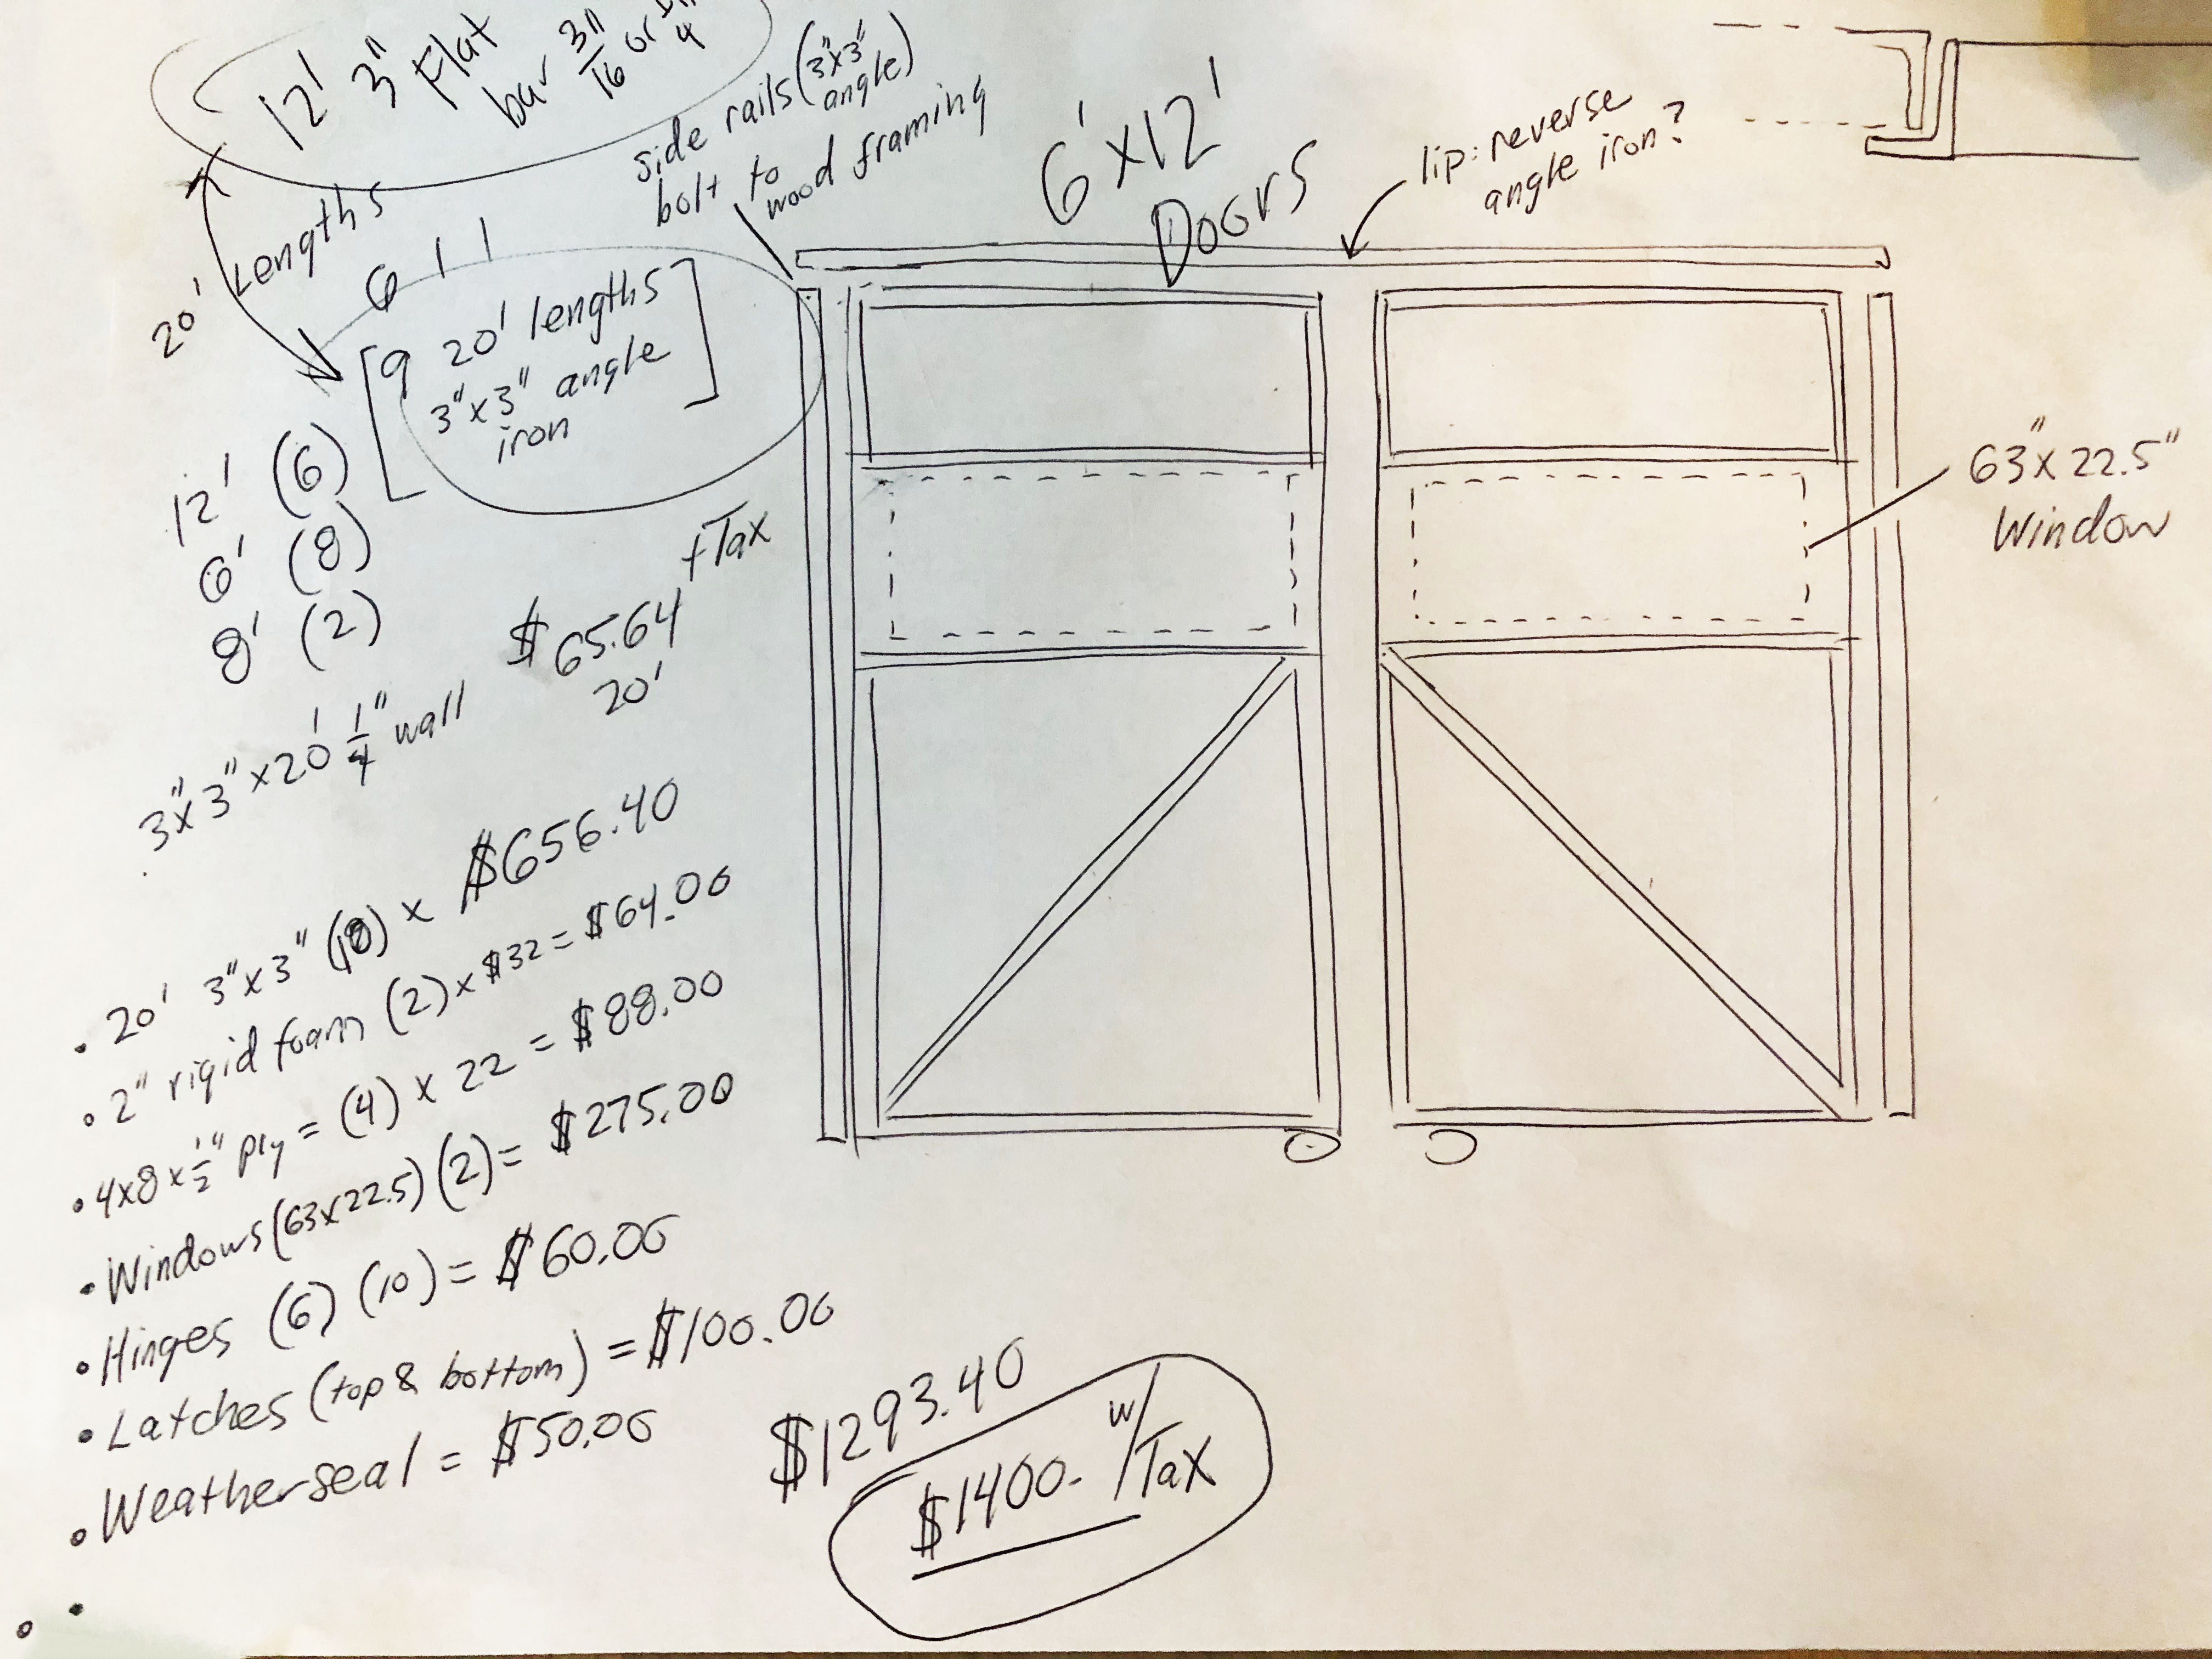
After some “thinking through” and some on-site measurements, the design evolved slightly. Here’s how things ended up.
Frame Design
The frame consists of 3″x3″ angle iron, 1/4″ thickness. Using mild steel, this turned out to be very cost effective- with steel coming in at about $650 total (door outer frame, all door frame material).
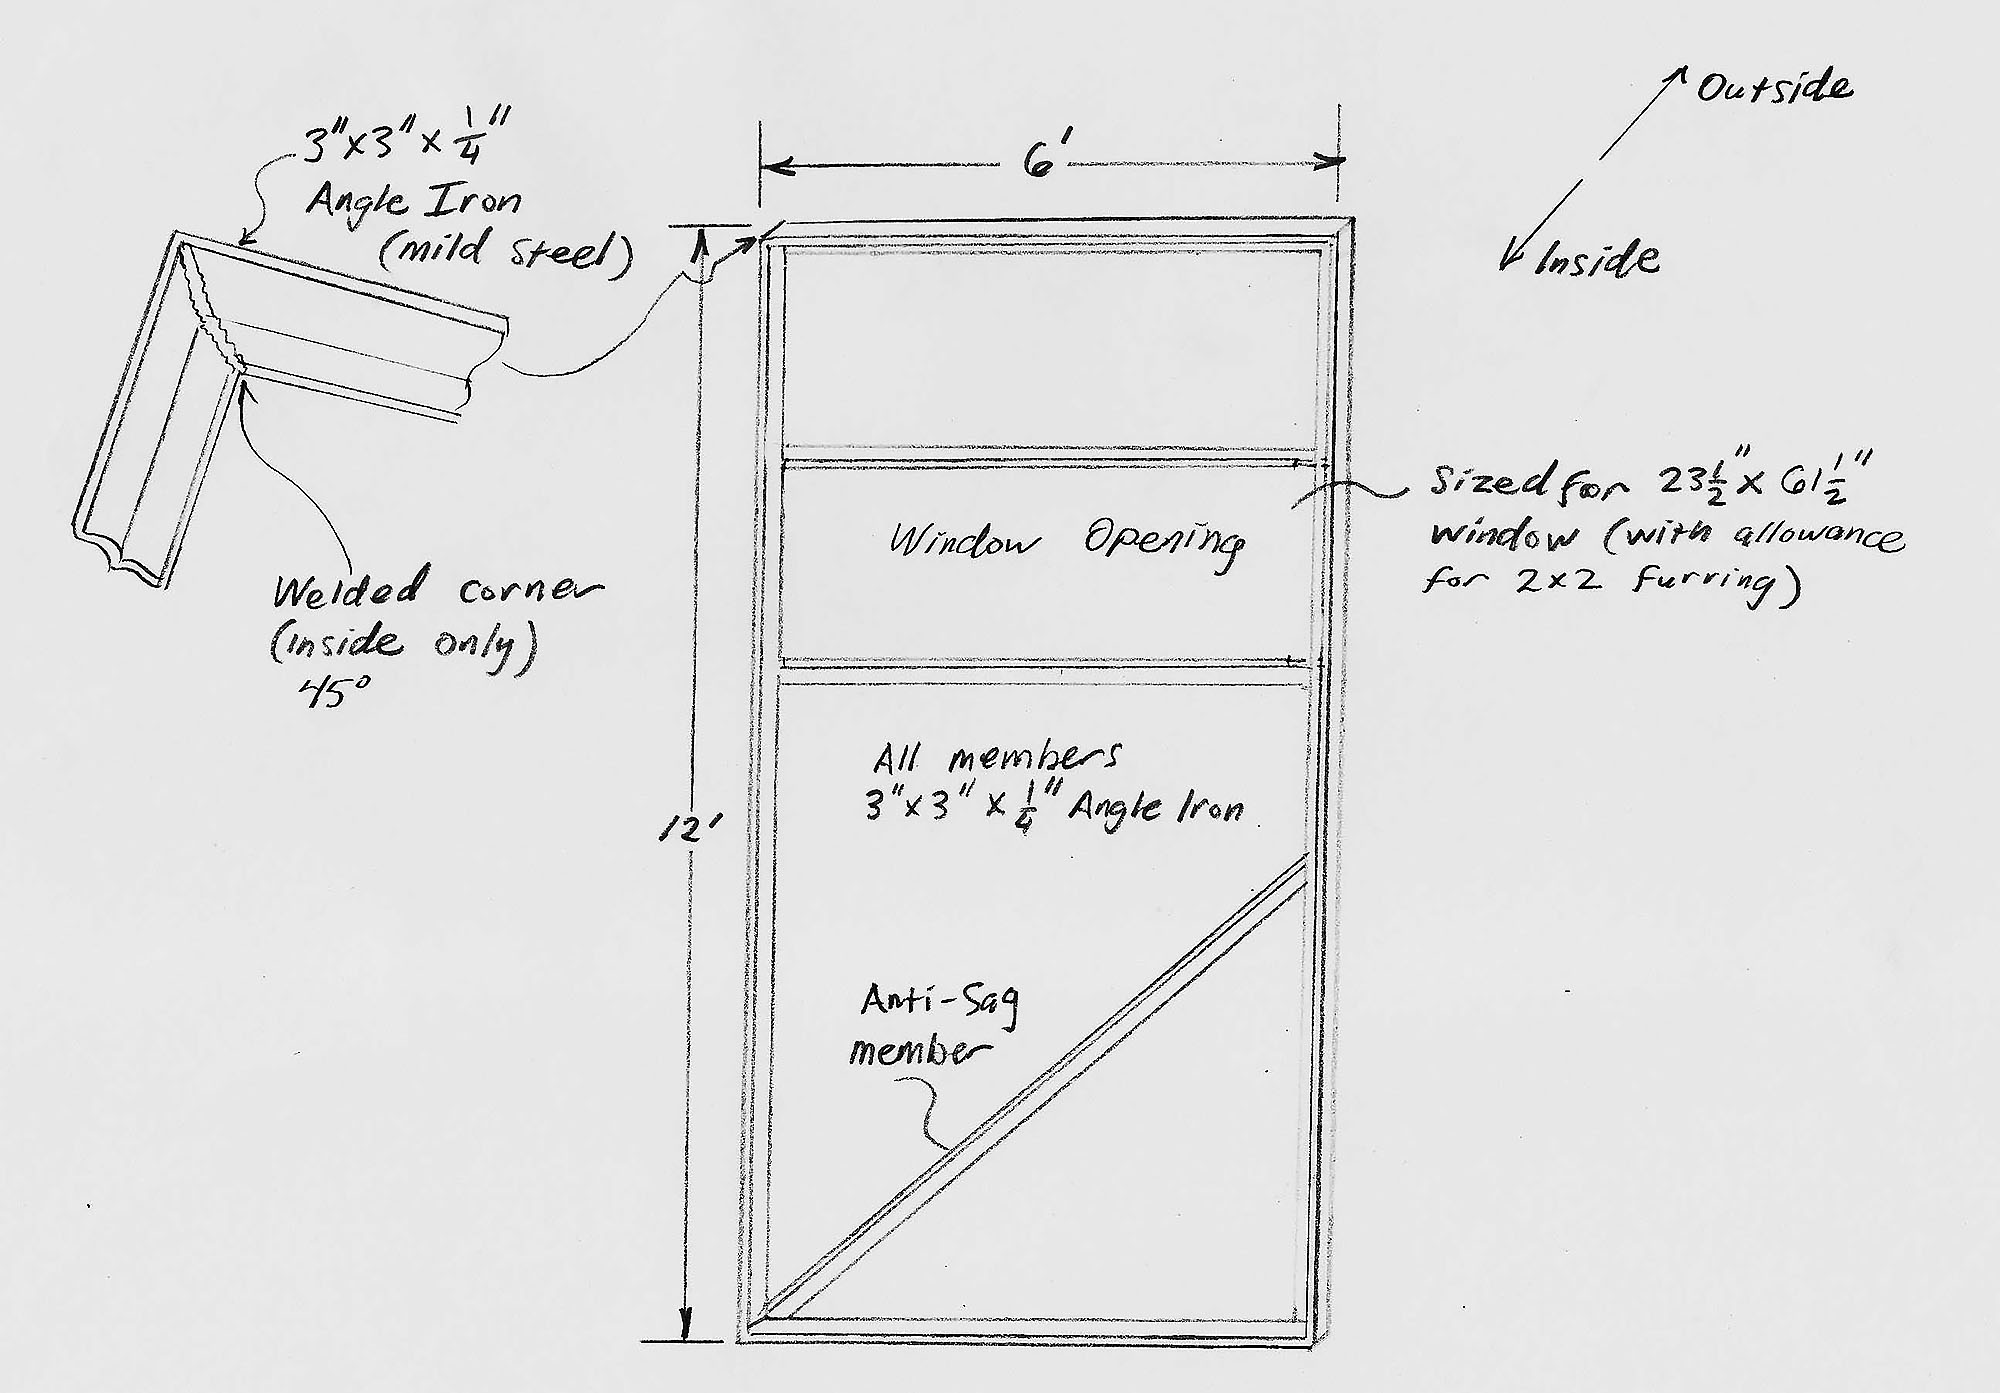
A cross-brace was added at about 45 degrees to stiffen the door, and to prevent sag. I also used the same 3″x3″ angle iron to “frame in” the window openings, which were positioned vertically to maximize security (they were high on the doors), as well as to center the mountain view when standing in the middle of the shop.
The outer frame was drilled and countersunk on the floor for the screws that would attach the frame to the wood rough-in, and then the outer frame was welded vertically in the opening. First these members were tacked in place, and then swung out slightly to finish the welds away from the wood opening.

Above: using a drill guide to pre-drill the holes for the screws that hold the outer frame to the roughed-in opening.
After the outer frame was installed, we took measurements before cutting the primary frame members. We were careful to leave the appropriate air gaps and clearances when cutting these angle iron pieces. The frames were tack welded on the floor and stood up in-place. We shimmed the frames to the perfect orientation, and then proceeded to finish all of the welds including the angle braces and hinges before removing the shims. The result? Perfection! We had about 1/2″ gaps between the doors, and at the top and bottom as well. This would account for some shifting over time, hinge wear, and swelling/movement of the door opening.
Next it was time to install windows, insulation, and sheeting!
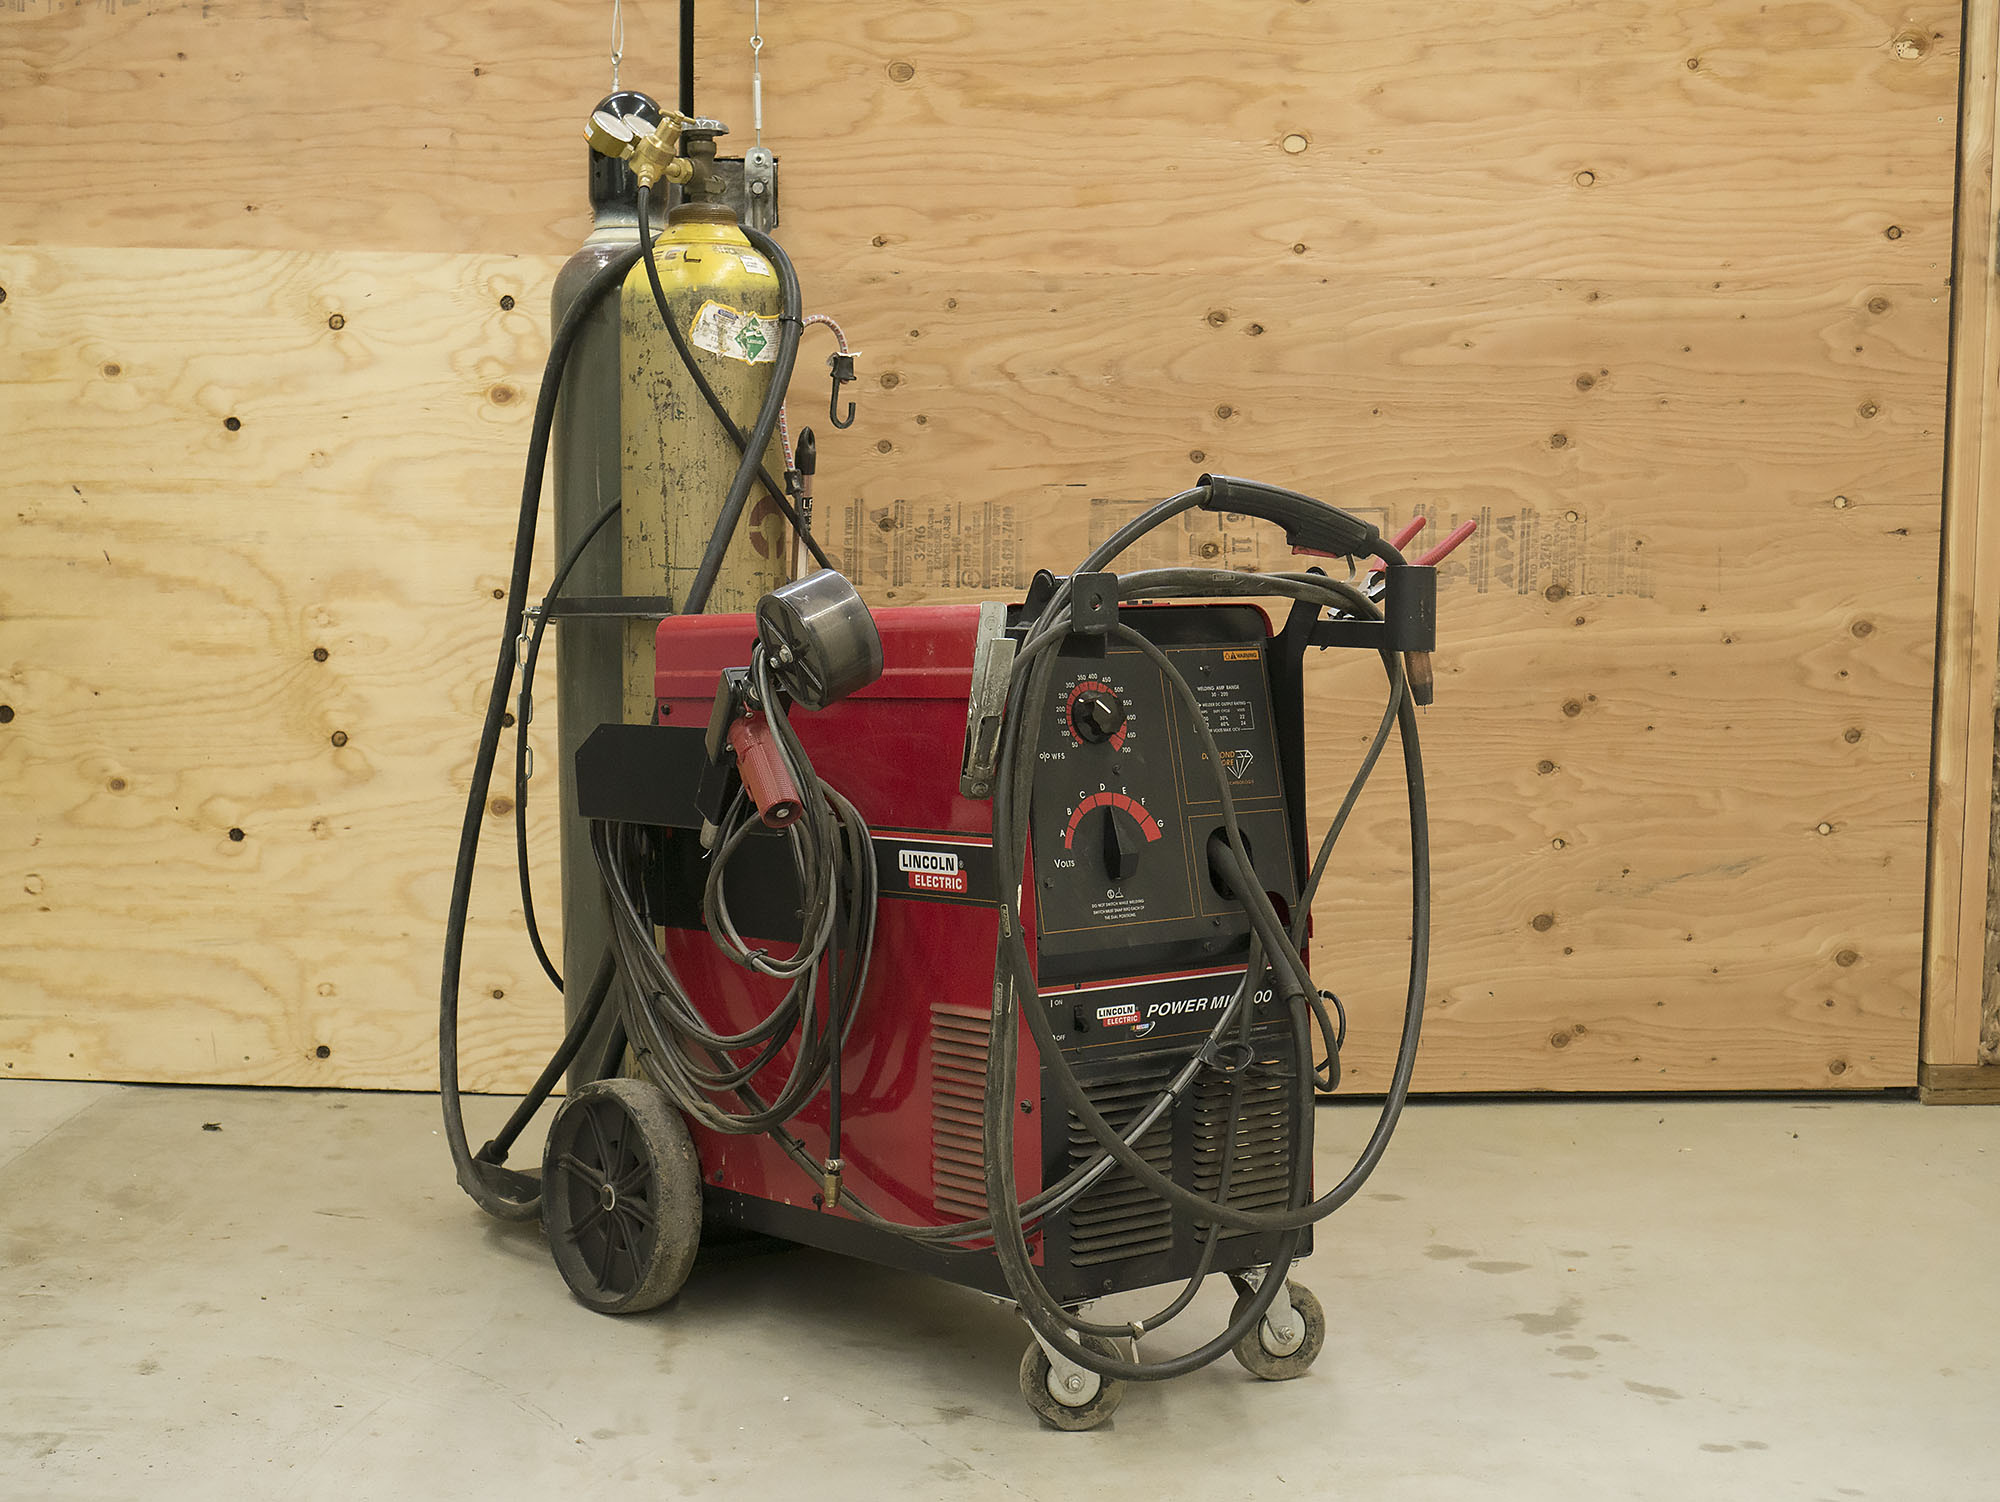
Above- my Lincoln Power MIG 200 (about 2000 model year). I’ve fabricated quite a few extras for this machine including front gun rack, billet aluminum side panel knobs, and dual full size bottle rear shelf extension. This machine is setup for both aluminum and steel, and does a great job.
Door Layers and Materials
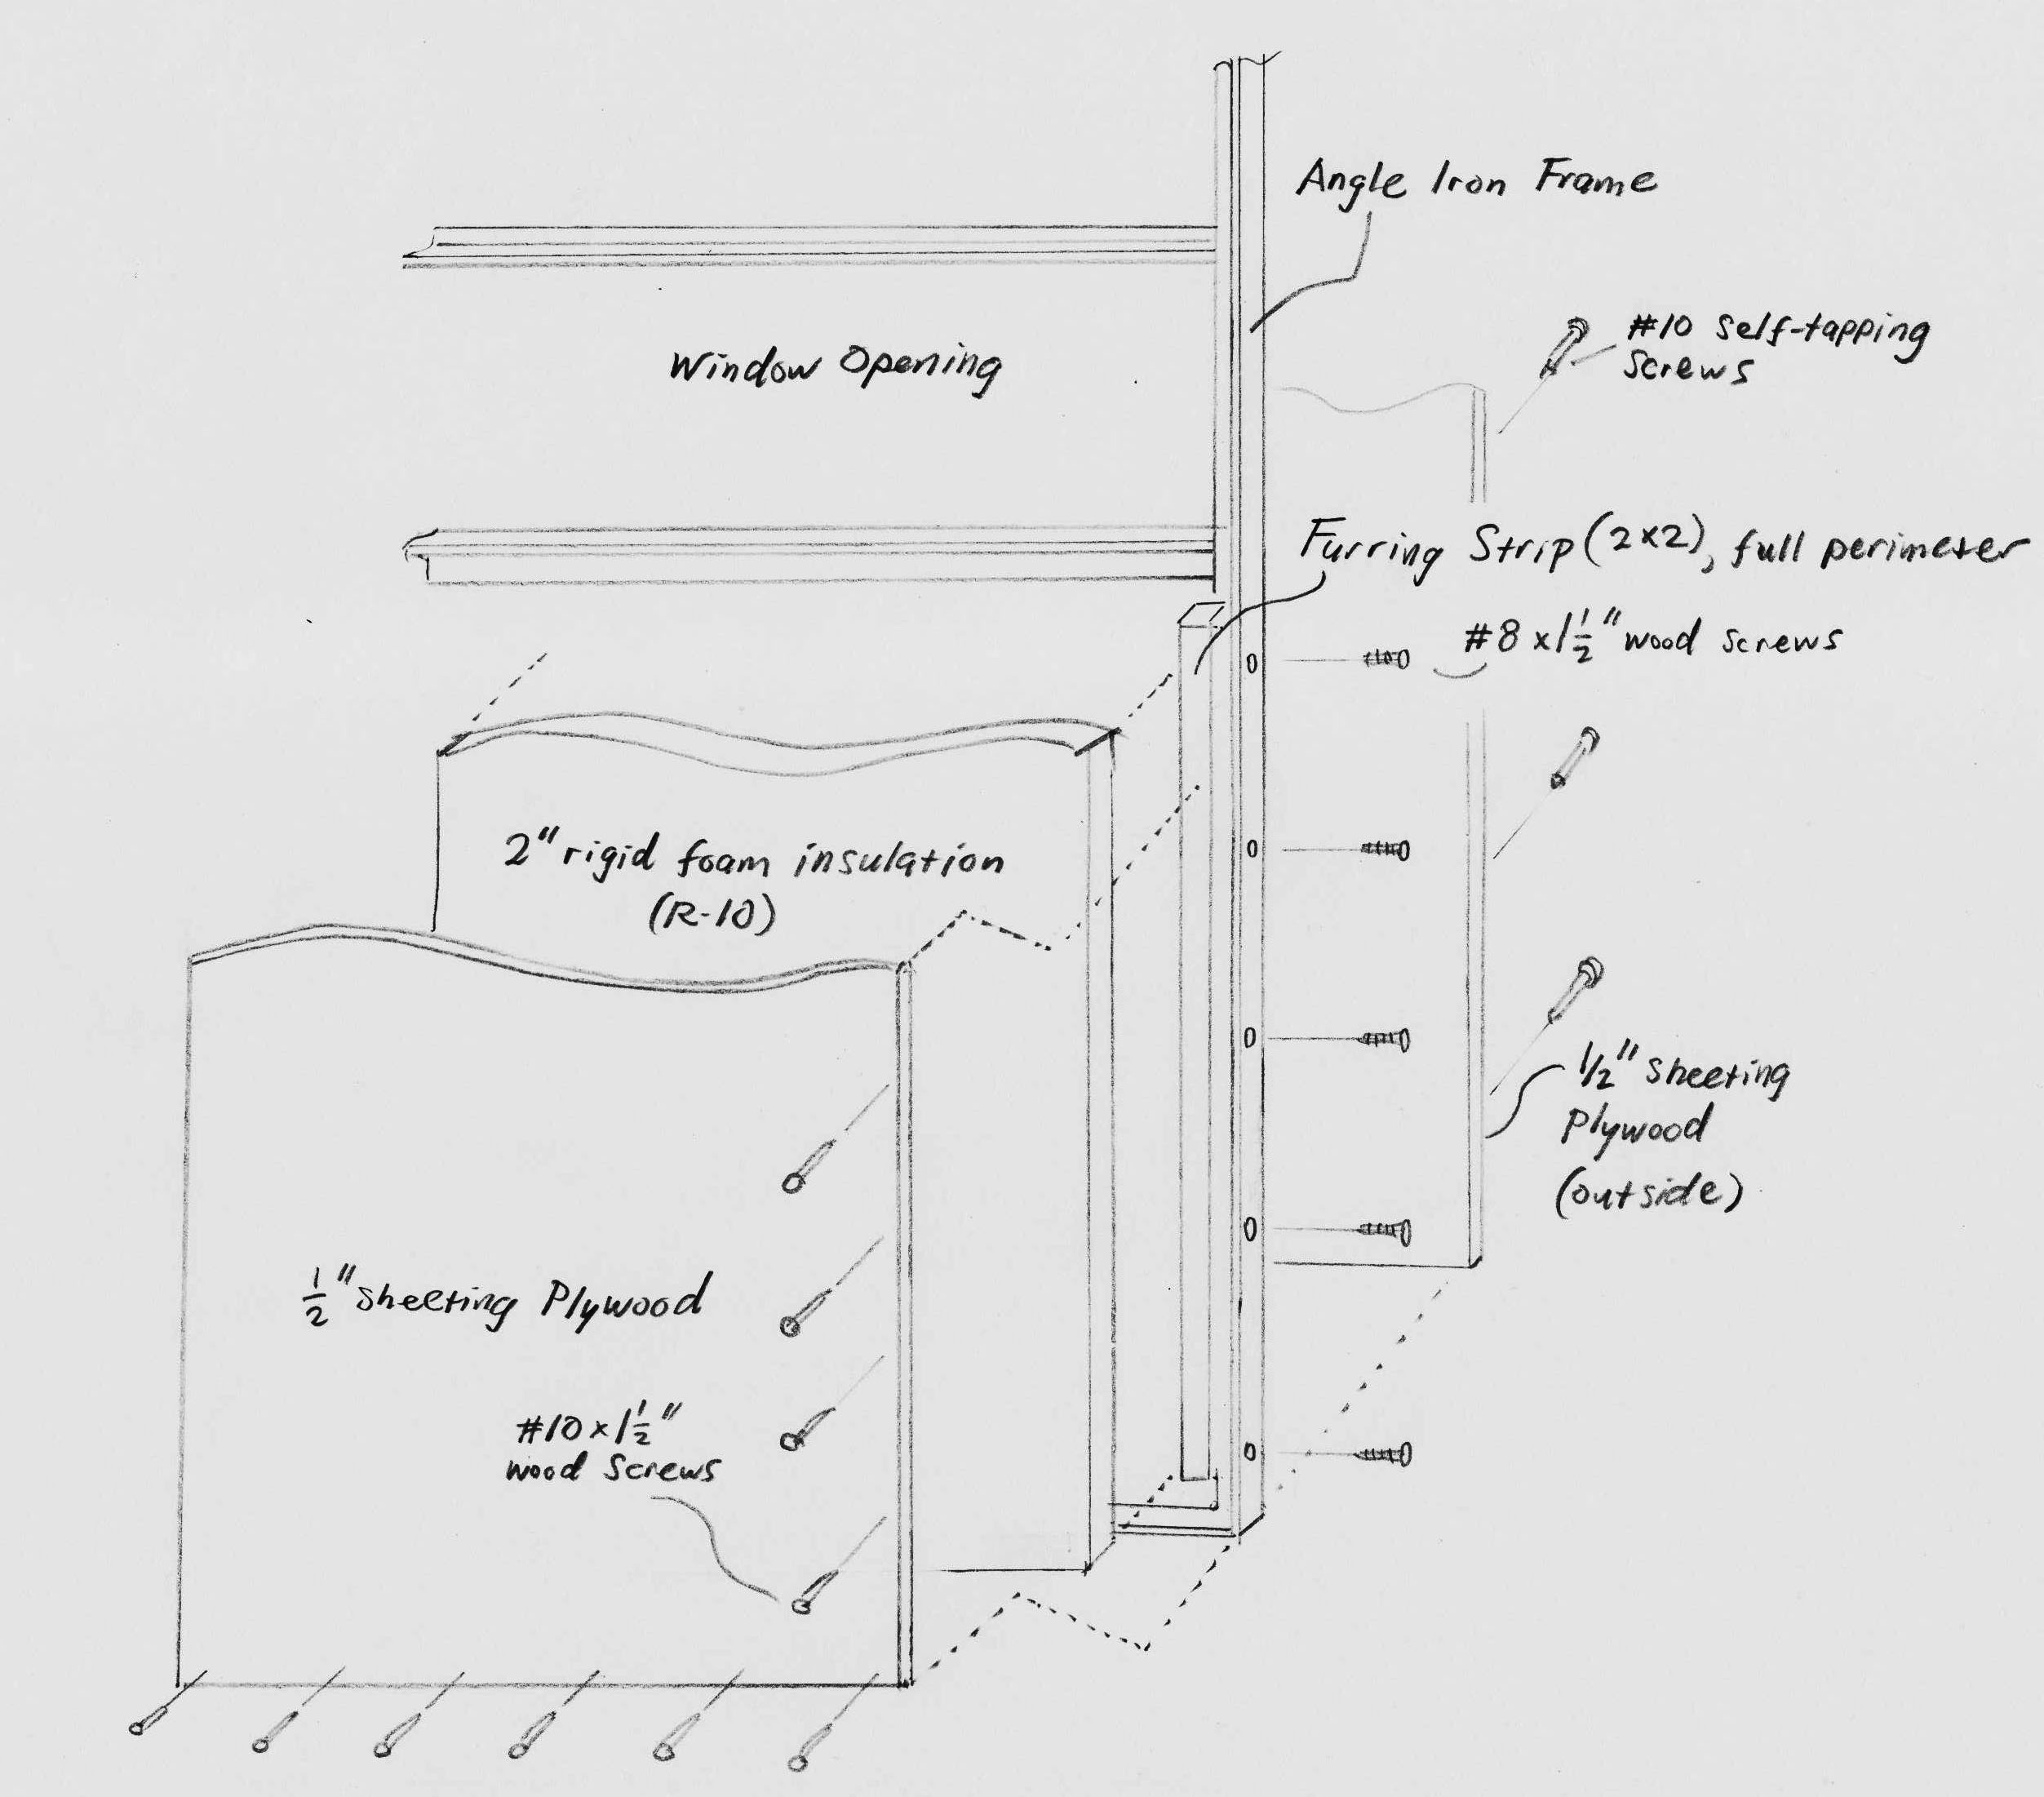
Before insulating these doors, we installed furring strips around the outer frame members and the window openings. These furring strips were screwed in from the outer sides, and would be used to screw into when installing the interior sheeting and the windows. We then used self-tapping screws to install the outer sheeting. This was a bit laborious, but didn’t take too long all things considered.
Then it was time for Windows- which were custom ordered (23.5″ x 61.5″ for a 24″ x 62″ rough opening). Then 2″ rigid foam was installed, and finally the interior sheeting was installed over that. Once we finished the interior sheeting, the rigidity of the doors was increased drastically, now with great shear strength due to the sandwiched construction: with sheeting on the inside and the outside.
Latches
I decided that for simplicity, I would use pin latches at the tops and bottoms of the doors- and to make the doors open from the inside, that way I wouldn’t need to worry about locks or other security measures. The adjacent man door would take care of that!
I thought it would be great to have levers in the middle of the doors that would pull the latches- meaning you could open each door in seconds (with one hand) by rotating the lever and pushing the door outward. So I drew up a quick design that would use 5/8″ rods, the same 3″x3″ angle iron, cables, and custom levers to actuate the rods. This worked out GREAT.
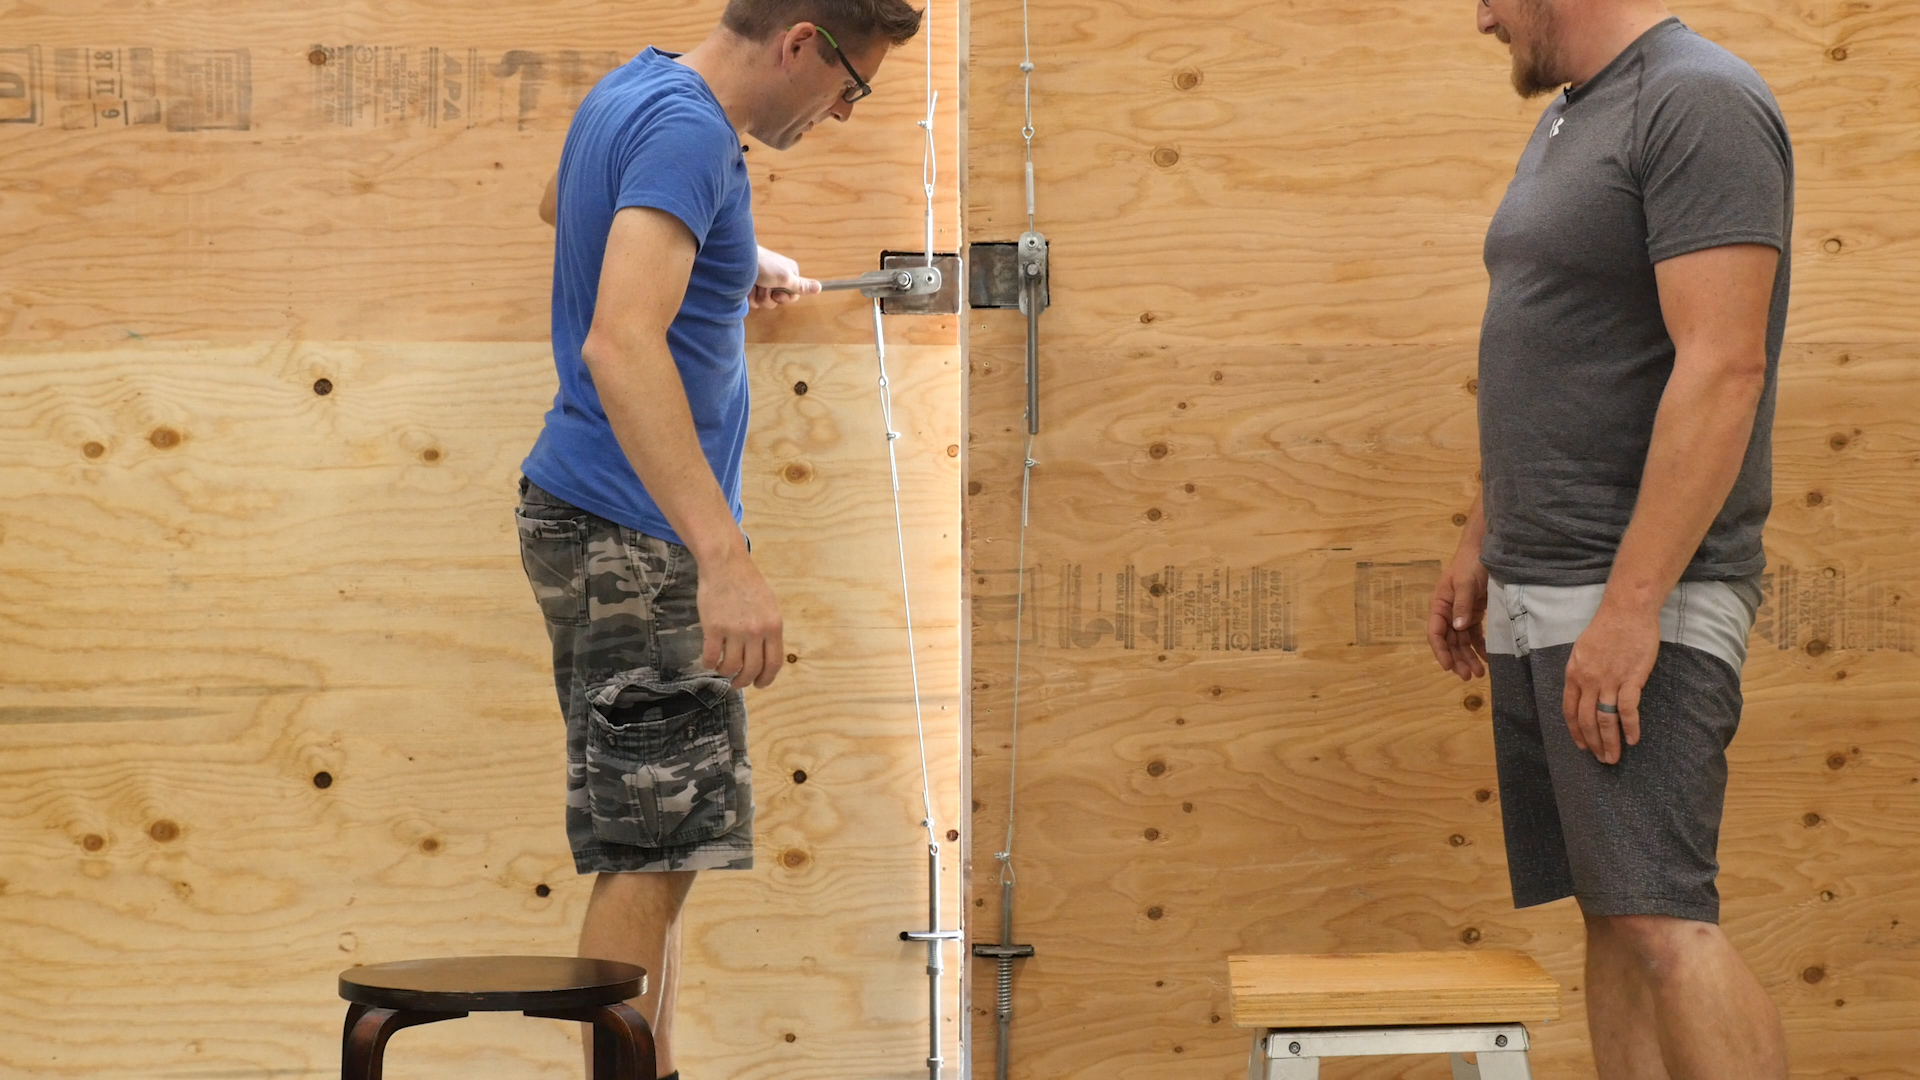
With inline turnbuckles, the cable adjustments are super-easy. With 5/8″ holes drilled in the concrete and a custom bracket at the top, these rods are very secure, and hold the doors tightly shut. A great way to finish off these doors!
Finishing Touches, Finishing Thoughts
The doors are basically done, and I really like how things turned out. These doors are easy to open, were cost-effective to build, and don’t obstruct anything on the inside of the building (a HUGE plus, considering the i-beam gantry I want to build). For final touches, I’ll be installing wood trim and weatherstripping on the inside (already installed exterior wiper on the exterior) and will sheet the outside with metal roofing material.
It’s GREAT to have a true 12′ high opening since I drive my backhoe into the shop to move around machinery, and to service the backhoe. I spent more than my initial $1400.00 estimate, probably more like $1700.00. However, compared to the $4000-6000 that I would have spent on an industrial insulated door with windows and commercial opener, I feel like I did great!
Have you built your own shop doors? I’d love to hear about your experiences! Please leave a comment.
Thanks,
Gavin


Great project. This is the first I have seen of the shipping container shop. Do you have any videos of the build of the actual shop? Keep up the great work!
Hey! Awesome videos. I am in the process of building my out container shop. Was wondering if you had any plans on your container shop. It looks to be about the same size as I need. Any help would be greatest appreciated. The name is Patrick I’m a roofer in Georgia.
I like your door build would like some details on the initial shop build.